Panasonic WV-CP500 Installation Guide - Page 25
Step 4, Step 5
 |
View all Panasonic WV-CP500 manuals
Add to My Manuals
Save this manual to your list of manuals |
Page 25 highlights
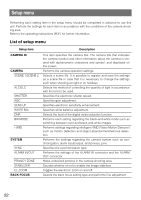
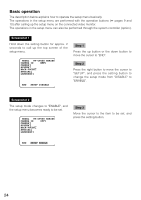
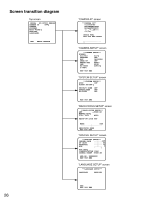
Screenshot 3 The selected setup screen in the setup menu appears on the screen. **CAMERA SETUP** SCENE1 ALC/ELC ALC SHUTTER OFF AGC ON(HIGH) SENS UP OFF WHITE BAL ATW1 DNR HIGH BW MODE AUTO1 i-VMD RET TOP END Note: • If the top screen of the setup menu is called up with the operation buttons while a camera image is displayed, the setup mode is always "DISABLE" to prevent operation errors. To perform settings in the setup menu, change the setup mode to "ENABLE". • The cursor is a reversely highlighted part. Step 4 Perform the settings for each item. • Selection of setting item: Press the up button or down button to move the cursor. • Change of settings: Press the right button or left button. • Display of advanced setup screen: Press the setting button when "O" is attached to the target setting item. • Return to previous setup screen: Move the cursor to "RET" and press the setting button. • Return to the top screen: Move the cursor to "TOP" and press the setting button. Step 5 To return to the camera image screen, move the cursor to "END" and press the setting button. 25
-
 1
1 -
2
-
3
-
4
-
5
-
6
-
7
-
8
-
9
-
10
-
11
-
12
-
13
-
14
-
15
-
16
-
17
-
18
-
19
-
 20
20 -
 21
21 -
 22
22 -
 23
23 -
 24
24 -
 25
25 -
 26
26 -
 27
27 -
 28
28 -
 29
29 -
 30
30 -
31
-
32
 |
 |
