Panasonic WV-SW155 Installation Guide - Page 20
<Connecting the cable through holes opened in the ceiling or wall>, <Connecting the cable
 |
View all Panasonic WV-SW155 manuals
Add to My Manuals
Save this manual to your list of manuals |
Page 20 highlights
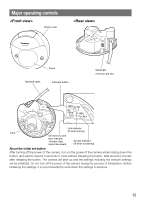
Cable access hole Tamperproof screw hole Place the installation template label (accessory) on the ceiling or wall, mark the hole for the cable to be passed through and for the fixing screws (3 places), then open the holes. Remove the installation template label, and mount the mount bracket with 3 fixing screws (locally procured). (☞ Pages 26 and 27) Place the installation template label (accessory) on the ceiling or wall, mark the holes for the fixing screws (3 places), then open the holes. Remove the installation template label, and mount the mount bracket with 3 fixing screws (locally procured). (☞ Pages 26 and 27) n Ceiling n Wall 20
-
 1
1 -
2
-
3
-
4
-
5
-
6
-
7
-
8
-
9
-
10
-
11
-
12
-
13
-
14
-
 15
15 -
 16
16 -
 17
17 -
 18
18 -
 19
19 -
 20
20 -
 21
21 -
 22
22 -
 23
23 -
 24
24 -
 25
25 -
26
-
27
-
28
-
29
-
30
-
31
-
32
-
33
-
34
-
35
-
36
-
37
-
38
-
39
-
40
-
41
-
42
-
43
-
44
 |
 |

20
<Connecting the cable through holes opened in the ceiling or wall>
Place the installation template label (accessory) on the ceiling or wall, mark the hole for the cable to
be passed through and for the fixing screws (3 places), then open the holes.
Remove the installation template label, and mount the mount bracket with 3 fixing screws (locally
procured). (
☞
Pages 26 and 27)
<Connecting the cable through the side cable access hole>
Place the installation template label (accessory) on the ceiling or wall, mark the holes for the fixing
screws (3 places), then open the holes.
Remove the installation template label, and mount the mount bracket with 3 fixing screws (locally
procured). (
☞
Pages 26 and 27)
Tamperproof screw hole
Cable access hole
n
Ceiling
n
Wall