Panasonic WVSF336 WVSF332 User Guide - Page 19
Preparations
 |
View all Panasonic WVSF336 manuals
Add to My Manuals
Save this manual to your list of manuals |
Page 19 highlights
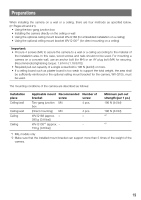
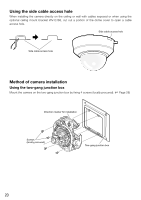
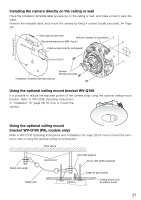
Preparations When installing the camera on a wall or a ceiling, there are four methods as specified below. (☞ Pages 20 and 21). • Using the two-gang junction box • Installing the camera directly on the ceiling or wall • Using the optional ceiling mount bracket WV-Q168 (for embedded installation on a ceiling) • Using the optional ceiling mount bracket WV-Q105*1 (for direct mounting on a ceiling) Important: • Procure 4 screws (M4) to secure the camera to a wall or a ceiling according to the material of the installation area. In this case, wood screws and nails should not be used. For mounting a camera on a concrete wall, use an anchor bolt (for M4) or an AY plug bolt (M4) for securing. (Recommended tightening torque: 1.6 N·m {1.18 lbf·ft}) • Required pull-out capacity of a single screw/bolt is 196 N {44 lbf} or more. • If a ceiling board such as plaster board is too weak to support the total weight, the area shall be sufficiently reinforced or the optional ceiling mount bracket for the camera, WV-Q105, must be used. The mounting conditions of the camera are described as follows: Installation place Ceiling/wall Ceiling/wall Ceiling Ceiling Applicable mount Recommended Number of bracket screw screw Two-gang junction M4 box 4 pcs. (Direct mounting) M4 4 pcs. WV-Q168 (approx. - - 280 g {0.8 lbs}) WV-Q105*1 (approx. - - 150 g {0.8 lbs}) Minimum pull-out strength (per 1 pc.) 196 N {44 lbf} 196 N {44 lbf} *2 *2 *1 PAL models only *2 Make sure that the installed mount bracket can support more than 5 times of the weight of the camera. 19
-
 1
1 -
2
-
3
-
4
-
5
-
6
-
7
-
8
-
9
-
10
-
11
-
12
-
13
-
 14
14 -
 15
15 -
 16
16 -
 17
17 -
 18
18 -
 19
19 -
 20
20 -
 21
21 -
 22
22 -
 23
23 -
 24
24 -
25
-
26
-
27
-
28
-
29
-
30
-
31
-
32
-
33
-
34
-
35
-
36
-
37
-
38
-
39
-
40
-
41
-
42
-
43
-
44
 |
 |
