Pentax K-x Black K-x Black K-x Manual - Page 178
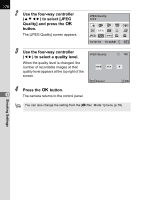
Use the four-way controller, to select [JPEG, Quality] and press the, button.
 |
View all Pentax K-x Black manuals
Add to My Manuals
Save this manual to your list of manuals |
Page 178 highlights
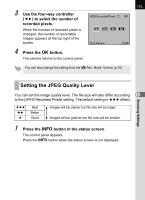
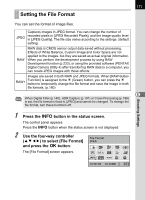
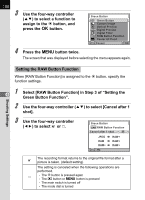
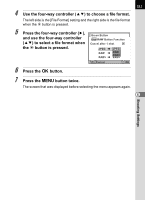
176 2 Use the four-way controller (2345) to select [JPEG Quality] and press the 4 button. The [JPEG Quality] screen appears. JPEG Quality OFF OFF HDR OFF AF.A JPEG 12M 10/10/'09 10:30AM [ 37] 3 Use the four-way controller (45) to select a quality level. JPEG Quality When the quality level is changed, the number of recordable images at that quality level appears at the top right of the screen. MENU Cancel 128 OK OK 4 Press the 4 button. 6 The camera returns to the control panel. Shooting Settings You can also change the setting from the [A Rec. Mode 1] menu (p.79).
-
 1
1 -
2
-
3
-
4
-
5
-
6
-
7
-
8
-
9
-
10
-
11
-
12
-
13
-
14
-
15
-
16
-
17
-
18
-
19
-
20
-
21
-
22
-
23
-
24
-
25
-
26
-
27
-
28
-
29
-
30
-
31
-
32
-
33
-
34
-
35
-
36
-
37
-
38
-
39
-
40
-
41
-
42
-
43
-
44
-
45
-
46
-
47
-
48
-
49
-
50
-
51
-
52
-
53
-
54
-
55
-
56
-
57
-
58
-
59
-
60
-
61
-
62
-
63
-
64
-
65
-
66
-
67
-
68
-
69
-
70
-
71
-
72
-
73
-
74
-
75
-
76
-
77
-
78
-
79
-
80
-
81
-
82
-
83
-
84
-
85
-
86
-
87
-
88
-
89
-
90
-
91
-
92
-
93
-
94
-
95
-
96
-
97
-
98
-
99
-
100
-
101
-
102
-
103
-
104
-
105
-
106
-
107
-
108
-
109
-
110
-
111
-
112
-
113
-
114
-
115
-
116
-
117
-
118
-
119
-
120
-
121
-
122
-
123
-
124
-
125
-
126
-
127
-
128
-
129
-
130
-
131
-
132
-
133
-
134
-
135
-
136
-
137
-
138
-
139
-
140
-
141
-
142
-
143
-
144
-
145
-
146
-
147
-
148
-
149
-
150
-
151
-
152
-
153
-
154
-
155
-
156
-
157
-
158
-
159
-
160
-
161
-
162
-
163
-
164
-
165
-
166
-
167
-
168
-
169
-
170
-
171
-
172
-
 173
173 -
 174
174 -
 175
175 -
 176
176 -
 177
177 -
 178
178 -
 179
179 -
 180
180 -
 181
181 -
 182
182 -
 183
183 -
184
-
185
-
186
-
187
-
188
-
189
-
190
-
191
-
192
-
193
-
194
-
195
-
196
-
197
-
198
-
199
-
200
-
201
-
202
-
203
-
204
-
205
-
206
-
207
-
208
-
209
-
210
-
211
-
212
-
213
-
214
-
215
-
216
-
217
-
218
-
219
-
220
-
221
-
222
-
223
-
224
-
225
-
226
-
227
-
228
-
229
-
230
-
231
-
232
-
233
-
234
-
235
-
236
-
237
-
238
-
239
-
240
-
241
-
242
-
243
-
244
-
245
-
246
-
247
-
248
-
249
-
250
-
251
-
252
-
253
-
254
-
255
-
256
-
257
-
258
-
259
-
260
-
261
-
262
-
263
-
264
-
265
-
266
-
267
-
268
-
269
-
270
-
271
-
272
-
273
-
274
-
275
-
276
-
277
-
278
-
279
-
280
-
281
-
282
-
283
-
284
-
285
-
286
-
287
-
288
-
289
-
290
-
291
-
292
-
293
-
294
-
295
-
296
-
297
-
298
-
299
-
300
-
301
-
302
-
303
-
304
-
305
-
306
-
307
-
308
-
309
-
310
-
311
-
312
-
313
-
314
-
315
-
316
-
317
-
318
-
319
-
320
-
321
-
322
-
323
-
324
 |
 |

176
Shooting Settings
6
2
Use the four-way controller
(
2345
) to select [JPEG
Quality] and press the
4
button.
The [JPEG Quality] screen appears.
3
Use the four-way controller
(
45
) to select a quality level.
When the quality level is changed, the
number of recordable images at that
quality level appears at the top right of the
screen.
4
Press the
4
button.
The camera returns to the control panel.
You can also change the setting from the [
A
Rec. Mode 1] menu (p.79).
12
M
[
37
]
10:30AM
JPEG
HDR
HDR
OFF
OFF
OFF
OFF
AF.A
OFF
OFF
10/10/’09
JPEG Quality
MENU
128
OK
OK
JPEG Quality
Cancel