Pentax Optio H90 White Optio H90 Orange Optio H90 - Page 78
Taking Pictures in the Basic Mode (Green Mode), Press the, button.
 |
View all Pentax Optio H90 White manuals
Add to My Manuals
Save this manual to your list of manuals |
Page 78 highlights
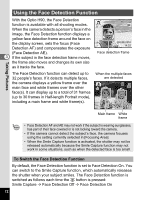
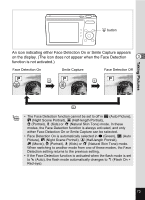
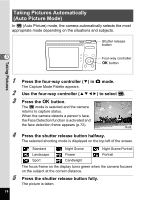
Taking Pictures 3 4 3 5 6 Press the 4 button. The R mode is selected and the camera returns to capture status. When the camera detects a person's face, the Face Detection function is activated and the face detection frame appears (p.72). 38 08/08/2010 14:25 Set the functions you want to change. Refer to "Setting the Shooting Functions" (p.99 - p.120) for details on how to set the functions. Press the shutter release button halfway. The focus frame on the display turns green when the camera focuses on the subject at the correct distance. Press the shutter release button fully. The picture is taken. Taking Pictures in the Basic Mode (Green Mode) In 9 (Green) mode, you can enjoy easy picture-taking using standard settings, regardless of the settings in the [A Rec. Mode] menu. The 9 mode settings are as shown below. Flash Mode Drive Mode Focus Mode , (Auto) 9 (Standard) = (Standard) Face Detection On Information Display Normal Recorded Pixels White Balance E (4000×3000) F (Auto) Focusing Area J (Multiple) AE Metering L (Multi-segment metering) Sensitivity Auto EV Compensation Highlight Correction Shadow Correction Pixel Track SR Blink Detection Digital Zoom Instant Review Sharpness Saturation Contrast Date Imprint ±0.0 P (Off) P (Off) P (Off) O (On) O (On) O (On) G (Normal) G (Normal) G (Normal) Off 76
-
 1
1 -
2
-
3
-
4
-
5
-
6
-
7
-
8
-
9
-
10
-
11
-
12
-
13
-
14
-
15
-
16
-
17
-
18
-
19
-
20
-
21
-
22
-
23
-
24
-
25
-
26
-
27
-
28
-
29
-
30
-
31
-
32
-
33
-
34
-
35
-
36
-
37
-
38
-
39
-
40
-
41
-
42
-
43
-
44
-
45
-
46
-
47
-
48
-
49
-
50
-
51
-
52
-
53
-
54
-
55
-
56
-
57
-
58
-
59
-
60
-
61
-
62
-
63
-
64
-
65
-
66
-
67
-
68
-
69
-
70
-
71
-
72
-
 73
73 -
 74
74 -
 75
75 -
 76
76 -
 77
77 -
 78
78 -
 79
79 -
 80
80 -
 81
81 -
 82
82 -
 83
83 -
84
-
85
-
86
-
87
-
88
-
89
-
90
-
91
-
92
-
93
-
94
-
95
-
96
-
97
-
98
-
99
-
100
-
101
-
102
-
103
-
104
-
105
-
106
-
107
-
108
-
109
-
110
-
111
-
112
-
113
-
114
-
115
-
116
-
117
-
118
-
119
-
120
-
121
-
122
-
123
-
124
-
125
-
126
-
127
-
128
-
129
-
130
-
131
-
132
-
133
-
134
-
135
-
136
-
137
-
138
-
139
-
140
-
141
-
142
-
143
-
144
-
145
-
146
-
147
-
148
-
149
-
150
-
151
-
152
-
153
-
154
-
155
-
156
-
157
-
158
-
159
-
160
-
161
-
162
-
163
-
164
-
165
-
166
-
167
-
168
-
169
-
170
-
171
-
172
-
173
-
174
-
175
-
176
-
177
-
178
-
179
-
180
-
181
-
182
-
183
-
184
-
185
-
186
-
187
-
188
-
189
-
190
-
191
-
192
-
193
-
194
-
195
-
196
-
197
-
198
-
199
-
200
-
201
-
202
-
203
-
204
-
205
-
206
-
207
-
208
-
209
-
210
-
211
-
212
-
213
-
214
-
215
-
216
-
217
-
218
-
219
-
220
-
221
-
222
-
223
-
224
-
225
-
226
-
227
-
228
-
229
-
230
-
231
-
232
-
233
-
234
-
235
-
236
-
237
-
238
-
239
-
240
-
241
-
242
-
243
-
244
-
245
-
246
-
247
-
248
-
249
-
250
-
251
-
252
-
253
-
254
-
255
-
256
 |
 |
