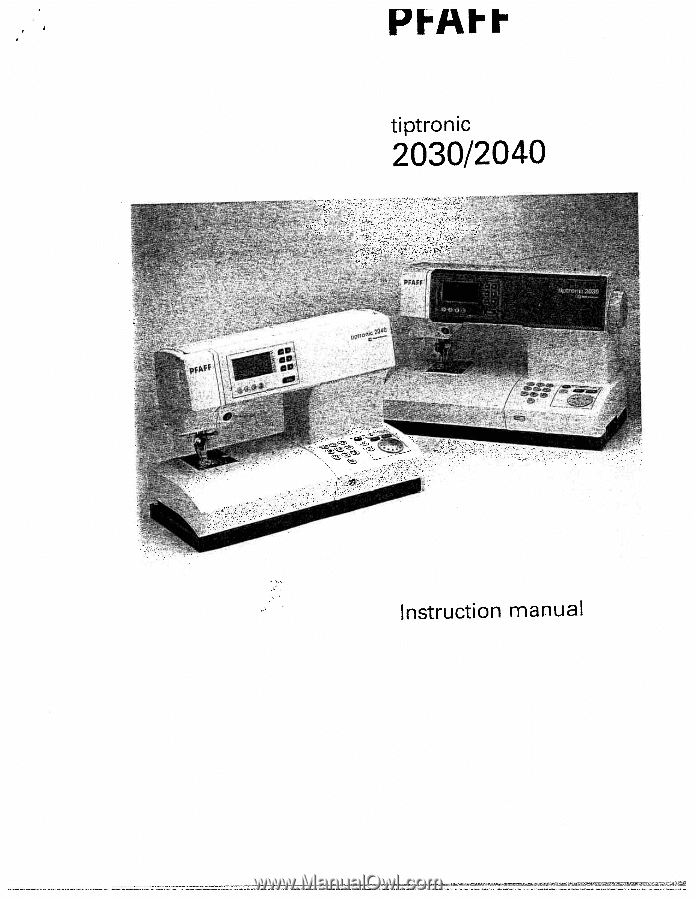
Pfaff Tiptronic 2030 Owner's Manual
Pfaff Tiptronic 2030 Manual
 |
View all Pfaff Tiptronic 2030 manuals
Add to My Manuals
Save this manual to your list of manuals |
Pfaff Tiptronic 2030 manual content summary:
- Pfaff Tiptronic 2030 | Owner's Manual - Page 1
1\) rf D C C-') 0 C D C, 0 1%) D C -II B 0) C C - Pfaff Tiptronic 2030 | Owner's Manual - Page 2
of this instruction manual when reading instructions For Australia only • If the supply cord agent or similarly is damaged, it must replaced by the manufacturer qualified person in order to avoid a hazard. or its service • The appliance is out supervision. not iniended for use - Pfaff Tiptronic 2030 | Owner's Manual - Page 3
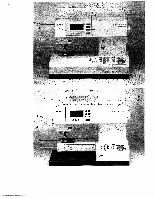
:. -- 1 iptronic 2040 4O 4t 5O - ,c. . a PFAFF 42 43 a -L ,-a - -.-fl-a-,-a,:. z:itronic 2040 4 - - Pfaff Tiptronic 2030 | Owner's Manual - Page 4
(41) hread guide (42) (43) (44) (45) Spool holder with unwinding 'HTooplecfoovresrewcoitnhdstsiptcoholprhooglrdaemr Bobbin winder disk chart (46) (47) Hook cover (hook behind it) Free arm (48) Sewing bulb (max. 5 W) (49) Thread cutter (50) Thread take-up (51) Presser foot lifter (52> (53 - Pfaff Tiptronic 2030 | Owner's Manual - Page 5
area, such as threading needle, changing needle, threading bobbin, or changing presser foot, etc. 1 6. Always unplug sewing machine from the electric outlet when removing covers, lubricating, or when making any other user servicing adjustments mentioned in the instruction manual. Please also - Pfaff Tiptronic 2030 | Owner's Manual - Page 6
the risk of electric shock, do not open the machine. There are no parts inside the machine which the user can repair. This is solely the responsibility of our qualified service staff. I 1.Only original PFAFF parts may be used. I 2.The machine is designed for a mains supply with a mains rated voltage - Pfaff Tiptronic 2030 | Owner's Manual - Page 7
time enough to study the instruction book, nothing can go wrong. After all, this is the only way to learn all the things the machine can do, and to make full use of them. If you have any further questions, that is no problem! Your PFAFF dealer will be at your service with any help or - Pfaff Tiptronic 2030 | Owner's Manual - Page 8
of headings Accessories Appliqué work Automatic tapering Balance Basting Bobbin case Bobbin thread monitor (model 2040) Bobbin thread tension Bobbin thread, drawing up Bobbin winding Bobbin winding through the needle Buttonhole, fully-automatic Buttonholes Buttonholes with gimp thread Buttonholes - Pfaff Tiptronic 2030 | Owner's Manual - Page 9
, tiptronic 2040 Embroidery stitch programs, tiptronic 2030 Embroidery, general notes Eyelet embroidery Feed dog, lowering Felling foot/Appliqué foot Foot control, connecting Free motion embroidery Free motion quilting foot/bias binder Fringe foot/narrow edge foot ... Gathering General sewing aids - Pfaff Tiptronic 2030 | Owner's Manual - Page 10
\Jeedle, threading "Jeedle/bobbin thread tension "Jon-elastic/elastic stitches \ion-stick fancy stitch foot for leather altering atterns, storing intuck foot intuck foot with guide esser feet (special accessories) •esser feet (standard accessories) •esser foot lifter esser foot changing 1 38 1 - Pfaff Tiptronic 2030 | Owner's Manual - Page 11
of programs Top feed (integrated dual feed) Twin needle Twin needle, threading Utility stitch programs, tiptronic 2040 Utility stitch programs, tiptronic 2030 Voltage switchover Zippers, sewing in 7/9 hole foot/braiding foot 1 /4 inch quilt and patchwork foot 45 1 29 79 46 1 39 1 40 39 82 78 48, 49 - Pfaff Tiptronic 2030 | Owner's Manual - Page 12
Jtility stitch programs tiptronic 2040 1 ID Ill "i. linen) For automatically sewing on buttons 1 0 Basting stitch For basting cut-out parts together 11 Quilt left to right or from right to left, using the pattern mirror key) stitch during sewing) 1 3 Stemstitch, narrow 1 4 Decorative elastic - Pfaff Tiptronic 2030 | Owner's Manual - Page 13
Utility stitch programs tiptronic 2040 15 16 17 21 22 23 24 I 25 Hir i 171 26 27 f 28 I C II Open overlock stitch For closing and serging seams 6 19 Honeycomb stitch For sewing seams and on for elastic thread, overstitching ornamental hem seams terry cloth 6 20 Cross hem stitch 21 - Pfaff Tiptronic 2030 | Owner's Manual - Page 14
Utility stitch programs tiptronic 2030 1234 6 101 '11 12 automatically sewing on buttons 6 T 1 0 Basting stitch j For basting cut-out parts together be or from right to left, using sewn from the pattern left to right mirror key) 6 stitch during sewing) 1 3 Stmstitch, narrow 1 Durabie - Pfaff Tiptronic 2030 | Owner's Manual - Page 15
tiptronic 2030 14 15 16 22 23 24 25 26 Pro- Description gram No. 1 4 Decorative elastic stitch 1 Application For overstitching elastic as well as for gathering cords and wool and smocking threads 19 Honeycomb stitch For sewing seams and on for elastic thread, overstitching ornamental hem - Pfaff Tiptronic 2030 | Owner's Manual - Page 16
ci F 0 00 :-z-- N) ---- - ---- -- -- --- -- - p4e W 0) - (3) IIhJ. (31 dW 5 CC) 0 t .-1 , - +1 ---------- C) (0 - Q ------- 'dIIP nr9 co '' (0 (31 0 1 1 1 lIllIliuhjIf - - III (31 wfluhllIlljI III - llhlIII1'llillhI (51 mIHff ( -- .JJ (31 Md1d (31 co - L/?/ - Pfaff Tiptronic 2030 | Owner's Manual - Page 17
- CD C', Z3ZZ_ C) Oo Zz 4 C) (31 Imilhuji1 1 1 1 1 1 , 1njrnl1lllil llIh IIuIhIMIftlll hnilhP JL.J (31 0 coO t') CD zzz! \LjjAW 11 () 1 cQ) ø w w .. Ih AIk _1P 0) (0 rxv>c WI." 0 - - Pfaff Tiptronic 2030 | Owner's Manual - Page 18
- Pfaff Tiptronic 2030 | Owner's Manual - Page 19
with stitch program chart Electrical connection Voltage switchover Accessories Detachable work support Bobbin winding Bobbin case Needle/bobbin thread tension Threading the needle thread Needle threader Pulling up the bobbin thread Presser foot lifter Thread cutter Changing the presser feet Winding - Pfaff Tiptronic 2030 | Owner's Manual - Page 20
, the foot control and instruction book into the compartment of the carrying case. Top cover Open the folding cover (44) upwards. PFAFF PFAFF 2040 -% '4 ' -1, -i .-1, -1 -A -1 tiptronic 2040 Mthbh; t,,,,,,,.,y -' A iVllJY.I1J)JJ1.' 11If1II!ff Jilt! ie programs of the sewing machine are - Pfaff Tiptronic 2030 | Owner's Manual - Page 21
Instructions Electrical connection Connect the lead cord between the socket (11) of the sewing machine and the wall outlet Connecting the foot control Connect the plug of the foot control to the connection socket (1 2) of the sewing machine. The sewing speed is controlled by pressing the foot - Pfaff Tiptronic 2030 | Owner's Manual - Page 22
by placing 'our left index finger on the ridged area on the eft of the lid and open the lid upwards and iway from you. Arranging the accessories The standard accessories are marked with numbers. Arrange the parts in the respective compartments of the accessory tray. ccessories 2030/2040 - Pfaff Tiptronic 2030 | Owner's Manual - Page 23
In order to sew upwards out of using the free arm, swing the hole. When replacing the the detachable work support work support, make sure to the left and it is flush with lift the it free arm of the sewing machine. L Preparing the machine for bobbing winding Place an empty bobbin so that - Pfaff Tiptronic 2030 | Owner's Manual - Page 24
Ô3: Winding the bobbin from the spool pin Place the sewing thread on the spool holder. To obtain free movement of the thread and hold the thread spool firmly, fit an unwinding disk of the right size for the thread spool. Threading Place the thread into guide A from the front and pull it - Pfaff Tiptronic 2030 | Owner's Manual - Page 25
the second spool holder in the hole provided. Threading Threading of the thread is carried out as in the case of the spool holder on page 22. Switch on the master switch Hold the end of the thread firmly and press the I foot control. As soon as the bobbin is full, the winding action will be - Pfaff Tiptronic 2030 | Owner's Manual - Page 26
two fabric layers. The following is valid for general sewing work: Thread interlace is visible on the top side of the fabric: The needle thread tension is too tight or the bobbin thread tension is too loose. The thread tension must be corrected. Thread interlace is visible on the underside of the - Pfaff Tiptronic 2030 | Owner's Manual - Page 27
C just a little to the right to increase the bobbin thread tension. Inserting the bobbin case Lift latch F and push the bobbin case fully onto pin D of the sewing hook Opening E of the bobbin case must face upwards. Check: Pull the bobbin thread sharply. The bobbin case must not fall out of the hook - Pfaff Tiptronic 2030 | Owner's Manual - Page 28
the needle Switch off the master switch Raise the presser foot lifter (51). Place the thread on the spool holder and fit an unwin ding disk of the right size. Using both hands, pull the thread into thread guide A from the front Place the thread from right to left into the pre-tension device B. Now - Pfaff Tiptronic 2030 | Owner's Manual - Page 29
Needle threader In order to make threading of the needle easier and quicker the PFAFF needle threader is provided. Lower the presser foot Press the threader down with the handle. Threader hook R swivels through the needle eye. Place the thread over hook 0 and under the thread hook R and hold the end - Pfaff Tiptronic 2030 | Owner's Manual - Page 30
holding the end of the needle thread, press the foot control so the needle moves down and up. Pull the needle thread to draw up the bobbin thread. obbin thread lose the hook cover (46) and pull the thread ider the presser foot to the left. Thread cutter Pull the thread from the back to the front - Pfaff Tiptronic 2030 | Owner's Manual - Page 31
Check: Please check that the presser foot is properly attached by raising the presser foot lifter. Setting the needle thread tension Set the required amount of the needle thread tension (35) using the markings on the tension dial. The normal setting for sewing is 3 - 5. For embroidery, darning and - Pfaff Tiptronic 2030 | Owner's Manual - Page 32
PFFF 2040 I Winding a bobbin through the needle It is possible to wind bobbins even when the machine is fully threaded. Raise the presser foot lifter (51) to the top position. Pull the needle thread underneath the presser foot and upward through the right-hand threader slot (34). Place the thread - Pfaff Tiptronic 2030 | Owner's Manual - Page 33
rear. Lower the presser foot and insert the needle, pushing it up as far as it will go. Hold the needle and tighten the set screw (52) firmly. Threading the twin needle: Replace the sewing needle with a twin needle. Insert the second spool holder and place one spool of thread on each of the spool - Pfaff Tiptronic 2030 | Owner's Manual - Page 34
The IDF System/Integrated Dual Feed (top feed) For sewing difficult materials PFAFF provides the ideal solution: the Integrated Dual Feed, IDF system. As on industrial machines, the IDF feeds the fabric from the top and bottom at the same time. The material is fed precisely. On light or difficult - Pfaff Tiptronic 2030 | Owner's Manual - Page 35
Engaging the top feed/IDF Important For all work with the Dual Feed (IDF), use the presser feet with the center back cut out Raise the presser foot Press the top feed (31) downwards until it engages. Disengaging the top feed/IDF Hold the Dual Feed with two fingers at the marked points - Pfaff Tiptronic 2030 | Owner's Manual - Page 36
kPP - :/ • : Lowering the feed dog For certain sewing work such as free-motion cleaned, the feed dog has to be lowered. quilting or darning and when the machine must be Raise the presser foot before lowering the feed dog. Push slide A to the left. to engage the feed dog move the slide - Pfaff Tiptronic 2030 | Owner's Manual - Page 37
- Pfaff Tiptronic 2030 | Owner's Manual - Page 38
contrast on the display Bobbin thread monitor (model 2040) Selecting the sewing programs Altering pattern sizes Altering the stitch width/needle position Altering the pattern width/stitch length Altering the pattern length/stitch density Balance lnfo key/reverse sewing key Sewing function keys Twin - Pfaff Tiptronic 2030 | Owner's Manual - Page 39
may change after long use or due to the machine being This setting can be readjusted with the contrast regulator (54). Bobbin thread monitor (model 2040) If the bobbin is nearing its end [2 yd (2 m) 3 '/ yd (3 m)1 or there is no thread on the bobbin, the bobbin symbol appears on the - Pfaff Tiptronic 2030 | Owner's Manual - Page 40
, model 2030): for scrolling backward and forward in the sewing programs. Clockwise in ascending order Counterclockwise = in descending order 0. 2. With the direct selection keys for instant selection of the most commonly used programs (0 - 9) and for the selection of the alphabet programs. 3. With - Pfaff Tiptronic 2030 | Owner's Manual - Page 41
on the display. To change: Stitch width w..% Pattern width Needle position for straight stitches ...2 Stitch length < Pattern length Stitch density vsz Pattern density Balance Use key pair a C 40 - Pfaff Tiptronic 2030 | Owner's Manual - Page 42
Altering the The selected stitch width program can be sewn in various widths, e.g. zigzag stitch No. 3. 1 : :i : Altering the needle position Straight stitch No. 1, stitch No. positions by pressing key pair 2 and stitch No. 11 can a to move the needle to be sewn in any of 1 3 left - Pfaff Tiptronic 2030 | Owner's Manual - Page 43
). For decorative stitches, program 63 comes up the in a overall width of standard width the pattern and can be is shown on the display. altered using key pair a. When entered. Altering the stitch length The stitch length of a program can be altered - Pfaff Tiptronic 2030 | Owner's Manual - Page 44
IF 1. Altering the pattern The pattern length of length decorative patterns can be altered using key pair Ii Altering the stitch density Wpreadittthemrvnoarrceiaonduesbnsesteiatlcyltheorper drlo.egsTsrhademepsnasstetuleycr.hn as buttonhole, satin stitches, length will remain constant - Pfaff Tiptronic 2030 | Owner's Manual - Page 45
of the balance is With key pair c you can change the reverse feed of or without preceding sign) indicates the value set the machine from -9 to (+)9. A number (with In the minus range sewn shorter. the patterns or programs are sewn shorter and thus the overall length will - Pfaff Tiptronic 2030 | Owner's Manual - Page 46
lowered Page number of the info menu Reverse sewing This key has the following functions: • when pressed, will reverse sew • manual finish of a buttonhole • programming the buttonhole determines the length of the darning program (model 2040) • sewing on lace while tapering automatically (see page - Pfaff Tiptronic 2030 | Owner's Manual - Page 47
above the key on the display when the needle is lowered and disappears when the key is pressed again. "Slow sewing" key (38) By pressing the "slow sewing" key the speed of the machine is reduced by half. The symbol appears on the display and disappears when the key is pressed again. IP - Pfaff Tiptronic 2030 | Owner's Manual - Page 48
a the pattern twin needle width with until the warning symbol disappears. a distance between the needles of no You may now more than 2 mm and safely sew the selected pattern. 47 - Pfaff Tiptronic 2030 | Owner's Manual - Page 49
that are formed from the right will always retain the right-hand needle entry position, regardless of any changes in width. Note: Do not use a twin needle to sew patterns that are formed from one side! Do not use a twin needle if this symbol in the display lights up (see page 47). 48 - Pfaff Tiptronic 2030 | Owner's Manual - Page 50
hFF w_ - - : info • - - D' /I Pwahtetenrntshetyhaatrearwe ifdoermneedd/nfarorrmowtheed.center will change equally from the right and the left 49 - Pfaff Tiptronic 2030 | Owner's Manual - Page 51
H II - Pfaff Tiptronic 2030 | Owner's Manual - Page 52
Contents Pattern combinations Keys for the pattern sequence Storing patterns Deleting from the pattern sequence Subsequent inserting into the pattern sequence Deleting a pattern sequence Deleting all M-memories Changing a pattern within the pattern sequence "Pattern beginning" function Page 54 Page - Pfaff Tiptronic 2030 | Owner's Manual - Page 53
of storing pattern and word sequences in the memories of the machine. The pattern combinations are stored, after having been sewed once, until you overwrite or delete the memories. The tiptronic 2040 has 6 rn-memories, the tiptronic 2030 has 3 rn-memories. Up to 20 patterns or letters can - Pfaff Tiptronic 2030 | Owner's Manual - Page 54
be found next to the selection knob (selection key on the model tiptronic 2030) rn-key: m) for opening or closing an rn-memory m+: rn-memory/scrolling through the rn-memories which are activated. A-Z keys (2 x on the 2040, 1 x on the 2030): for the direct selection of the fonts Opening an rn-memory - Pfaff Tiptronic 2030 | Owner's Manual - Page 55
01 C) - r_f) -1 °CD zr - CD CD 0 CDg Cl) CD 3 a -f CD Z CD (\ :;l D 0) a C-,PCD a, 0 CD CD C-DC1 D CD 3 DCD CD Lu 0 Cl) cD 0 0 -' D CD -f :- ?. CD Cl) I!CDD a Cl) 0) Cl) D CO CD ØCD D(f) CD 0) c-DfDCgD CO 0) CD - Pfaff Tiptronic 2030 | Owner's Manual - Page 56
machi ne's memory even after you switch off the machine. Tip: In order to embroider a pattern sequence is tied-off on completion and the machine stops automatically. Subsequent deleting of a pattern within a pattern in the pattern sequence, scroll using the cursor keys to the desired position in - Pfaff Tiptronic 2030 | Owner's Manual - Page 57
front of the pattern Select the desired pattern and store which is to it using the be m+ key(14). After having inserted the pattern, the cursor moves a pattern at the beginning of a pattern sequence, scroll to the left using the cursor key. Once the cursor is positioned at the beginning of the - Pfaff Tiptronic 2030 | Owner's Manual - Page 58
the memory is completely empty. Deleting all M-memories You can delete all M-memories at once by holding down the clear key (9) while turning on the machine. 59 - Pfaff Tiptronic 2030 | Owner's Manual - Page 59
cursor below the desired pattern. Now the pattern can be enlarged, narrowed down or mirrored. "Pattern beginning" function If you have interrupted the sewing operation and would like to start the pattern sequence again, position the cursor -i as far to the left as possible, Then press the clear - Pfaff Tiptronic 2030 | Owner's Manual - Page 60
- Pfaff Tiptronic 2030 | Owner's Manual - Page 61
Non-elastic/elastic stitches Overlock stitches Sewing on buttons Darning/inserting patches Lace work Gathering Covering stitches Smocking Hemming Zipper Shell edging Page 65 - 66 Page 65 - 68 Page 69 Page 70 - Pfaff Tiptronic 2030 | Owner's Manual - Page 62
II - CO ' - D 0 3 O o DrOC) C!) (1),rCQD I !I i g 0 - I ° D - Q- - 0 - o c,' - CD -f D CD -. CDDo3 C)-CDDD CD CD D Ci)COCD(D Cd) DD 3. -D p) o D -< - C,) CD - ' rn -I f()) D D-< C 0 " D QD C') - Pfaff Tiptronic 2030 | Owner's Manual - Page 63
a thick seam, we recommend placing a piece of fabric of the same thickness as the work under the presser foot to support it Blind stitch Prog. 6 project should now be facing up. - Place the fabric under the presser foot so that the crease line runs along edge guide B. - When the needle enters the - Pfaff Tiptronic 2030 | Owner's Manual - Page 64
for sewing all seams where great strength is needed, e.g. crotch seams. The heavier the fabric, the longer the stitch length required. Tip: If you wish to topstitch a collar point with prog. 1, use the function "needle lowered". The needle will remain in the fabric when the machine stops, allowing - Pfaff Tiptronic 2030 | Owner's Manual - Page 65
4 Due to its high elasticity this stitch is ideal for sewing on elastic, e.g. onto undergarments. - If replacing elastic, cut at the matching marks. - Stretch the elastic to fit the fabric, matching marks as you sew. - Overlap the ends slightly and secure with the elastic stitch. - On skirts and - Pfaff Tiptronic 2030 | Owner's Manual - Page 66
.tsolteootf the presser foot I N N N N N N N Open overlock stitch Prog. 18 The open joining or overlock stitch edge-finishing works well fabrics that when do not fray excessively. I Closed overlock stitch with selvage thread Prog. 21 If you wish to sew a fabric that select - Pfaff Tiptronic 2030 | Owner's Manual - Page 67
needle enters the left hole in the button. - Lower the presser foot lifter. The button will be held in place by the shank of the foot Make sure the needle also enters the right hole of the button. - Continue sewing on the button. The machine will complete the program for you. - Leave the feed dogs - Pfaff Tiptronic 2030 | Owner's Manual - Page 68
-= , Automatic darning - Prog. 73 (Model 2040) Program 73 is mainly for strengthening dama ged areas often as needed. Depending on straighten the the type of fabric, the darning pattern pattern using the balance adjustment may shift capability slightly out of (see chapter square. You can " - Pfaff Tiptronic 2030 | Owner's Manual - Page 69
! Only in this position is the thread tension engaged for darning. - Place the work to be repaired in a darning! embroidery hoop. - Lower the feed dog. - Draw up the bobbin thread and hold the threads when you start sewing. - Repair the damaged area/hole by guiding the fabric evenly forwards and - Pfaff Tiptronic 2030 | Owner's Manual - Page 70
and other garments with lace inserts. - Baste the lace to the face side of the fabric. - Stitch very close to both edges of the lace using straight stitch 1. - Carefully slit the fabric behind the lace center. Press these edges towards the at the gar ment From the front side of your - Pfaff Tiptronic 2030 | Owner's Manual - Page 71
this line. Leave about 4 - 5 inches (10 - 1 3 cm) of thread at the beginning and end of the seam. Sew 1 or 2 more rows of stitching, using the edge of the presser foot as a guide. - Gather the fabric by pulling the bobbin (bottom) threads to the desired fullness. - Distribute the gathers evenly and - Pfaff Tiptronic 2030 | Owner's Manual - Page 72
side. - Stitch the hem from the right side of the fabric. When sewing, make sure the under neath fabric edge is fully overstitched. TIP: You may find it easier to guide the fabric edges when using the faggoting guide (special accessory). It is available in 3 mm and 5 mm widths. The small post on - Pfaff Tiptronic 2030 | Owner's Manual - Page 73
quilting three layers (2 fabric and 1 batting) are joined together with small hand stitches to create beautiful family heirlooms. The sewing machine makes accomplishing this technique much easer and faster! The tiptronic 2020 and 201 0 enable you to achieve a won- derful hand-quilted look by - Pfaff Tiptronic 2030 | Owner's Manual - Page 74
tears and damaged areas. If the area is only slightly damaged, you may sew over it with rows of stitches until it is well covered. No additional backing each other. For tears, frayed edges or small holes it is advisable to place a piece of fabric, slightly larger than the damaged area and of the same - Pfaff Tiptronic 2030 | Owner's Manual - Page 75
along the groove at the center of the foot Sew the first gathering seam, leaving approximately 4 inches (1 0 cm> of the gimp thread at the beginning and end of the seam. Place the edge guide on this stitching line the next row will sew approximately 1 inch (2 - 2.5 cm) from the first row. Different - Pfaff Tiptronic 2030 | Owner's Manual - Page 76
Double-fold the fabric edge (about 1/8 inch / 2 mm per fold). - Place the folded fabric edge under hemmer and sew a few stitches to the secure. - Turn the handwheel towards you until needle is at its lowest point. Raise the the presser foot and slide the fabric into the scroll of the hemmer - Pfaff Tiptronic 2030 | Owner's Manual - Page 77
by using one of the 1 3 needle positions available. If the presser foot is attached foot to the right side. - Baste or pin the zipper in place and position it under the presser foot so that the teeth run along the side of the presser foot Bring the needle into the desired, right-hand position. - Sew - Pfaff Tiptronic 2030 | Owner's Manual - Page 78
and material. Raise the presser foot and open the zipper. - edge so that the teeth are still visible. - Engage the zipper foot on the right and set the needle to the required position. the end of the seam, open the zipper and finish sewing the seam. - Close the zipper and baste the overlap evenly - Pfaff Tiptronic 2030 | Owner's Manual - Page 79
a pretty contrast at the same time. Instead of pearl cotton thread you can also place a different colored light fabric underneath. Shell edging is very effective for thin, soft fabrics such as silk and rayon fabrics. It is frequently used as an edge finish on undergar ments. Select blind stitch No - Pfaff Tiptronic 2030 | Owner's Manual - Page 80
- Pfaff Tiptronic 2030 | Owner's Manual - Page 81
Contents General notes on buttonholes Inserting the buttonhole guide Inserting the buttonhole foot Types of buttonholes Fully automatic buttonhole Semi-automatic buttonhole! manual finish Manual buttonhole Buttonholes with gimp thread Tips for a perfect buttonhole Page 86 Page 87 Page 87 Page 88 - Pfaff Tiptronic 2030 | Owner's Manual - Page 82
rhtehenetthepbrruotyftooeusnshwiooinlseahsl to sew (3 touch. The tiptronic uses buttonhole guide No. 1 sized velvet, Your tiptronic offers you three ways of sewing a buttonhole: - fully automatically - semi-automatically - manual The values for a semi-automatic and manual buttonhole are entered - Pfaff Tiptronic 2030 | Owner's Manual - Page 83
(esbpt ebasterpwtdr.ieenxegntebnthadcesktowsvloiegrhattrhlryoewsnose)tehodanlte the plate. there is a Inserting the buttonhole foot No. 5: UBf(oaesloefstoorbtoesuwetsettaoarn"rdtChinohthglaeentgoffoirnosogentwtNtth,ooep.tuhp5llerettosshseesecerorwunfondobntuereetrtdpooanfmghthaeorelke2s9.). 87 - Pfaff Tiptronic 2030 | Owner's Manual - Page 84
stretch fabrics 3) Keyhole buttonhole No. 76 (No. 61 on the model 2030) for jackets, coats and pants (trousers) 4) Round buttonhole No. 74 (only on model 2040) for ladies' outer garments, especially blouses and dresses 5) Eyelet No. 72 (only on model - Pfaff Tiptronic 2030 | Owner's Manual - Page 85
FF i1 Fully automatic buttonhole Select the desired buttonhole (e.g. No. 9). You can immediately start sewing. Using the key pairs a, b and c, you can adjust the length and width of the buttonhole and the stitch density. 89 - Pfaff Tiptronic 2030 | Owner's Manual - Page 86
" key (33) one time after you have started sewing the button hole. IF 00 The word "man" appears in the dspIay, indicating a manual finish of the buttonhole is desired. Before the left side of the buttonhole ends, the machine will slow down. When the left side of the buttonhole is the same length - Pfaff Tiptronic 2030 | Owner's Manual - Page 87
The machine will sew the second bartack and complete the buttonhole. The word "auto" appears on the display. ill AB remaining buttonholes will now be sewn automatically. Note: If - Pfaff Tiptronic 2030 | Owner's Manual - Page 88
Manual buttonhole I You can also set the length of the buttonhole while the "reverse sewing" key. The word "man" appears previously, disappears. sewing reached the desired length, press the "reverse sewing" key once again. The machine will now sew the first bartack and the second buttonhole seam. - Pfaff Tiptronic 2030 | Owner's Manual - Page 89
with gimp thread BaUaleharevxunoesnatetdlgetiemlontpaphnfdobeuohiarllonoeeolrflgtluaedgcPptsfuiormasrottisaehtnmpsobwatnoltttiethhnhatoerhgareereentasahcddshrereiroengpeowapthrgvedosntuer.f, .thae clamp at the front of the presser foot Button hole No. 9 can now be sewn. - Pfaff Tiptronic 2030 | Owner's Manual - Page 90
with the buttonhole foot In close to a this case, reinforced edge, may sometimes use the presser foot No. 1. thread is inserted while sewing - Linen buttonholes are particularly dense and attractive if you use embroidery and darning thread. - Buttonholes are normally selected a always sew - Pfaff Tiptronic 2030 | Owner's Manual - Page 91
- Pfaff Tiptronic 2030 | Owner's Manual - Page 92
accessory table Felling foot/appliqué foot Shirring foot Cording footJshirring foot Knit edge foot/ruffler 1/4 inch quilt and patchwork foot Free motion quilting foot/ bias binder Pintuck foot with guide Non-stick fancy stitch foot for leather 7/9 Hole foot/braiding foot Circular embroidery guide - Pfaff Tiptronic 2030 | Owner's Manual - Page 93
Presser feet (normal accessories) 0 Standard presser foot Order No.: 98-694 81 6-00 1 Fancy stitch foot - Pfaff Tiptronic 2030 | Owner's Manual - Page 94
4 Zipper and edge presser foot Order No.: 98-694 884-00 5 Buttonhole foot Order No.: 93-036 990-9 1 6 Darning foot Order NoW: 93-035 960-9 1 7 Hemmer Order No.: 98-694 81 8-00 99 - Pfaff Tiptronic 2030 | Owner's Manual - Page 95
8 Edge guide Order No.: 98-802 422-00 10 Buttonhole guide Order No.: 93-037 595-91 Bulb remover/Needle plate changer Order No.: 93-038 920-91 Second spool holder Seam ripper Brush Oil - Pfaff Tiptronic 2030 | Owner's Manual - Page 96
Non-stick presser foot Circular embroidery guide Faggoting guide Quilting and patchwork foot Quilting and patchwork foot (for dual feed) Pintuck foot with guide Braid foot 7/9 hole foot Narrow-edge foot Rollerfoot Free mohon quilt foot Quilt vvork finger guard Order No. Sewing work 93-042 941 - Pfaff Tiptronic 2030 | Owner's Manual - Page 97
using a sewing thread of a contrasting color. The felling foot is available in two diffe rent widths. Appliqué foot Appliqués are easily sewn and always produce a beautiful effect By using and press your applique pieces in place on your base fabric. - Place a stabilizer under your work area. - Pfaff Tiptronic 2030 | Owner's Manual - Page 98
- Attach the pintuck foot - Insert a twin needle on your 1 30/7 05 H-ZWI; 1.6 or 2.0 machine (e.g. mm needle spacing; size 80). - Thread the two needles (see page 31). - Using a water-soluble marker, draw a place ment line for your first pintuck - Increase the bobbin thread tension by turning - Pfaff Tiptronic 2030 | Owner's Manual - Page 99
front bar. - Place the fabric to be gathered, face up, under the presser foot and the fabric to remain flat face down, on the top through the foot cut out - Hold the top fabric slightly taut while sewing. The harder you pull the greater the gathering effect you achieve. - Be sure to guide the fabric - Pfaff Tiptronic 2030 | Owner's Manual - Page 100
foot ,wehhcoilmloeseesletyewxoitnrilgew.si,Tdehetlicys. The ruffler can be used in three different ways: 1. Folding and in one lace and operation. When you dealer, full buy the ruffler from your PFAFF operating instructions are included. Program: 1 Stitch length: 3 Tension: 3 - - Pfaff Tiptronic 2030 | Owner's Manual - Page 101
faster and easier with the sewing machine (program 11). - Use invisible (monofilament) thread in the needle. Use a contrast or complementary polyester or cotton thread in the bobbin. - Set the needle thread tension to 7-9. Loosen the bobbin thread tension approximately 1/4 turn counterclockwise to - Pfaff Tiptronic 2030 | Owner's Manual - Page 102
gfFaowbrriittchhisebdiyagoseustanapeesemdisouaontvfhoerlyadneeddasnbyieaamst etaatphpopedeaof about 1" (24 mm) wide. - Remove the presser foot and holder. Attach the bias binder. - Cut the beginning of the raw Tip: You can effect by obtain using an additional decorative a zigzag or fancy - Pfaff Tiptronic 2030 | Owner's Manual - Page 103
all remaining pintucks. - Replace the twin needles with a normal sewing needle. - Set the needle thread tension to 3. - Place stabilizer under work area. - Place two pintucks in the guides on either side of the center of the foot Embroider your desired decorative stitches in this space. Non-stick - Pfaff Tiptronic 2030 | Owner's Manual - Page 104
2trhLfdo.iesnoTactvuhhefnreredotsahemdtero - Attach the Overstitch 7/9 hole foot the threads with a stitch and - thread of your choice. Tip: Pearl thread or embroidery twist is well suited. Braiding foot This special heavy/bulky foot is cords best suited (e.g. loosely for overstitching - Pfaff Tiptronic 2030 | Owner's Manual - Page 105
is secured with the screw on the presser foot holder. - Stabilize your fabric. - Place the center marked point of your fabric directly below the rubber point of the embro idery guide. - Select the desired embroidery pattern and begin sewing. - Change the radius with every new circle by loosening - Pfaff Tiptronic 2030 | Owner's Manual - Page 106
foot with a fabric - marking pen. Place a piece of stabilizer under the the end loops flat/tight Knot the beginning and end threads on the - reverse side. Program: 3 Stitch length: - Pfaff Tiptronic 2030 | Owner's Manual - Page 107
Using the Medium ball point Heavy ball point Stretch-fabric needle developed especially for Pfaff. for delicate stretch Particularly and knitted suitable fabrics. Wide-meshed and plastic Topstitched of No. 30/3 seams with buttonhole synthetic thread silk 1 30/705 H-WING - Size: C C - Pfaff Tiptronic 2030 | Owner's Manual - Page 108
embroidery embroidery Decorative hem stitch effect. Well finshed woven fabric and fine batiste are particularly suitable. Triple needle Before sewing by turning the the desired handwheel. embroidery In this way, snteietcdhleesb, rcehaekcakgewihseathveoridtehde needles as much can penetrate as - Pfaff Tiptronic 2030 | Owner's Manual - Page 109
•": :H- I 4 414 k .21 4-. ._-.c -- -: - - - •i • /7 - ! -m-: -. - -- •: • : .,. -- :1-5 - - 7 - r 1 H • • 7 •• 1. •,• •ç• • ?'• 1, 3 41 - Pfaff Tiptronic 2030 | Owner's Manual - Page 110
- Pfaff Tiptronic 2030 | Owner's Manual - Page 111
Contents General notes on embroidery Page 118 Combined borders Page 119 Combined borders using twin needle Page 119 Monograms Page 120 Free motion embroidery Page 121 Altering pattern width/lengthfor combined borders Page 1 22 Tapering/Embroidering with satin-stitch - Pfaff Tiptronic 2030 | Owner's Manual - Page 112
tiptronic 2040 and 2030 offer you a wide variety of fancy and decorative stitches• You can produce even greater embroidery variations by combining different patterns, colors and sizes. For embroidery work we recommend using special embroidery threads which are available from your PFAFF bobbin thread - Pfaff Tiptronic 2030 | Owner's Manual - Page 113
ahjcuehsnitetavheeldittwlueasiirmnngiangagintawstyiinmonbn!oeel dle. The illustration shows what appears on the display (see page 31). Variegated embroidery Apply iron-on backing thread was used or other stabilizer for this border combination. under the fabric. What a beautiful effect! 119 - Pfaff Tiptronic 2030 | Owner's Manual - Page 114
foot and bring it into the darning position (see page 72). Lower the feed dog. Place use the darning position. Knot the threads on the back of your work and remove the stabilizer. The remaining watersoluble stabilizer will dissolve in water. TIP: Sewing i.e. no free motion guiding is required. Simply - Pfaff Tiptronic 2030 | Owner's Manual - Page 115
. - Position the motifs on the belt and pin in place. Frame the fabric and the water-soluble stabilizer in an embroidery hoop. - Embroider the belt using free motion embroidery. - Tip: The You can quicker you sew, the more even the embroidery. use a dense zigzag stitch for the stem and - Pfaff Tiptronic 2030 | Owner's Manual - Page 116
Changing the pattern width The pattern width can be altered using key pair a (1). The width can also be adjusted while sewing. Changing the pattern length The pattern length can be altered using key pair b (2). The length can also be adjusted while sewing. - Pfaff Tiptronic 2030 | Owner's Manual - Page 117
- and only can embroider perfect with PFAFF - you can now corners at 9 O angles. You automatically taper with your tiptronic, i.e. you can use this technique for appliqué, decorative buttonholes and for interesting embroidery patterns. The instructions for automatic tapering are described on the - Pfaff Tiptronic 2030 | Owner's Manual - Page 118
width while - sewing from 0 to 6 mm and reduce it again to0mm. 2' Note: If you have selected the right or left needle position, the stitch width only changes in one direction. Manual change! Irregular pattern - Apply iron-on backing or other stabilizer under fabric. - Set needle thread tension to - Pfaff Tiptronic 2030 | Owner's Manual - Page 119
..t2kseneiev- red.ee0lld.ey3lepwmopitsmohits.iitothineonossra.tzinigzsatigtchstiztcighza3g in for motifs Blossoms - Select width program using key 3 (center pair a to needle position) and embroider follow the blossom contour. individual - Pfaff Tiptronic 2030 | Owner's Manual - Page 120
kFF aa a. •0 Automatic tapering You can use both stitch No. 3 and stitch No. 1 2 for automatic tapering. If sewing the point If you wish to sew the corner, then press the reverse sewing key (33) while sewing. The taper will be sewn automatically at an angle of 450 V FF ma mu,, The machine - Pfaff Tiptronic 2030 | Owner's Manual - Page 121
variation of the classic linen buttonhole. - Select program No. 1 2. - Press the tie-off key three times. - Sew the first buttonhole sean, to the desired length. - When sewing you sew three the bartacks, make sure that zigzag stitches at full length. This guarantees that a gap is formed bet - Pfaff Tiptronic 2030 | Owner's Manual - Page 122
the appliqué foot to the sewing machine. - Transfer the paper-backed off the paper. webbing to the back side of the appliqué fabric. Cut the motif out and - Place the appliqué pieces on base fabric and iron securely. - Stitch all contours either with appliqué stitch width 2 - 4 - Pfaff Tiptronic 2030 | Owner's Manual - Page 123
create with your sewing machine. a fabric marker will stabilizer f- orimt htehlpescmutaoiunttsaianptphreoxsihmaapteelyan1d/8stability - - of the areas while sewing. Embroider the contours with a satin stitch When all dissolve satin - Pfaff Tiptronic 2030 | Owner's Manual - Page 124
Quilting Quilting is a traditional hand sewing technique. The method developed to make use of material remnants has become a sewing enthusiasts. that very the wives of American settlers popular artistic hobby for many - Pfaff Tiptronic 2030 | Owner's Manual - Page 125
.ssi,mply Free motion machine quilting Eltmfwathremreorilmtyoebthiurposmogtlunhiahoidettqteeaiturosfbhyeinlelteetooidqmnrotugndrfaiarolctetcshghieoeneilgnliymodqeofwuooucuiteorloistrotlieqonni(dsugrs.ieqpgldtYuepucirmoilfidotuaaioegbnltdcrrgiaifaacscnbmiscsy - Pfaff Tiptronic 2030 | Owner's Manual - Page 126
are 40 or cotton machine embroidery thread recommended: - Place a stabilizer under the fabric. - An embroidery hoop is recommended when working with very soft materials. - You can also embroider on Aida material as used width of the cross-stitches of your tiptronic 2040 count'size of the - Pfaff Tiptronic 2030 | Owner's Manual - Page 127
.sseThchcuetethnfeoatenbfrearibocorfirmctthwuoesvotmerfoiafttrhkstheneeudpginly around the pin. - Remove the presser foot - Place the presser foot lifter in the darning position. - Pull up the bobbin thread and hold it for the first few stitches - Pfaff Tiptronic 2030 | Owner's Manual - Page 128
C'-) C) C) I Di CD CD C/) 3' H 3: 'CD Q P C Di CD -i- 3 0 CDD. i 0 CDD 44 . ''' i"' *4 CD0Q aCCD< (CD r-+ C a0 2C Di 0 D 3 i D3 Di - CT C E5' EE3 0(0 CD .-+ C C CD.,(0 C CD D53c1(D )cCm3CD+Di03D g- --u (DDiQ'+' 3CDcD a E- ri 3 Ø D 3 - Pfaff Tiptronic 2030 | Owner's Manual - Page 129
- Pfaff Tiptronic 2030 | Owner's Manual - Page 130
Contents Changing the needle plate Changing the sewing lamp Cleaning and oiling Sewing problems and their solutions Page 138 Page 139 Page 138 Page 140 - Pfaff Tiptronic 2030 | Owner's Manual - Page 131
now be easily removed. Replacing Place the needle plate against the rear edge of until you hear it snap in place. Before you start sewing, check that the needle olate is . The machine otherwise requires no maintenance and must not be oiled at any other points. Clean and oil the sewing machine every 1 - Pfaff Tiptronic 2030 | Owner's Manual - Page 132
and the foot control plug from the machine. Remove the detachable work support Important: The maximum wattage of the bulb is 5 watts. Bulbs can be purchased from your PFAFF dealer (order No. 92-329 975-05). The sewing lamp (bulb> is located inside the needle head of the sewing machine. Insertion - Pfaff Tiptronic 2030 | Owner's Manual - Page 133
a/ C 'vk Sewing pi oblems and their solutions Problem Cause - The machine skips stitches ihe needle is not properly inserted. Wrong needle is in use. Needlri is bent or blunt. 1 lie machine is not proper ly ti rreaded Needle is too small for thread. Needle thread breaks Sep reasons above. TI - Pfaff Tiptronic 2030 | Owner's Manual - Page 134
d) Weight Nominal voltage (reversible) Power consumption Sewing lamp Sewing speed Stitching width Stitching length Presser foot lift Max. presser foot height Needle system Package contents Sewing machine Carrying case Foot control Lead cord Accessories Instruction manual 408 x 290 x 1 87 mm 8.3 kg - Pfaff Tiptronic 2030 | Owner's Manual - Page 135
6u!puesiepun e6quApeJ!eIdJwu!seqoM; ufeRdfolUaWBeUdOs9qD3fl4pSoUj! Sq JO OS8Id - Pfaff Tiptronic 2030 | Owner's Manual - Page 136
Parts of the sewing machine (model 2030 Thread guide Spool holder with unwinding disk Hole for second spool holder Top cover with stitch program chart Bobbin winder (46) Hook cover (hook behind it) (47) Free arm (48) Sewing bulb (max. 5 W) (49) Thread cutter (50) Thread take-up (51) Presser foot - Pfaff Tiptronic 2030 | Owner's Manual - Page 137
- I .ZPFAFF 5O- 4O41 Lj : - Pfaff Tiptronic 2030 | Owner's Manual - Page 138
PFAFF G. M. Pfaff Aktiengesellschaft Werk Karisruhe-Durlach GriIznerstra1e 11 76227 Karlsruhe Printed in Germany Rohr Druck GmbH Mainzer Stra1e 1 05 67657 Kaiserslautern Subject to technical changes No. 29-629 989-33/000. RD 5/99 engl.
-
 1
1 -
 2
2 -
 3
3 -
 4
4 -
 5
5 -
 6
6 -
 7
7 -
8
-
9
-
10
-
11
-
12
-
13
-
14
-
15
-
16
-
17
-
18
-
19
-
20
-
21
-
22
-
23
-
24
-
25
-
26
-
27
-
28
-
29
-
30
-
31
-
32
-
33
-
34
-
35
-
36
-
37
-
38
-
39
-
40
-
41
-
42
-
43
-
44
-
45
-
46
-
47
-
48
-
49
-
50
-
51
-
52
-
53
-
54
-
55
-
56
-
57
-
58
-
59
-
60
-
61
-
62
-
63
-
64
-
65
-
66
-
67
-
68
-
69
-
70
-
71
-
72
-
73
-
74
-
75
-
76
-
77
-
78
-
79
-
80
-
81
-
82
-
83
-
84
-
85
-
86
-
87
-
88
-
89
-
90
-
91
-
92
-
93
-
94
-
95
-
96
-
97
-
98
-
99
-
100
-
101
-
102
-
103
-
104
-
105
-
106
-
107
-
108
-
109
-
110
-
111
-
112
-
113
-
114
-
115
-
116
-
117
-
118
-
119
-
120
-
121
-
122
-
123
-
124
-
125
-
126
-
127
-
128
-
129
-
130
-
131
-
132
-
133
-
134
-
135
-
136
-
137
-
138
 |
 |
1\)
C
C-’)
C
1%)
C
C
D
0
D
B
0)
C
rf
0
D
C,
-II