Pfaff creative 2.0 Owner's Manual - Page 27
Cut jump stitches only for embroidering - features
 |
View all Pfaff creative 2.0 manuals
Add to My Manuals
Save this manual to your list of manuals |
Page 27 highlights
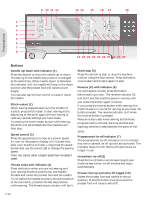
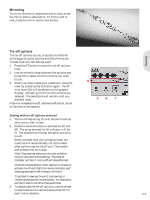
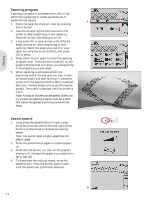
Sensormatic free-motion Activate to set the machine in sensormatic freemotion mode for presser foot 6A. Lower the feed dogs. In sewing mode, press the info button. The sensormatic free-motion icon will be shown instead of the presser foot recommendation. The fabric must be moved manually. When sewing in free-motion at low speed the presser foot will raise and lower with each stitch to hold the fabric on the stitch plate while the stitch is being formed. At higher speed, the presser foot Áoats over the fabric while sewing. When turning on the machine, a pop-up informs you that the sensormatic free-motion is active. Presser foot pressure (only for sewing) In most cases, you do not need to adjust the presser foot pressure. To improve the result when using specialty techniques, adjust the pressure. Use the left and right arrow buttons on the wheel to adjust the pressure. The higher the number, the more pressure on the fabric. The value can be adjusted between 0 and 9 in steps of 0.5. Your manual setting will be cancelled when you turn off the machine. Note: If you want to change the presser foot pressure for a sequence, bring the sequence to sewing mode and change the setting. Pivot height Adjust the height of the presser foot when the machine is set for free-motion or when in embroidery mode. In Sensormatic free-motion mode: Skipped stitches can occur if your fabric moves up and down with the needle as you are stitching. Lowering the pivot height will reduce the space between the presser foot and the fabric and eliminate the skipped stitches. Note: Be careful not to reduce the pivot height too much. The fabric must still move freely under the presser foot. In Embroidery stitch-out mode: Some embroideries may build up under the presser foot. If there is not enough space between the presser foot and the embroidery, the top thread will form loops on the underside of the embroidery. Increase the pivot height in small steps until the embroidery moves freely under the presser foot. Automatic presser foot lift (only for sewing) When selected, the automatic presser foot lift is activated. The presser foot will raise to pivot height when stopping with the needle in the down position. When deselected, the presser foot will stay lowered even if the machine stops with the needle in down position. Balance (only for sewing) When sewing on special fabrics or doing a special technique, the balance may need to be adjusted. Start by sewing a stitch on a piece of scrap fabric. Use the left and right arrow buttons to balance the stitch between -7 and 7. When you sew again, the balance will be adjusted. The changes only affect the selected stitch. The setting will go back to default when you select another stitch. Cut jump stitches (only for embroidering) Your machine features the automatic function cut jump stitches. This function saves you time trimming after the embroidery is completed. Select cut jump stitches in the settings menu. As you embroider your machine will trim the top jump stitch thread and pull the thread end to the underside of the fabric. Note: Your machine will also cut the thread after you have changed to a new color. Hold the thread end when you start embroidering again, so that you can easily remove the thread end when cut. Designs marked "Cut jump stitch trim command" are programmed for cut jump stitches. Jump stitch trim commands can be added to any design using the 5D™ Organizer Software, included with your machine. Go to "File" and select "Add Trim Commands". Stop for cut (only for embroidering) When starting to embroider the machine stops after a few stitches asking you to cut the thread end. Use the OK button to turn on or off this function in the settings menu. Note: Stop for cut and cut jump stitches cannot be used at the same time. Stop for cut is also disabled if you use the foot control when embroidering. Language Use the left and right arrow buttons to change the language of all text in your machine. Audible alarm Turn all alarm sounds of the machine on or off. Default setting is on. Contrast Adjust the contrast of the graphic display by using the left and right arrow buttons. The value can be set between -20 to 20 in steps of 1. Software version Check the software version for your sewing machine. 2:15 Preparations
-
 1
1 -
2
-
3
-
4
-
5
-
6
-
7
-
8
-
9
-
10
-
11
-
12
-
13
-
14
-
15
-
16
-
17
-
18
-
19
-
20
-
21
-
 22
22 -
 23
23 -
 24
24 -
 25
25 -
 26
26 -
 27
27 -
 28
28 -
 29
29 -
 30
30 -
 31
31 -
 32
32 -
33
-
34
-
35
-
36
-
37
-
38
-
39
-
40
-
41
-
42
-
43
-
44
-
45
-
46
-
47
-
48
-
49
-
50
-
51
-
52
-
53
-
54
-
55
-
56
-
57
-
58
-
59
-
60
-
61
-
62
-
63
-
64
-
65
-
66
-
67
-
68
 |
 |