Pfaff creative 7560 Owner's Manual - Page 96
FL FL
 |
View all Pfaff creative 7560 manuals
Add to My Manuals
Save this manual to your list of manuals |
Page 96 highlights
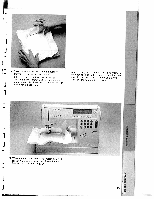
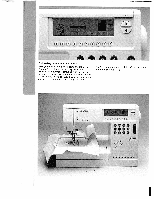
[ r L r L [ F L r i III With the cursor keys (7) the pattern in the E1 embroidery field can be moved to the right or the left. The gray field on the right of the display shows you the new position. To the left of this, the change is displayed in increments of 1 mm. This is very helpful tor This symbol only appears on patterns for which an 80 hoop (frame) is required. It, however, you wish to use a 1 20 hoop F instead, you can switch to the larger hoop by pressing number key 0. The embroidery I-. frame repositions itself. placing the pattern precisely on the fabric. The placing/movement within the embro idery hoop (frame) always refers to the middle of the motif. The hoop moves automatically to the pattern start when you begin to embroider. Note the change of position so that when you repeat the pattern, e.g. with several I-i When you press key 7 underneath this symbol, the embroidery frame traces around the size and position of the pattern within the embroidery field. This is to check whether the embroidery pattern is being embroidered in the correct position. r napkins, the same position is easily found. With keys 8 and 9 the pattern can be visibly moved up and down within the embroidery field. To return to the previous symbols (from page 1 7) press the "esc" key. Here the individual steps are also represen ted numerically. F L F L [ L L. (N C IC) C 0 20 I
-
 1
1 -
2
-
3
-
4
-
5
-
6
-
7
-
8
-
9
-
10
-
11
-
12
-
13
-
14
-
15
-
16
-
17
-
18
-
19
-
20
-
21
-
22
-
23
-
24
-
25
-
26
-
27
-
28
-
29
-
30
-
31
-
32
-
33
-
34
-
35
-
36
-
37
-
38
-
39
-
40
-
41
-
42
-
43
-
44
-
45
-
46
-
47
-
48
-
49
-
50
-
51
-
52
-
53
-
54
-
55
-
56
-
57
-
58
-
59
-
60
-
61
-
62
-
63
-
64
-
65
-
66
-
67
-
68
-
69
-
70
-
71
-
72
-
73
-
74
-
75
-
76
-
77
-
78
-
79
-
80
-
81
-
82
-
83
-
84
-
85
-
86
-
87
-
88
-
89
-
90
-
 91
91 -
 92
92 -
 93
93 -
 94
94 -
 95
95 -
 96
96 -
 97
97 -
 98
98 -
 99
99 -
 100
100 -
 101
101 -
102
-
103
-
104
-
105
-
106
-
107
-
108
-
109
-
110
-
111
-
112
-
113
-
114
-
115
-
116
-
117
-
118
-
119
-
120
-
121
-
122
-
123
-
124
-
125
-
126
-
127
-
128
-
129
-
130
-
131
-
132
-
133
-
134
-
135
-
136
-
137
-
138
-
139
-
140
-
141
-
142
-
143
-
144
-
145
-
146
-
147
-
148
-
149
-
150
-
151
-
152
-
153
-
154
-
155
 |
 |
