Pfaff creative vision 5.5 Owner's Manual - Page 103
Embroidery stitch editor - example
 |
View all Pfaff creative vision 5.5 manuals
Add to My Manuals
Save this manual to your list of manuals |
Page 103 highlights
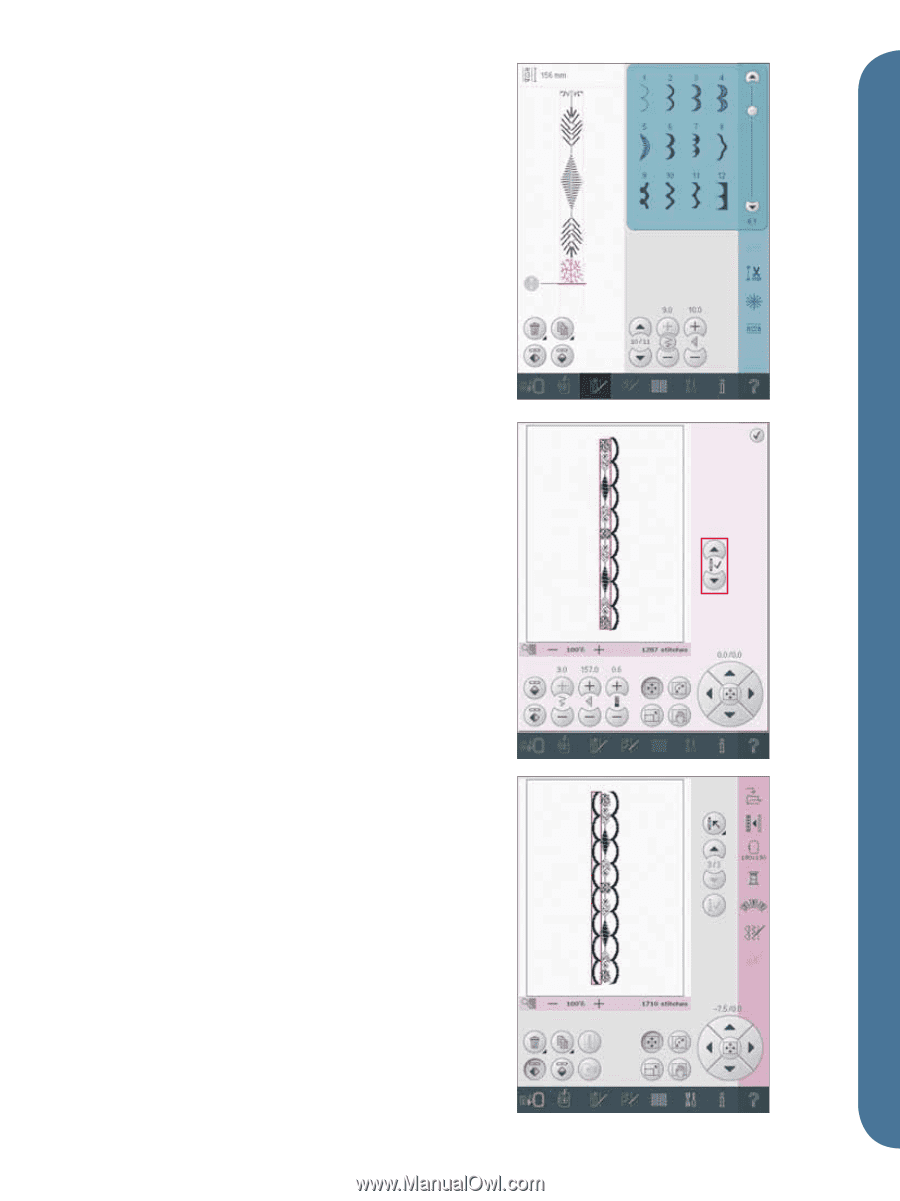
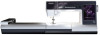
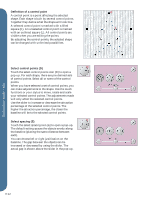
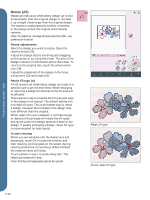
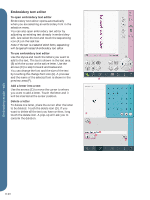
Embroidery stitch editor - example 1. Enter embroidery edit. 2. To create a sequence, open sequencing by touching the icon on the task bar (F). Select stitch number 4.3.30, then 4.3.17, 4.2.2, 4.3.17. Mirror the last inserted stitch end to end. Insert stitch 4.3.26, 4.3.17, 4.2.2, 4.3.17. Mirror the last inserted stitch and Ànally add stitch 4.3.30. 3. Close sequencing by touching the icon on the task bar. The sequence is loaded to embroidery edit. 4. Deselect the sequence by touching outside the design on the screen, or step by using the arrows. 5. Open sequencing once again. Select stitch number 4.1.2. 6. Long touch the duplicate icon. In the pop-up that appears, enter 7 and touch ok for a total of eight copies. 7. Close sequencing to load the second sequence to embroidery edit. 8. Touch the wheel center icon when move is selected, to move the new sequence to the center of the hoop. Move 7.5mm to the right. 9. Open Embroidery stitch editor (24). 10. Decrease the width of the second sequence to 8mm. 11. Toggle to the Àrst sequence, using the arrows (A). Increase the length of the sequence to Àt the second sequence, 157.0mm. Increase the density to 0.6. 12. Close Embroidery stitch editor. Select the second sequence and duplicate. Mirror side to side. Center the copy and move 7.5mm to the left of the Àrst sequence. F A Embroidery mode - edit 8:17
-
 1
1 -
2
-
3
-
4
-
5
-
6
-
7
-
8
-
9
-
10
-
11
-
12
-
13
-
14
-
15
-
16
-
17
-
18
-
19
-
20
-
21
-
22
-
23
-
24
-
25
-
26
-
27
-
28
-
29
-
30
-
31
-
32
-
33
-
34
-
35
-
36
-
37
-
38
-
39
-
40
-
41
-
42
-
43
-
44
-
45
-
46
-
47
-
48
-
49
-
50
-
51
-
52
-
53
-
54
-
55
-
56
-
57
-
58
-
59
-
60
-
61
-
62
-
63
-
64
-
65
-
66
-
67
-
68
-
69
-
70
-
71
-
72
-
73
-
74
-
75
-
76
-
77
-
78
-
79
-
80
-
81
-
82
-
83
-
84
-
85
-
86
-
87
-
88
-
89
-
90
-
91
-
92
-
93
-
94
-
95
-
96
-
97
-
 98
98 -
 99
99 -
 100
100 -
 101
101 -
 102
102 -
 103
103 -
 104
104 -
 105
105 -
 106
106 -
 107
107 -
 108
108 -
109
-
110
-
111
-
112
-
113
-
114
-
115
-
116
-
117
-
118
-
119
-
120
-
121
-
122
-
123
-
124
-
125
-
126
-
127
-
128
-
129
-
130
-
131
-
132
-
133
-
134
-
135
-
136
-
137
-
138
-
139
-
140
-
141
-
142
 |
 |