Pfaff creative vision 5.5 Owner's Manual - Page 73
Sewing a sequence
 |
View all Pfaff creative vision 5.5 manuals
Add to My Manuals
Save this manual to your list of manuals |
Page 73 highlights
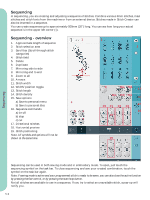
Directional stitches (17) Add directional stitches between stitches in a sequence. These stitches make it possible to move stitches in various directions and you can create new shapes and wider large-area borders. Directional stitches are straight stitches with a length of approximately 1mm and can be used in 16 different directions. Open the directional stitches pop-up. The selected angle will be indicated in red (A) in the directional Àeld (B). The angle will also be shown on the popup (C). Touch the directional Àeld to select which angle you want to insert a stitch. You can either touch the desired line on the white area or touch and drag the red line and then release it at the desired angle. When the intended angle is selected, touch the insert icon (D) and one stitch will be inserted in the sequence at the cursor position. The directional stitch can be deleted, duplicated or mirrored without closing the directional stitches pop-up. Horizontal preview (18) To see your sequence horizontally, touch the preview icon. Your sequence will be shown on a pop-up. If it is too long for the window, it is possible to zoom to all (E) to see the entire sequence. You can also scroll through the sequence with the arrows (F). Sewing a sequence To sew the sequence, return to sewing mode or embroidery edit. Close sequencing by deselecting the sequencing icon on the task bar. Adjustments made in sewing mode or embroidery mode will affect the whole sequence. However, these changes will not be saved if you return to sequencing. In embroidery edit, the position of the sequence will be kept. In sewing mode it is possible to start sewing anywhere in the sequence. Use the arrows (G) to step through the sequence. 17 18 E G B A D C F Sequencing 5:5
-
 1
1 -
2
-
3
-
4
-
5
-
6
-
7
-
8
-
9
-
10
-
11
-
12
-
13
-
14
-
15
-
16
-
17
-
18
-
19
-
20
-
21
-
22
-
23
-
24
-
25
-
26
-
27
-
28
-
29
-
30
-
31
-
32
-
33
-
34
-
35
-
36
-
37
-
38
-
39
-
40
-
41
-
42
-
43
-
44
-
45
-
46
-
47
-
48
-
49
-
50
-
51
-
52
-
53
-
54
-
55
-
56
-
57
-
58
-
59
-
60
-
61
-
62
-
63
-
64
-
65
-
66
-
67
-
 68
68 -
 69
69 -
 70
70 -
 71
71 -
 72
72 -
 73
73 -
 74
74 -
 75
75 -
 76
76 -
 77
77 -
 78
78 -
79
-
80
-
81
-
82
-
83
-
84
-
85
-
86
-
87
-
88
-
89
-
90
-
91
-
92
-
93
-
94
-
95
-
96
-
97
-
98
-
99
-
100
-
101
-
102
-
103
-
104
-
105
-
106
-
107
-
108
-
109
-
110
-
111
-
112
-
113
-
114
-
115
-
116
-
117
-
118
-
119
-
120
-
121
-
122
-
123
-
124
-
125
-
126
-
127
-
128
-
129
-
130
-
131
-
132
-
133
-
134
-
135
-
136
-
137
-
138
-
139
-
140
-
141
-
142
 |
 |
