Philips 50PF9631D User manual - Page 5
Getting started - hdmi
 |
UPC - 609585113824
View all Philips 50PF9631D manuals
Add to My Manuals
Save this manual to your list of manuals |
Page 5 highlights
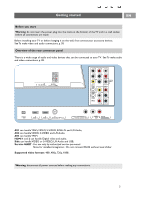
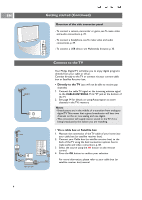
Getting started EN Before you start Warning: do not insert the power plug into the mains at the bottom of the TV and in a wall socket before all connections are made. Before installing your TV or before hanging it on the wall, first connect your accessory devices. See To make video and audio connections, p. 38. Overview of the rear connector panel There is a wide range of audio and video devices that can be connected to your TV. See To make audio and video connections, p. 38. H Pr L V Pb R VIDEO AV1 S-VIDEO Y DIGITAL AUDIO IN AV3 VIDEO Pr S-VIDEO AV2 L Pb R Y SERVICE UART o HDMI 1 o HDMI 2 o ANTENNA 75 DISPLAY SYNCHRONIZED o DIGITAL AUDIO OUT o AUDIO o DISPLAY L OUT R SYNCHRONIZED H Pr L V Pb R VIDEO AV1 S-VIDEO Y DIGITAL AUDIO IN AV3 VIDEO Pr S-VIDEO AV2 L Pb R Y SERVICE UART o HDMI 1 o HDMI 2 o ANTENNA 75 DISPLAY SYNCHRONIZED o DIGITAL AUDIO OUT o AUDIO o DISPLAY L OUT R SYNCHRONIZED AV1 can handle YPbPr,VIDEO, S-VIDEO, RGB-HV and L/R Audio, AV2 can handle VIDEO, S-VIDEO and L/R Audio, AV3 can handle YPbPr, HDMI 1 and 2 can handle Digital video and audio, Side can handle VIDEO or S-VIDEO, L/R Audio and USB, Service UART : For use only by authorized service personnel. Note for installers/integrators : Do not connect RS232 without level shifter. Supported video formats: 480i, 480p, 720p, 1080i. Warning: disconnect all power sources before making any connections. 3
-
 1
1 -
 2
2 -
 3
3 -
 4
4 -
 5
5 -
 6
6 -
 7
7 -
 8
8 -
 9
9 -
 10
10 -
 11
11 -
12
-
13
-
14
-
15
-
16
-
17
-
18
-
19
-
20
-
21
-
22
-
23
-
24
-
25
-
26
-
27
-
28
-
29
-
30
-
31
-
32
-
33
-
34
-
35
-
36
-
37
-
38
-
39
-
40
-
41
-
42
-
43
-
44
-
45
-
46
-
47
-
48
-
49
-
50
-
51
-
52
-
53
-
54
-
55
-
56
-
57
-
58
-
59
-
60
-
61
-
62
-
63
-
64
 |
 |
