Philips CDR800 User manual - Page 23
Internal recording - ye cdr 800
 |
View all Philips CDR800 manuals
Add to My Manuals
Save this manual to your list of manuals |
Page 23 highlights
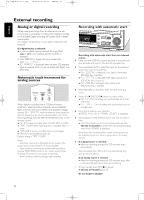
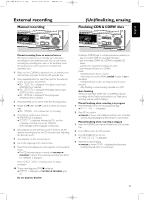
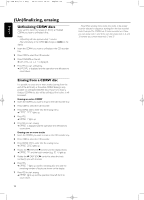
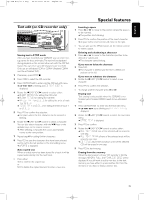
xp CDR 800/17.1 eng. 25-07-2001 15:12 Pagina 20 Internal recording Recording a single track Recording a program English Recording a single track during playback 1 Make sure the CDR(W) is absolutely free of scratches and dust particles and insert it into the CD recorder tray. 2 Play your desired track on the CD changer. 3 Press RECORD on the set to enter the recording menu. ➜ REC TR and the tracknumber are displayed. 4 Press either: YES to start recording, ➜The arrow lights, RECORD IN PROGRESS is shown, playback and recording start from the beginning of the selected track and the actual recording time left starts to count down. or NO to continue playback. Do not forget to finalize! Recording an entire CD High speed recording and automatic finalizing of the current disc 1 Make sure the CDR(W) is absolutely free of scratches and dust particles and insert it into the CD recorder tray. 2 Select the required disc by pressing CD1, CD2 or CD3. 3 Press COPY CD to enter into the record mode. ➜ The arrow and theYES key start blinking.The remaining recording time of the CDR(W), the total playing time of the source CD and RECORD CD1 (or 2, 3) ? are displayed. 4 PressYES to start recording and finalizing. ➜ The arrow lights, RECORD IN PROGRESS and FINALIZE are shown, high speed recording and finalizing start and the actual recording time left starts to count down. Note: If a program was already available before pressing COPY CD, this will be ignored. PROGRAM goes off and the current disc will be recorded.After finishing the recording, PROGRAM is shown and the program is available again. Do not forget to finalize! 20 High speed recording and automatic finalizing (optional) of the current program 1 Make sure the CDR(W) is absolutely free of scratches and dust particles and insert it into the CD recorder tray. 2 Select and store all desired tracks in the CD changer memory (see "Programming track numbers"). 3 Press COMPILE CD to enter into the record mode. ➜ The arrow starts blinking.The remaining recording time of the CDR(W), the total playing time of the program and REC PROG ? are displayed. Note: If no program is available and you press COMPILE CD, you enter immediately into the program menu. Start programming and return to the record mode by pressing PROGRAM or COMPILE CD. 4 Press either: NO to change the program. ➜ PROGRAM starts blinking. Now you can change the program (see "Programming") and return to the record mode by pressing COMPILE CD. or YES to confirm recording. ➜ AUTO FINAL ? is displayed. 5 Press either: YES, if the CDR(W) is to be finalized after recording, or NO, if the CDR(W) is not to be finalized after recording. ➜ The arrow lights, RECORD IN PROGRESS is shown, high speed recording and finalize (if selected) start and the actual recording time left starts to count down. Do not forget to finalize!
-
 1
1 -
2
-
3
-
4
-
5
-
6
-
7
-
8
-
9
-
10
-
11
-
12
-
13
-
14
-
15
-
16
-
17
-
 18
18 -
 19
19 -
 20
20 -
 21
21 -
 22
22 -
 23
23 -
 24
24 -
 25
25 -
 26
26 -
 27
27 -
 28
28 -
29
-
30
-
31
-
32
-
33
-
34
-
35
-
36
-
37
-
38
-
39
-
40
-
41
-
42
-
43
-
44
-
45
-
46
-
47
-
48
-
49
-
50
-
51
-
52
-
53
-
54
-
55
-
56
-
57
-
58
-
59
-
60
-
61
-
62
-
63
-
64
-
65
-
66
-
67
-
68
-
69
-
70
-
71
-
72
-
73
-
74
-
75
-
76
-
77
-
78
-
79
-
80
-
81
-
82
-
83
 |
 |
