Philips MX5600D User manual - Page 19
Connections optional - owners manual
 |
UPC - 037849932025
View all Philips MX5600D manuals
Add to My Manuals
Save this manual to your list of manuals |
Page 19 highlights
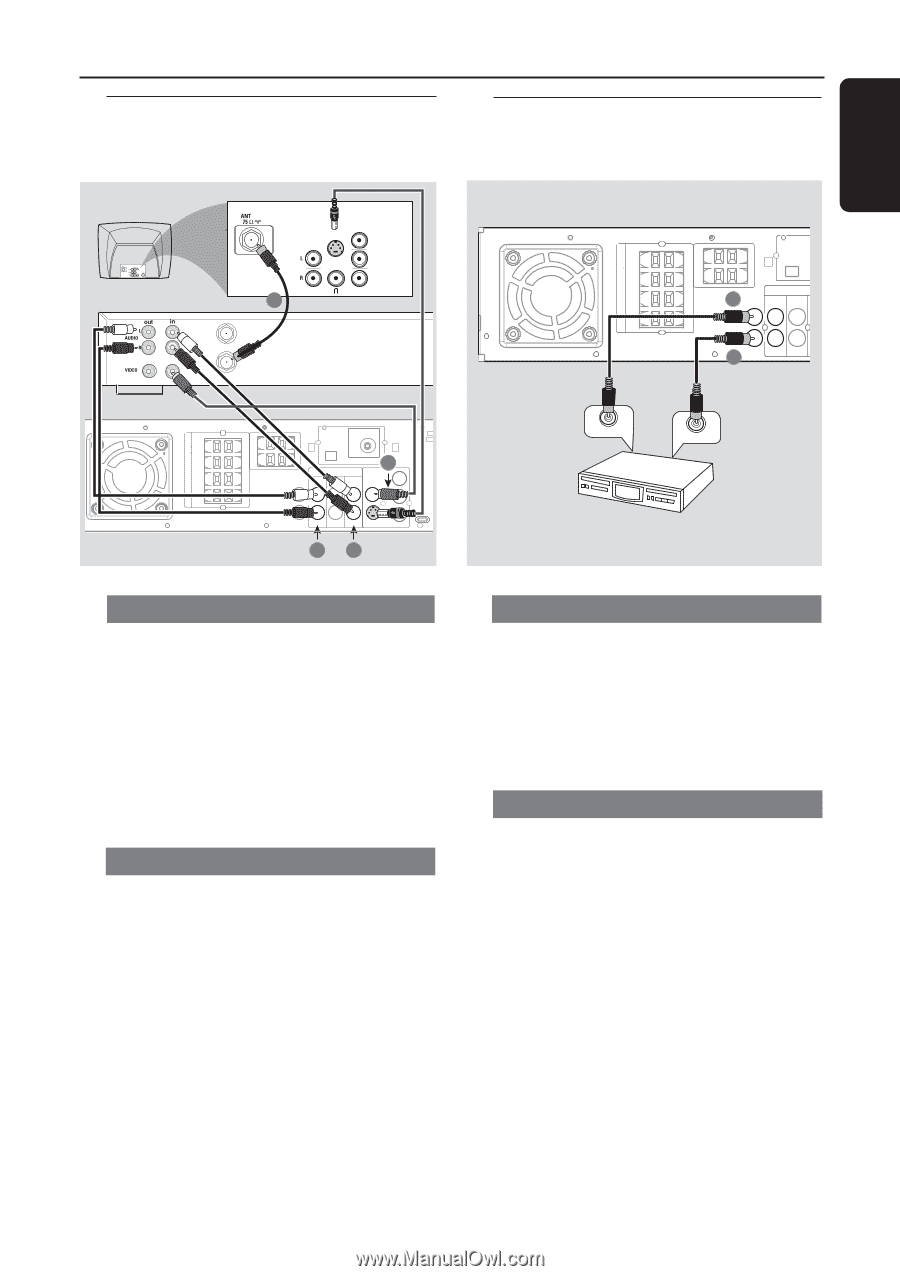
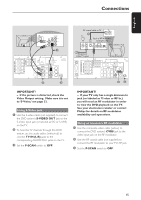
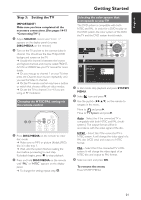
Connecting a VCR or Cable/Satellite Box Connections (optional) Connecting digital audio equipment SPEAKER SYSTEMS (8Ω) SURROUND CENTER FRONT SUB-WOOFER SPEAKER SYSTEMS (8Ω) SURROUND CENTER FRONT SUB-WOOFER English AUDIO OUT COMPONENT VIDEO IN S-VIDEO IN Pr/Cr VIDEO IN Pb/Cb Y 1 ANT IN VCR or Cable/Satellite TO TV Box L AM R C AUDIO SL 2 DIGITAL AUX OUT IN TV IN SR L R 1 DIGITAL IN L AM R 3 FM ANTENNA C AUDIO VIDEO DIGITAL AUX TV LINE OUT Pr SL OUT IN IN OUT CVBS SR L Pb R DIGITAL IN Y S-VIDEO P-SCAN ON OFF 24 DIGITAL IN DIGITAL OUT (for example) CD Recorder Viewing and listening to the playback 1 Connect the VCR or Cable/Satellite Box to the TV as shown. 2 Connect the DVD system's AUX IN (R/L) jacks to the AUDIO OUT jacks on the VCR or cable/satellite box. Before starting operation, press AUX/DI on the remote to select "AUX" in order to activate the input source. Using the VCR for recording DVDs Some DVDs are copy-protected. You cannot record or dub protected discs using a VCR. 3 Connect the DVD system's CVBS jack to the VIDEO IN jack on the VCR. 4 Connect the DVD system's LINE OUT (R/L) jacks to the AUDIO IN jacks on the VCR. This will allow you to make analog stereo (two channel, right and left) recordings. To view DVD playback while recording, you must connect the DVD system to your TV using the S-VIDEO (as shown above) or the Component (Pr Pb Y) video connection. Listening to the playback 1 Connect the DVD system's DIGITAL IN jack to the DIGITAL OUT jack on a digital audio device. Before starting operation, press AUX/DI on the remote to select "DI" in order to activate the input source. Recording (digital) 2 Connect the DVD system's DIGITAL OUT jack to the DIGITAL IN jack on a digital recording device (DTS-Digital Theater System compatible, with a Dolby Digital decoder, for example.) Before starting operation, set the DIGITAL OUTPUT according to the audio connection. (See page 33 "Setting the digital output".) Notes: - Some DVDs are copy-protected. You cannot record the disc through a VCR or digital recording device. - Always refer to the owner's manual of the other equipment for complete connection and usage details. 17
-
 1
1 -
2
-
3
-
4
-
5
-
6
-
7
-
8
-
9
-
10
-
11
-
12
-
13
-
 14
14 -
 15
15 -
 16
16 -
 17
17 -
 18
18 -
 19
19 -
 20
20 -
 21
21 -
 22
22 -
 23
23 -
 24
24 -
25
-
26
-
27
-
28
-
29
-
30
-
31
-
32
-
33
-
34
-
35
-
36
-
37
-
38
-
39
-
40
-
41
-
42
-
43
-
44
-
45
-
46
-
47
-
48
-
49
-
50
 |
 |