Pioneer 310-S Owner's Manual - Page 27
Getting started, Basic playback
 |
UPC - 012562656816
View all Pioneer 310-S manuals
Add to My Manuals
Save this manual to your list of manuals |
Page 27 highlights
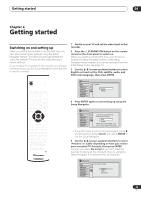
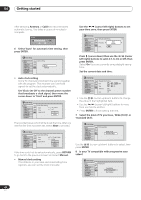
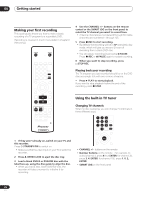
Getting started 04 Note • Antenna channels are numbered 2 through 69. Cable channels are numbered 1 through 125. • You can't change TV channels during playback or recording, or while in recording standby. Changing audio channels Some TV programs are broadcast with both a main and a Second Audio Program (SAP). You can change the TV audio using the AUDIO button. STANDBY/ON OPEN/CLOSE AUDIO ENTER • Press AUDIO to change the TV audio. The current audio channel is displayed on-screen. Mono SAP Stereo • If SAP is selected, but there is no SAP channel being broadcast, you will still hear the main audio channel. • If the sound is poor quality when set to Stereo, you can often improve it by changing to Mono. Basic playback This section shows you how to use your recorder for playback of discs (DVD, CD, etc.). More playback features, such as repeat and program play, are covered in the next chapter. Important • Throughout this manual, the term 'DVD' means playback-only DVD-Video discs and DVD-R/RW. If a function is specific to a particular kind of DVD disc, it is specified. • Some DVD-Video discs don't allow certain playback controls to operate at certain points in the disc. This is not a malfunction. PLAY STOP 1 Press STANDBY/ON to switch on. Also turn on your TV and make sure that it is set to the correct video input. 2 Press OPEN/CLOSE to open the disc tray. 3 Load a disc. Load a disc with the label side facing up, using the disc tray guide to align the disc (if you're loading a doublesided DVD-Video disc, load it with the side you want to play face down). • If you want to play a DTS audio CD, please first read the note on page 28. 4 Press PLAY to start playback. • If you're playing a DVD-Video or Video CD, a disc menu may appear when you start playback. Use the / / / (cursor) buttons and ENTER to navigate DVD disc menus, and the number buttons and ENTER for Video CD menus. • See the following sections for more details on playing specific kinds of discs. 5 To stop playback, press STOP. 6 When you've finished using the recorder, eject the disc and switch the recorder back into standby. • To open/close the disc tray, press OPEN/CLOSE. Remove the disc before putting the recorder into standby. • Press STANDBY/ON to switch the recorder into standby. 27 En
-
 1
1 -
2
-
3
-
4
-
5
-
6
-
7
-
8
-
9
-
10
-
11
-
12
-
13
-
14
-
15
-
16
-
17
-
18
-
19
-
20
-
21
-
 22
22 -
 23
23 -
 24
24 -
 25
25 -
 26
26 -
 27
27 -
 28
28 -
 29
29 -
 30
30 -
 31
31 -
 32
32 -
33
-
34
-
35
-
36
-
37
-
38
-
39
-
40
-
41
-
42
-
43
-
44
-
45
-
46
-
47
-
48
-
49
-
50
-
51
-
52
-
53
-
54
-
55
-
56
-
57
-
58
-
59
-
60
-
61
-
62
-
63
-
64
-
65
-
66
-
67
-
68
-
69
-
70
-
71
-
72
-
73
-
74
-
75
-
76
-
77
-
78
-
79
-
80
-
81
-
82
-
83
-
84
-
85
-
86
-
87
-
88
-
89
-
90
-
91
-
92
-
93
-
94
-
95
-
96
-
97
-
98
-
99
-
100
 |
 |
