Pioneer 504CMX Operating Instructions - Page 37
Energy saving settings, ENERGY SAVE
 |
UPC - 012562689784
View all Pioneer 504CMX manuals
Add to My Manuals
Save this manual to your list of manuals |
Page 37 highlights
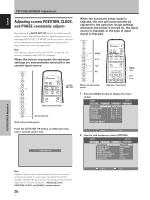
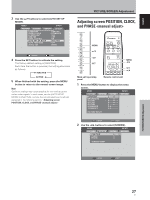
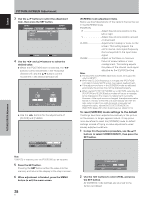
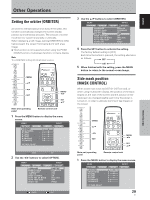
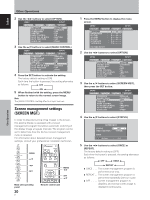
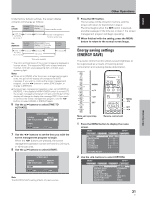
English Under factory default settings, the screen display contents will change as follows: Set [ONCE] Inverse image* White mask display Power standby mode [TIME TO ACTIVATE] (set in step 7) 10 minutes 30 minutes Screen management function ends here Set [REPEAT] Inverse image* [TIME TO ACTIVATE] (set in step 7) 10 minutes White mask Power display standby mode 30 minutes 24 hours Inverse image* 10 minutes This cycle repeats * The color and brightness of the current image are displayed in inverse values. The respective RGB color output levels are inverted, with light areas appearing dark, and dark areas appearing light. Notes ÷ When set to [ONCE], after the screen management program ends, this part of the display will change to the [OFF] message. If you wish to continue the screen management program, use the 2/3 buttons to select [ONCE] again, or change to [REPEAT]. ÷ During screen management operation when set to [ONCE] or [REPEAT], if the display's MAIN POWER switch is turned OFF, the screen management program will end, and this part of the display will change to display the message [OFF]. If you wish to continue the screen management program, use the 2/3 buttons to select [ONCE] or [REPEAT] again. 6 Use the 5/∞ buttons to select [TIME TO ACTIVATE]. SCREEN MGT. STATUS : TIME TO ACTIVATE : REPEAT 01H00M START SET RETURN MENU EXIT 7 Use the 2/3 buttons to set the time you wish the screen management program to begin. When the 2/3 buttons are pressed, the screen management operation can be set from 0 to 24 hours, in 10-minute units. 8 Use the 5/∞ buttons to select [START]. SCREEN MGT. STATUS : TIME TO ACTIVATE : REPEAT 00H10M START SET SET MENU EXIT Note The [SCREEN MGT.] setting affects all input sources. Other Operations 9 Press the SET button. The set value will be stored in memory, and the screen will return to that shown in step 2. The timer begins when the SET button is pressed, and after passage of the time set in step 7, the screen management program will begin operating. 10 When finished with the setting, press the MENU button to return to the normal screen image. Energy saving settings (ENERGY SAVE) The power control function allows screen brightness to be suppressed as a means of lowering power consumption and reducing display deterioration. MENU 5/∞ 2/3 SET MENU 2/3 SET 5/∞ Main unit operating panel Remote control unit 1 Press the MENU button to display the menu screen. MENU PICTURE SCREEN CONTRAST : BRIGHTNESS : R.LEVEL : G.LEVEL : B.LEVEL : H.ENHANCE : V. E N H A N C E : SETUP 0 0 0 0 0 0 0 INPUT1 OPTION PICTURE RESET 2 Use the 2/3 buttons to select [OPTION]. MENU INPUT1 PICTURE SCREEN SETUP OPTION LANGUAGE ENERGY SAVE SCREEN MGT. ORBITER MASK CONTROL AUTO SET UP MODE AUTO FUNCTION AUDIO OUT : ENGLISH : STANDARD : OFF : OFF : ON : INACTIVE : OFF : FIXED Other Operations 31 En
-
 1
1 -
2
-
3
-
4
-
5
-
6
-
7
-
8
-
9
-
10
-
11
-
12
-
13
-
14
-
15
-
16
-
17
-
18
-
19
-
20
-
21
-
22
-
23
-
24
-
25
-
26
-
27
-
28
-
29
-
30
-
31
-
 32
32 -
 33
33 -
 34
34 -
 35
35 -
 36
36 -
 37
37 -
 38
38 -
 39
39 -
 40
40 -
 41
41 -
 42
42 -
43
-
44
-
45
-
46
-
47
-
48
-
49
-
50
-
51
-
52
-
53
-
54
-
55
-
56
-
57
-
58
-
59
-
60
-
61
-
62
-
63
-
64
-
65
-
66
-
67
-
68
-
69
-
70
-
71
-
72
-
73
-
74
-
75
-
76
-
77
-
78
-
79
-
80
-
81
-
82
-
83
-
84
-
85
-
86
-
87
-
88
-
89
-
90
-
91
-
92
-
93
-
94
-
95
 |
 |
