Pioneer 9000 Owner's Manual - Page 74
Adjusting the Time Alignment
 |
UPC - 012562585574
View all Pioneer 9000 manuals
Add to My Manuals
Save this manual to your list of manuals |
Page 74 highlights
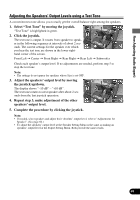
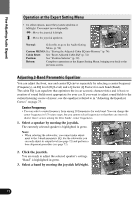
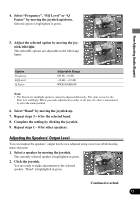
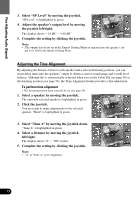
Fine Adjusting Audio (Expert) 3. Select "SP Level" by moving the joystick. "SP Level" is highlighted in green. 4. Adjust the speaker's output level by moving the joystick left/right. The display shows "-10 dB" - "+10 dB". 5. Complete the setting by clicking the joystick. Note: • The output level you set at the Expert Setting Menu is imported into the speaker's out- put level field in the Speaker Setting Menu. Adjusting the Time Alignment By adjusting the distance between each speaker and a selected listening position, you can insert delay times into the speakers' output to obtain a correct sound image and overall level balance. Although this is automatically achieved when you set the Cabin EQ (see page 58) or the listening position (see page 59), the Time Alignment feature provides a fine adjustment. To perform time alignment • The listening position must correctly be set (see page 59). 1. Select a speaker by moving the joystick. The currently selected speaker is highlighted in green. 2. Click the joystick. You are ready to make adjustments to the selected speaker. "Band" is highlighted in green. 3. Select "Time A" by moving the joystick down. "Time A" is highlighted in green. 4. Select a distance by moving the joystick left/right. The display shows "0" - "200" inches. 5. Complete the setting by clicking the joystick. Note: • "A" in "Time A" is for Alignment. 73
-
 1
1 -
2
-
3
-
4
-
5
-
6
-
7
-
8
-
9
-
10
-
11
-
12
-
13
-
14
-
15
-
16
-
17
-
18
-
19
-
20
-
21
-
22
-
23
-
24
-
25
-
26
-
27
-
28
-
29
-
30
-
31
-
32
-
33
-
34
-
35
-
36
-
37
-
38
-
39
-
40
-
41
-
42
-
43
-
44
-
45
-
46
-
47
-
48
-
49
-
50
-
51
-
52
-
53
-
54
-
55
-
56
-
57
-
58
-
59
-
60
-
61
-
62
-
63
-
64
-
65
-
66
-
67
-
68
-
 69
69 -
 70
70 -
 71
71 -
 72
72 -
 73
73 -
 74
74 -
 75
75 -
 76
76 -
 77
77 -
 78
78 -
 79
79 -
80
-
81
-
82
-
83
-
84
-
85
-
86
-
87
-
88
-
89
-
90
-
91
-
92
-
93
-
94
-
95
-
96
-
97
-
98
-
99
-
100
-
101
-
102
-
103
-
104
 |
 |
