Pioneer AVH-X1800S Owner s Manual - Page 8
Basic operation - dvd
 |
View all Pioneer AVH-X1800S manuals
Add to My Manuals
Save this manual to your list of manuals |
Page 8 highlights
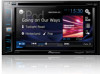
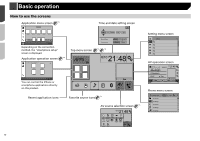
Basic operation 1 LCD screen 2 Volume (+/-) button 3 DISP button On the AV operation screen, press to turn the display off. On the Application screen or navigation mode, press to display the side control bar. Press and hold to turn the display off. p When the display is turned off, touch the screen to revert to the original screen. 4 button Press to display the top menu screen. Press and hold to activate the voice recognition function. Refer to Using the voice recognition function (for iPhone) on page 15 5 MODE Press to switch between the Application screen button and the AV operation screen. Press and hold to switch to the camera view mode. 6 TRK ( /) button Press to return to the previous track (chapter) or go to the next track (chapter). Press and hold to perform fast reverse or fast forward. Press to answer or end a call. 7 button 8 RESET button Refer to Resetting the microprocessor on page 6 9 Discloading Refer to Inserting and ejecting a disc on page 8 slot Remote control 1 23 8 a 7 4 5 9 b 6 c 8 1 Volume (+/-) 2 MODE Press to switch between the Application screen and the AV operation screen. Press and hold to switch to the camera view mode. 3 SRC Press to cycle through all the available sources. Press and hold to turn the source off. 4 TOP MENU Returns to the top menu during DVD playback. 5 MENU Displays the DVD menu during DVD playback. 6 Thumb pad Selects a menu on the DVD menu. 7 MUTE 8 AUDIO Changes the audio language, subtitle language SUBTITLE or viewing angle during DVD playback. ANGLE 9 BAND/ ESC Selects the tuner band when tuner is selected as a source. Cancels the control mode of functions. Switches between media file types when playing the data of Disc, USB. 10 RETURN Returns to the specified point and begins playback from there. 11 Pauses or resumes playback. or For audio: Press and hold to perform fast reverse or fast forward. For video: Press to perform fast reverse or fast forward. or Press to return to the previous track (chapter) or go to the next track (chapter). Press to answer or end a call. Stops playback. If you resume playback, playback will start from the point where you stopped. Touch the key again to stop playback completely. 12 FOLDER/P. Selects the next or previous disc or folder. CH Recalls radio station frequencies assigned to preset channel keys. Notes on using the LCD panel WARNING Keep hands and fingers clear of this product when opening, closing, or adjusting the LCD panel. Be especially cautious of children's hands and fingers. Do not use with the LCD panel left open. It may result in injury in the event of an accident. CAUTION Do not open or close the LCD panel by force. It may cause a malfunction. Do not operate this product until the LCD panel has completely opened or closed. The LCD panel may stop at that angle for safety. Do not place a glass or can on the open LCD panel. Adjusting the LCD panel angle X5800BHS X4800BS 1 Press the button. 2 Touch or LCD panel. to adjust the angle of the 3 Touch . Returns to the previous screen. Inserting/ejecting/connecting media CAUTION Do not insert anything other than a disc into the disc-loading slot. Inserting and ejecting a disc Inserting a disc X5800BHS X4800BS 1 Press the button. 2 Touch to open the LCD panel. 3 Insert a disc into the disc-loading slot. Ejecting a disc X5800BHS X4800BS 1 Press the button. 2 Touch to open the LCD panel. 3 Remove the disc, and press the button.
-
 1
1 -
2
-
 3
3 -
 4
4 -
 5
5 -
 6
6 -
 7
7 -
 8
8 -
 9
9 -
 10
10 -
 11
11 -
 12
12 -
 13
13 -
14
-
15
-
16
-
17
-
18
-
19
-
20
-
21
-
22
-
23
-
24
-
25
-
26
-
27
-
28
-
29
-
30
-
31
-
32
-
33
-
34
-
35
-
36
-
37
-
38
-
39
-
40
-
41
-
42
-
43
-
44
-
45
-
46
-
47
-
48
-
49
-
50
-
51
-
52
-
53
-
54
-
55
-
56
-
57
-
58
-
59
-
60
-
61
-
62
-
63
-
64
-
65
-
66
-
67
-
68
-
69
-
70
-
71
-
72
-
73
-
74
-
75
-
76
-
77
-
78
-
79
-
80
-
81
-
82
-
83
-
84
-
85
-
86
-
87
-
88
-
89
-
90
-
91
-
92
-
93
-
94
-
95
-
96
-
97
-
98
-
99
-
100
-
101
-
102
-
103
-
104
-
105
-
106
-
107
-
108
-
109
-
110
-
111
-
112
-
113
-
114
-
115
-
116
-
117
-
118
-
119
-
120
-
121
-
122
-
123
-
124
-
125
-
126
-
127
-
128
-
129
-
130
-
131
-
132
-
133
-
134
-
135
-
136
-
137
-
138
-
139
-
140
-
141
-
142
-
143
-
144
-
145
-
146
-
147
-
148
-
149
-
150
-
151
-
152
-
153
-
154
-
155
-
156
-
157
-
158
-
159
-
160
-
161
-
162
-
163
-
164
-
165
-
166
-
167
-
168
-
169
-
170
-
171
-
172
-
173
-
174
-
175
-
176
-
177
-
178
-
179
-
180
-
181
-
182
-
183
-
184
-
185
-
186
-
187
-
188
-
189
-
190
-
191
-
192
-
193
-
194
-
195
-
196
-
197
-
198
-
199
-
200
-
201
-
202
-
203
-
204
-
205
-
206
-
207
-
208
-
209
-
210
-
211
-
212
-
213
-
214
-
215
-
216
 |
 |
