Pioneer AVH-X1800S Owner s Manual - Page 9
On first-time startup
 |
View all Pioneer AVH-X1800S manuals
Add to My Manuals
Save this manual to your list of manuals |
Page 9 highlights
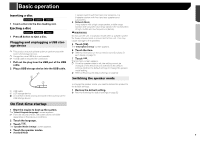
Basic operation Inserting a disc X3800BHS X2800BS X1800S 1 Insert a disc into the disc-loading slot. Ejecting a disc X3800BHS X2800BS X1800S 1 Press button to eject a disc. Plugging and unplugging a USB storage device p This product may not achieve optimum performance with some USB storage devices. p Connection via a USB hub is not possible. p A USB cable is required for connection. 1 Pull out the plug from the USB port of the USB cable. 2 Plug a USB storage device into the USB cable. 1 2 1 USB cable 2 USB storage device Check that no data is being accessed before pulling out the USB storage device. 4-speaker system with front and rear speakers, or a 6-speaker system with front and rear speakers and subwoofers. Network Mode 3-way system with a high range speaker, middle range speaker and subwoofer (low range speaker) for reproduction of high, middle and low frequencies (bands). WARNING Do not use the unit in standard mode when a speaker system for 3-way network mode is connected to this unit. This may cause damage to the speakers. 5 Touch [OK]. The "Smartphone Setup" screen appears. 6 Touch the item. Refer to Information on the connections and functions for each device on page 18 7 Touch . The top menu screen appears. p Once the speaker mode is set, the setting cannot be changed unless this product is restored to the default settings. Restore the default settings to change the speaker mode setting. Refer to Restoring the default settings on page 52 Switching the speaker mode To change the speaker mode, you need to restore this product to the default settings. 1 Restore the default setting. Refer to Restoring the default settings on page 52 On first-time startup 1 Start the engine to boot up the system. The "Select Program Language" screen appears. p From the second time on, the screen shown will differ depending on the previous conditions. 2 Touch the language. 3 Touch . The "Speaker Mode Settings" screen appears. 4 Touch the speaker modes. Standard Mode 9
-
 1
1 -
2
-
3
-
 4
4 -
 5
5 -
 6
6 -
 7
7 -
 8
8 -
 9
9 -
 10
10 -
 11
11 -
 12
12 -
 13
13 -
 14
14 -
15
-
16
-
17
-
18
-
19
-
20
-
21
-
22
-
23
-
24
-
25
-
26
-
27
-
28
-
29
-
30
-
31
-
32
-
33
-
34
-
35
-
36
-
37
-
38
-
39
-
40
-
41
-
42
-
43
-
44
-
45
-
46
-
47
-
48
-
49
-
50
-
51
-
52
-
53
-
54
-
55
-
56
-
57
-
58
-
59
-
60
-
61
-
62
-
63
-
64
-
65
-
66
-
67
-
68
-
69
-
70
-
71
-
72
-
73
-
74
-
75
-
76
-
77
-
78
-
79
-
80
-
81
-
82
-
83
-
84
-
85
-
86
-
87
-
88
-
89
-
90
-
91
-
92
-
93
-
94
-
95
-
96
-
97
-
98
-
99
-
100
-
101
-
102
-
103
-
104
-
105
-
106
-
107
-
108
-
109
-
110
-
111
-
112
-
113
-
114
-
115
-
116
-
117
-
118
-
119
-
120
-
121
-
122
-
123
-
124
-
125
-
126
-
127
-
128
-
129
-
130
-
131
-
132
-
133
-
134
-
135
-
136
-
137
-
138
-
139
-
140
-
141
-
142
-
143
-
144
-
145
-
146
-
147
-
148
-
149
-
150
-
151
-
152
-
153
-
154
-
155
-
156
-
157
-
158
-
159
-
160
-
161
-
162
-
163
-
164
-
165
-
166
-
167
-
168
-
169
-
170
-
171
-
172
-
173
-
174
-
175
-
176
-
177
-
178
-
179
-
180
-
181
-
182
-
183
-
184
-
185
-
186
-
187
-
188
-
189
-
190
-
191
-
192
-
193
-
194
-
195
-
196
-
197
-
198
-
199
-
200
-
201
-
202
-
203
-
204
-
205
-
206
-
207
-
208
-
209
-
210
-
211
-
212
-
213
-
214
-
215
-
216
 |
 |
