Pioneer AVIC-88DVD Other Manual - Page 3

Contents - install

Page 3 highlights

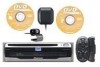
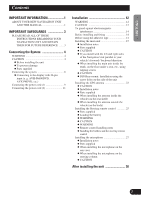
ENGLISH ESPAÑOL DEUTSCH Contents IMPORTANT INFORMATION 1 ABOUT YOUR NEW NAVIGATION UNIT AND THIS MANUAL 1 IMPORTANT SAFEGUARDS 3 PLEASE READ ALL OF THESE INSTRUCTIONS REGARDING YOUR NAVIGATION UNIT AND RETAIN THEM FOR FUTURE REFERENCE ...... 3 Connecting the System 4 WARNING 4 CAUTION 4 - Before installing the unit - To prevent damage - Parts supplied Connecting the system 8 - Connecting to the display with 26-pin input (e. g. AVH-P6600DVD, AVX-P8DVD, etc.) Connecting the power cord (1 9 Connecting the power cord (2 11 Installation 12 WARNING 12 CAUTION 12 To guard against electromagnetic interference 14 Before installing and fixing 14 Before using the adhesive tape 14 Installing the main unit 15 - Installation notes - Parts supplied - CAUTION - If you install with the left and right sides of the Navigation Unit parallel to your vehicle's forward / backward direction - When installing the main unit inside the trunk, on the floor under a seat, etc., using tapping screws - CAUTION - DIN Rear-mount: Installation using the screw holes on the side of the unit Installing the GPS antenna 22 - CAUTION - Installation notes - Parts supplied - When installing the antenna inside the vehicle (on the rear shelf) - When installing the antenna outside the vehicle (on the body) Installing the Steering remote control 25 - Parts supplied - Loading the battery - WARNING - CAUTION - WARNING - Remote control handling notes - Installing the holders and the steering remote control Installing the microphone 27 - Installation notes - Parts supplied - When installing the microphone on the sun visor - When installing the microphone on the steering column - CAUTION After installing the unit 30 FRANÇAIS ITALIANO NEDERLANDS 2

  • 1
  • 2
  • 3
  • 4
  • 5
  • 6
  • 7
  • 8
  • 9
  • 10
  • 11
  • 12
  • 13
  • 14
  • 15
  • 16
  • 17
  • 18
  • 19
  • 20
  • 21
  • 22
  • 23
  • 24
  • 25
  • 26
  • 27
  • 28
  • 29
  • 30
  • 31
  • 32
  • 33
  • 34
  • 35
  • 36
  • 37
  • 38
  • 39
  • 40
  • 41
  • 42
  • 43
  • 44
  • 45
  • 46
  • 47
  • 48
  • 49
  • 50
  • 51
  • 52
  • 53
  • 54
  • 55
  • 56
  • 57
  • 58
  • 59
  • 60
  • 61
  • 62

IMPORTANT INFORMATION
......................
1
ABOUT YOUR NEW NAVIGATION UNIT
AND THIS MANUAL
................................
1
IMPORTANT SAFEGUARDS
....................
3
PLEASE READ ALL OF THESE
INSTRUCTIONS REGARDING YOUR
NAVIGATION UNIT AND RETAIN
THEM FOR FUTURE REFERENCE
......
3
Connecting the System
............................
4
WARNING
........................................................
4
CAUTION
........................................................
4
-
Before installing the unit
-
To prevent damage
-
Parts supplied
Connecting the system
......................................
8
-
Connecting to the display with 26-pin
input (e. g. AVH-P6600DVD,
AVX-P8DVD, etc.)
Connecting the power cord (1)
..........................
9
Connecting the power cord (2)
........................
11
Installation
................................................
12
WARNING
......................................................
12
CAUTION
......................................................
12
To guard against electromagnetic
interference
................................................
14
Before installing and fixing
............................
14
Before using the adhesive tape
........................
14
Installing the main unit
....................................
15
-
Installation notes
-
Parts supplied
-
CAUTION
-
If you install with the left and right sides
of the Navigation Unit parallel to your
vehicle’s forward / backward direction
-
When installing the main unit inside the
trunk, on the floor under a seat, etc., using
tapping screws
-
CAUTION
-
DIN Rear-mount: Installation using the
screw holes on the side of the unit
Installing the GPS antenna
..............................
22
-
CAUTION
-
Installation notes
-
Parts supplied
-
When installing the antenna inside the
vehicle (on the rear shelf)
-
When installing the antenna outside the
vehicle (on the body)
Installing the Steering remote control
............
25
-
Parts supplied
-
Loading the battery
-
WARNING
-
CAUTION
-
WARNING
-
Remote control handling notes
-
Installing the holders and the steering remote
control
Installing the microphone
................................
27
-
Installation notes
-
Parts supplied
-
When installing the microphone on the
sun visor
-
When installing the microphone on the
steering column
-
CAUTION
After installing the unit
..........................
30
2
ENGLISH
ESPAÑOL
DEUTSCH
FRANÇAIS
ITALIANO
NEDERLANDS
Contents