Pioneer AVIC-X950BH Operation Manual - Page 15
Adjusting the LCD panel angle, Inserting and ejecting a disc, Basic operation
 |
View all Pioneer AVIC-X950BH manuals
Add to My Manuals
Save this manual to your list of manuals |
Page 15 highlights
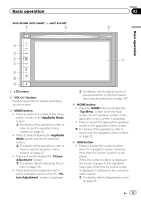
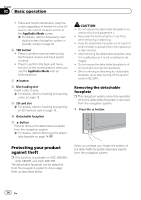
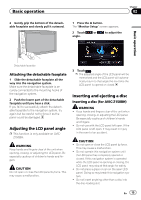
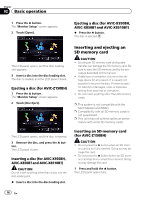
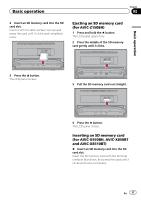
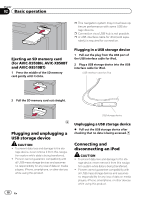
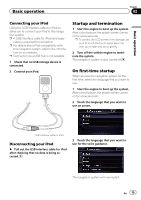
Basic operation Chapter 02 2 Gently grip the bottom of the detachable faceplate and slowly pull it outward. 1 Press the h button. The "Monitor Setup" screen appears. 2 Touch or to adjust the angle. Basic operation Detachable faceplate Attaching the detachable faceplate 1 Slide the detachable faceplate all the way into the navigation system. Make sure the detachable faceplate is securely connected to the mounting hooks of the navigation system. 2 Push the lower part of the detachable faceplate until you hear a click. If you fail to successfully attach the detachable faceplate to the navigation system, try again but be careful not to force it as the panel could be damaged. Adjusting the LCD panel angle p This function is only available on AVICZ150BH. WARNING Keep hands and fingers clear of the unit when opening, closing, or adjusting the LCD panel. Be especially cautious of children's hands and fingers. CAUTION Do not open or close the LCD panel by force. This may cause a malfunction. 3 Touch . p The adjusted angle of the LCD panel will be memorized and the LCD panel will automatically return to that angle the next time the LCD panel is opened or closed. Inserting and ejecting a disc Inserting a disc (for AVIC-Z150BH) WARNING ! Keep hands and fingers clear of the unit when opening, closing, or adjusting the LCD panel. Be especially cautious of children's hands and fingers. ! Do not use with the LCD panel left open. If the LCD panel is left open, it may result in injury in the event of an accident. CAUTION ! Do not open or close the LCD panel by force. This may cause a malfunction. ! Do not operate this navigation system until the LCD panel has completely opened or closed. If this navigation system is operated while the LCD panel is opening or closing, the LCD panel may stop at that angle for safety. ! Do not place a glass or can on the open LCD panel. Doing so may break this navigation system. ! Do not insert anything other than a disc into the disc-loading slot. En 15
-
 1
1 -
2
-
3
-
4
-
5
-
6
-
7
-
8
-
9
-
 10
10 -
 11
11 -
 12
12 -
 13
13 -
 14
14 -
 15
15 -
 16
16 -
 17
17 -
 18
18 -
 19
19 -
 20
20 -
21
-
22
-
23
-
24
-
25
-
26
-
27
-
28
-
29
-
30
-
31
-
32
-
33
-
34
-
35
-
36
-
37
-
38
-
39
-
40
-
41
-
42
-
43
-
44
-
45
-
46
-
47
-
48
-
49
-
50
-
51
-
52
-
53
-
54
-
55
-
56
-
57
-
58
-
59
-
60
-
61
-
62
-
63
-
64
-
65
-
66
-
67
-
68
-
69
-
70
-
71
-
72
-
73
-
74
-
75
-
76
-
77
-
78
-
79
-
80
-
81
-
82
-
83
-
84
-
85
-
86
-
87
-
88
-
89
-
90
-
91
-
92
-
93
-
94
-
95
-
96
-
97
-
98
-
99
-
100
-
101
-
102
-
103
-
104
-
105
-
106
-
107
-
108
-
109
-
110
-
111
-
112
-
113
-
114
-
115
-
116
-
117
-
118
-
119
-
120
-
121
-
122
-
123
-
124
-
125
-
126
-
127
-
128
-
129
-
130
-
131
-
132
-
133
-
134
-
135
-
136
-
137
-
138
-
139
-
140
-
141
-
142
-
143
-
144
-
145
-
146
-
147
-
148
-
149
-
150
-
151
-
152
-
153
-
154
-
155
-
156
-
157
-
158
-
159
-
160
-
161
-
162
-
163
-
164
-
165
-
166
-
167
-
168
-
169
-
170
-
171
-
172
-
173
-
174
-
175
-
176
-
177
-
178
-
179
-
180
-
181
-
182
-
183
-
184
-
185
-
186
-
187
-
188
-
189
-
190
-
191
-
192
-
193
-
194
-
195
-
196
-
197
-
198
-
199
-
200
-
201
-
202
-
203
-
204
 |
 |
