Pioneer DEH-6300UB Owner's Manual - Page 6
Tuner, CD/CD-R/CD-RW and USB, storage devices, Operating this unit - best buy
 |
UPC - 884938121163
View all Pioneer DEH-6300UB manuals
Add to My Manuals
Save this manual to your list of manuals |
Page 6 highlights
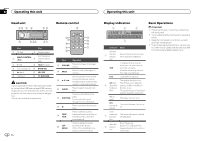
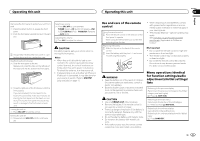
Section 02 Operating this unit Operating this unit Tuner Basic Operations Selecting a band 1 Press BAND/ESC until the desired band (FM1, FM2, FM3 for FM or AM) is displayed. Manual tuning (step by step) 1 Push M.C. left or right. Seeking 1 Push and hold M.C. left or right, and then re- lease. You can cancel seek tuning by pushing M.C. left or right. While pushing and holding M.C. left or right, you can skip stations. Seek tuning starts as soon as you release M.C. Storing and recalling stations for each band Using preset tuning buttons 1 When you find a station that you want to store in memory, press one of the preset tuning buttons (1 to 6) and hold until the preset number stops flashing. 2 Press one of the preset tuning buttons (1 to 6) to select the desired station. # You can also recall stored radio stations by pushing M.C. up or down during the frequency display. Using the preset screen 1 Press to switch to the preset screen. 2 Use M.C. to store the selected frequency in the memory. Turn to change the preset number. Press and hold to store. 3 Use M.C. to select the desired station. Turn to change the station. Press to select. Switching the display Selecting the desired text information 1 Press /DISP/SCRL. Program service name-song title/artist name Scrolling the song title/artist name information to the left 1 Press and hold /DISP/SCRL. Note Depending on the area, you cannot switch the display. Using iTunes tagging This function can be operated with the following iPod models. - iPhone 4 - iPhone 3GS - iPhone 3G - iPhone - iPod nano 5th generation - iPod nano 4th generation - iPod nano 3rd generation - iPod touch 3rd generation - iPod touch 2nd generation - iPod touch 1st generation - iPod classic 160GB - iPod classic 120GB - iPod classic - iPod 5th generation However, tag information can be stored in this unit even while other iPod models are used. The song information (tag) can be saved from the broadcasting station to your iPod. The songs will show up in a playlist called "Tagged playlist" in iTunes the next time you sync your iPod. Then you can directly buy the songs you want from the iTunes Store. ! The tagged songs and the song that you can buy from the iTunes Store may be different. Make sure to confirm the song before you make the purchase. Storing the tag information to this unit 1 Tune in to the broadcast station. 2 Press TAG/ if TAG is indicated in the display while desired song is broadcasting. ! While storing the tag data on this unit, TAG flashes. Storing the tagged information to your iPod 1 Connect the iPod to this unit and transfer this unit's tag information to the iPod. LOCAL (local seek tuning) Local seek tuning lets you tune in to only those radio stations with sufficiently strong signals for good reception. 1 Press M.C. to display the setting mode. 2 Turn M.C. to select the desired setting. FM: OFF-LEVEL1-LEVEL2-LEVEL3- LEVEL4 AM: OFF-LEVEL1-LEVEL2 The highest level setting allows reception of only the strongest stations, while lower levels allow the reception of weaker stations. 3 Press M.C. to confirm the selection. Function settings 1 Press M.C. to display the main menu. 2 Turn M.C. to change the menu option and press to select FUNCTION. 3 Turn M.C. to select the function. After selecting, perform the following procedures to set the function. BSM (best stations memory) BSM (best stations memory) automatically stores the six strongest stations in the order of their signal strength. 1 Press M.C. to turn BSM on. To cancel, press M.C. again. CD/CD-R/CD-RW and USB storage devices Basic Operations Playing a CD/CD-R/CD-RW 1 Insert the disc into the disc loading slot with the label side up. Ejecting a CD/CD-R/CD-RW 1 Press h (eject). Playing songs on a USB storage device 1 Open the USB connector cover and plug in the USB storage device using a USB cable. Stopping playback of files on a USB storage device 1 You may disconnect the USB storage device at any time. Selecting a folder 1 Push M.C. up or down. Selecting a track 1 Push M.C. left or right. Fast forwarding or reversing 1 Push and hold M.C. left or right. 6 En
-
 1
1 -
 2
2 -
 3
3 -
 4
4 -
 5
5 -
 6
6 -
 7
7 -
 8
8 -
 9
9 -
 10
10 -
 11
11 -
 12
12 -
13
-
14
-
15
-
16
-
17
-
18
-
19
-
20
-
21
-
22
-
23
-
24
-
25
-
26
-
27
-
28
-
29
-
30
-
31
-
32
-
33
-
34
-
35
-
36
-
37
-
38
-
39
-
40
-
41
-
42
-
43
-
44
-
45
-
46
-
47
-
48
-
49
-
50
-
51
-
52
-
53
-
54
-
55
-
56
-
57
-
58
-
59
-
60
 |
 |