Pioneer DJM 3000 Owner's Manual - Page 4
Features, Checking Accessories, Contents - manual
 |
UPC - 012562585734
View all Pioneer DJM 3000 manuals
Add to My Manuals
Save this manual to your list of manuals |
Page 4 highlights
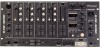
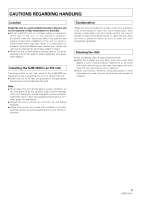
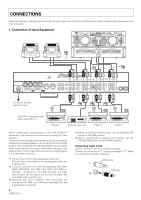
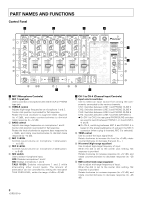
FEATURES Effect Mixing Changing between three kinds of effect mix (ECHO, ZIP, ROLL) can be performed easily merely by operating the Cross fader lever, or by pressing the Effect select/start switch. BPM Counter The auto BPM counter provided makes music tempo visible to the eye. Peak Level Meter The peak level meter provided is equipped with 11-bit LED indicators for all channels. Fader Start/Stop The CD player can be started or stopped simply by increasing or decreasing the level of the cross fader or channel fader. (This function can only be used when the Pioneer CD player series CMX-3000, CMX-5000, CDJ-1000, CDJ-100S, CDJ700S or CDJ-500 II is connected.) 3-Band Equalizer and Kill This 3-band equalizer corresponds to the HI, MID, and LOW channels. The attenuation level also serves as a kill function, which can decrease the level to -26 dB. Variety of Effects Both internal and external effects can be applied to all channels, the microphone, and master. A variety of effects can be enjoyed, including delay, echo, auto pan, auto trans, filter, flanger, reverb and pitch shifter. Full range of input and output functions This DJ Mixer is equipped with 4 (+3*) LINE inputs, 4 PHONO (dedicated MM) inputs, and 2 (+1*) MIC inputs, for a total of 10 inputs. In addition to 2 master output lines (one supporting professional-grade XLR mode), a variety of other independent outputs are also provided, including booth monitor output, recording output, and two digital outputs. SEND/RETURN jacks are also provided for the connection of external effects units. * These additional connectors can optionally be switched from PHONO input to make up the total. CHECKING ACCESSORIES ÷ 2 short-circuit pin plugs These are inserted in the PHONO 4 terminals. ÷ Operating instructions ÷ Warranty 4 CONTENTS FEATURES 4 CHECKING ACCESSORIES 4 CAUTIONS REGARDING HANDLING 5 Location 5 Installing the DJM-3000 in an EIA rack 5 Condensation 5 Cleaning the Unit 5 CONNECTIONS 6 PART NAMES AND FUNCTIONS 8 USING THE EFFECT FUNCTIONS 12 Features of Various Effectors 12 Delay, Echo, Auto Pan, Auto Trans, Filter, and Flanger Operations 14 Operating Reverb and Pitch Shifter 16 Using an External Effector 17 BPM COUNTING 18 Using the Auto Mode to Count BPM 18 Using the Manual Mode to Count BPM 19 USING THE FADER START FUNCTION 20 Starting with the Channel Fader 21 Starting with the Cross Fader 21 USING THE EFFECT MIX FUNCTION 22 Effect Mix Features 22 Selecting the Effect Mix Function 23 Effect Mix Fader Mode 24 Effect Mix Auto Mode 25 TROUBLESHOOTING 26 SPECIFICATIONS 27
-
 1
1 -
 2
2 -
 3
3 -
 4
4 -
 5
5 -
 6
6 -
 7
7 -
 8
8 -
 9
9 -
 10
10 -
11
-
12
-
13
-
14
-
15
-
16
-
17
-
18
-
19
-
20
-
21
-
22
-
23
-
24
-
25
-
26
-
27
-
28
 |
 |
