Pioneer DJM-800 Owner's Manual - Page 8
Connecting Microphone And Headphones, Connecting The Power Cord - back panel
 |
UPC - 012562796604
View all Pioneer DJM-800 manuals
Add to My Manuals
Save this manual to your list of manuals |
Page 8 highlights
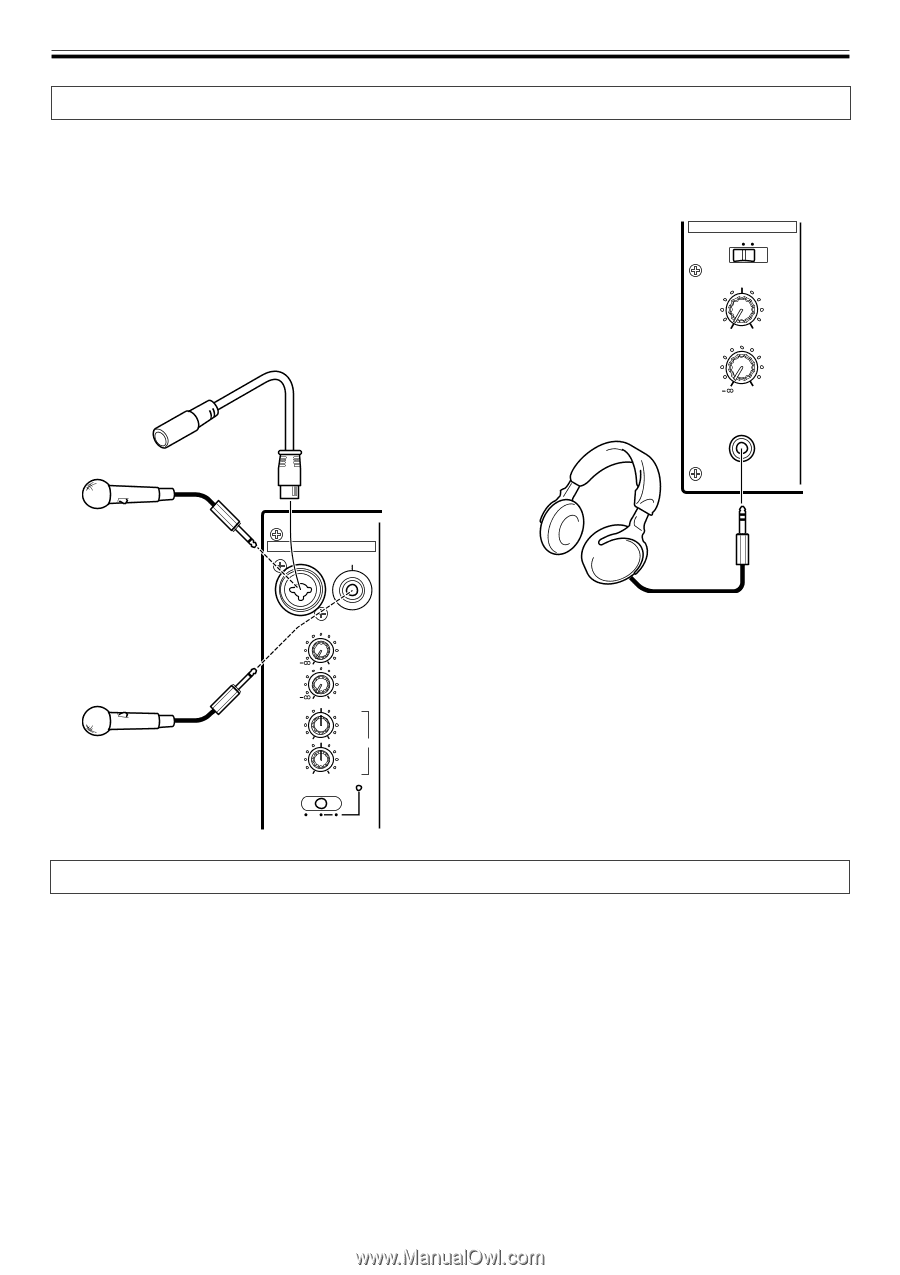
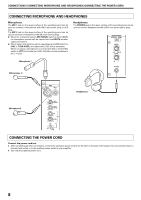
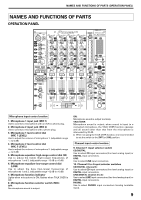
CONNECTIONS (CONNECTING MICROPHONE AND HEADPHONES/CONNECTING THE POWER CORD) CONNECTING MICROPHONE AND HEADPHONES Microphone The MIC 1 jack on the upper surface of the operating panel can be used to connect a microphone with Ø6.3 mm phone plug or XLR plug. The MIC 2 jack on the upper surface of the operating panel can be used to connect a microphone with Ø6.3 mm phone plugs. ¶ When the connection panel's MIC SIGNAL switch is set to [CUT], no microphone sounds will be output from the BOOTH monitor output connectors. ¶ When using a microphone, set the operating panel's MIC switch to [ON] or [TALK OVER], and adjust the LEVEL dial as necessary. When not using a microphone, it is recommended to set the MIC switch to [OFF] and rotate the LEVEL dial fully counterclockwise to the [- ∞] side. Headphones The PHONES jack on the upper surface of the operating panel can be used to connect headphones with a Ø6.3 mm stereo phone plug. HEADPHONES MONO SPLIT STEREO MIXING CUE MASTER LEVEL Microphone 1 (Microphone 1) 0 PHONES MIC MIC 1 MIC 2 Headphones Microphone 2 MIC 1 LEVEL 0 MIC 2 LEVEL 0 HI -12 +6 EQ LOW -12 +6 MIC OFF ON TALK OVER CONNECTING THE POWER CORD Connect the power cord last. ÷ After completing all other connections, connect the accessory power cord to the AC inlet on the back of the player, then connect the plug to a standard wall outlet or to the auxiliary power outlet of your amplifier. ÷ Use only the supplied power cord. 8
-
 1
1 -
2
-
 3
3 -
 4
4 -
 5
5 -
 6
6 -
 7
7 -
 8
8 -
 9
9 -
 10
10 -
 11
11 -
 12
12 -
 13
13 -
14
-
15
-
16
-
17
-
18
-
19
-
20
-
21
-
22
-
23
-
24
 |
 |