Pioneer DJM-S9 Operating Instructions - Page 10
Mixer
 |
View all Pioneer DJM-S9 manuals
Add to My Manuals
Save this manual to your list of manuals |
Page 10 highlights
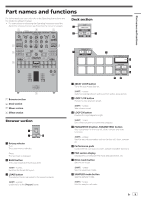
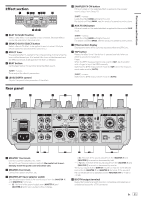
9 HOT CUE mode button Sets the hot cue mode. [SHIFT] + press: Sets the cue loop mode. a SLICER mode button Sets the slicer mode. [SHIFT] + press: Sets the slicer loop mode. Mixer section 4 4 1 3 6 h 78 55 2 3 6 g 9 1 INPUT SELECT switch (CH1 side) Selects the CH1 input source from the components connected to this unit. - [USB-A DECK1]: Select this to use the track loaded in DECK1 of the Serato DJ software on the computer connected to the USB-A terminal. - [USB-A DECK3]: Select this to use the track loaded in DECK3 of the Serato DJ software on the computer connected to the USB-A terminal. - [CD/LINE] terminal: Select this to use a line level output device (DJ player, etc.) connected to the [CD] terminals. - [PHONO]: Select this to use a phono level output device (analog player, etc.) connected to the [PHONO] input terminals. - [USB-B DECK1]: Select this to use the track loaded in DECK1 of the Serato DJ software on the computer connected to the USB-B terminal. - [USB-B DECK3]: Select this to use the track loaded in DECK3 of the Serato DJ software on the computer connected to the USB-B terminal. 2 INPUT SELECT switch (CH2 side) Selects the CH2 input source from the components connected to this unit. - [USB-A DECK2]: Select this to use the track loaded in DECK2 of the Serato DJ software on the computer connected to the USB-A terminal. - [USB-A DECK4]: Select this to use the track loaded in DECK4 of the Serato DJ software on the computer connected to the USB-A terminal. - [CD/LINE] terminal: Select this to use a line level output device (DJ player, etc.) connected to the [CD] terminals. - [PHONO]: Select this to use a phono level output device (analog player, etc.) connected to the [PHONO] input terminals. - [USB-B DECK2]: Select this to use the track loaded in DECK2 of the Serato DJ software on the computer connected to the USB-B terminal. 10 En - [USB-B DECK4]: Select this to use the track loaded in DECK4 of the Serato DJ software on the computer connected to the USB-B terminal. 3 TRIM control Adjusts the level of the sound input to each channel. 4 ISO control Boosts or cuts frequencies. 5 Channel Level Indicator Displays the sound level of the respective channels before passing through the channel faders. 6 FILTER control Applies the filter effect. 7 SHIFT button When another button is pressed while pressing the [SHIFT] button, a different function is called out. ! For details on operation using the [SHIFT] button, see the Operating Instructions. 8 PANEL/UTILITY button The panel display switches in the order below each time the button is pressed. Panel display off l [REC] panel l [FX] panel l [SP-6] panel l Panel display off ... [SHIFT] + press: The panel display switches in the order below each time the button is pressed. Panel display off l [SP-6] panel l [FX] panel l [REC] panel l Panel display off ... Press for over 1 second: If the button is pressed and held, this unit switches to the mode for changing the settings of this unit. 9 Headphone CUE fader Outputs the sound to headphones by changing the ratio of the CH1 and CH2 sounds according to the fader position. To monitor only the sound of headphones, rotate the HEADPHONES MIX control all the way to the CUE side. a Channel fader Move: Adjusts the level of audio signals output in each channel. [SHIFT] + move: Use the channel fader start function. b Crossfader Outputs the sound of each channel according to the curve characteristics selected by the CROSS FADER CURVE adjustment switch. [SHIFT] + move: Uses the crossfader start function. c MASTER LEVEL control Adjusts the master sound level output. d Master level indicator Displays the master output's audio level. [CLIP] blinks when the output level is too high. - Blinks slowly: indicates that the sound is about to be distorted. - Blinks fast: indicates that the sound is distorted. e Booth monitor level control Adjusts the level of audio signals output from the [BOOTH] terminal. f HEADPHONES LEVEL control Adjusts the audio level output from the [PHONES] jack. g HEADPHONES MIX control Adjusts the balance of the monitor volume between the sound of the channels selected for headphone CUE fader and the sound of the master channel. h SAMPLER VOLUME control Adjusts the Serato DJ sampler deck's overall sound level.
-
 1
1 -
2
-
3
-
4
-
 5
5 -
 6
6 -
 7
7 -
 8
8 -
 9
9 -
 10
10 -
 11
11 -
 12
12 -
 13
13 -
 14
14 -
 15
15 -
16
-
17
-
18
-
19
-
20
 |
 |
