Pioneer DJM-S9 Operating Instructions - Page 11
Effect Rear panel - fx banks
 |
View all Pioneer DJM-S9 manuals
Add to My Manuals
Save this manual to your list of manuals |
Page 11 highlights
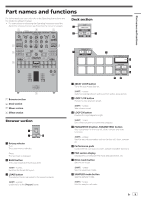
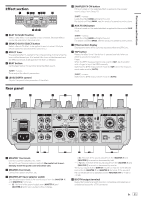
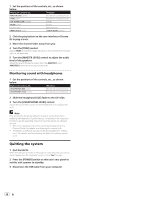
Part names and functions Effect section 1 3 45 843 2 697 1 BEAT FX SELECT button Select a beat effect to be applied to each channel. (Multiple effects cannot be selected at the same time.) 2 SERATO DJ FX SELECT button Select a Serato DJ effect to be applied to each channel. (Multiple effects cannot be selected at the same time.) 3 EFFECT lever The selected effect is applied to the corresponding channel while the lever is tilted toward you. It is locked if the lever is tilted forward, and the effect continues to be applied if the lever is released. 4 BEAT button Set the beat fraction for synchronizing the effect sound. [SHIFT] + press: These adjust the effects' parameters. 5 LEVEL/DEPTH control Adjusts the quantitative parameter of the effect. 6 SAMPLER FX ON button If this is turned on, the selected effect is applied to the sampler sound output from Serato DJ. [SHIFT] + press: Loads the Effect BANK setting to this unit. For details on Effect BANK, see this product's operating instructions. 7 AUX FX ON button If this is turned on, the selected effect is applied to the sound of AUX input. [SHIFT] + press: Loads the Effect BANK setting to this unit. For details on Effect BANK, see this product's operating instructions. 8 Effect section display Displays the name of the currently selected effect and BPM, etc. 9 TAP button Resets the effect time if the button is pressed and held when an effect is selected in Serato DJ. Press: When the BPM measurement mode is set to [TAP], tap the button with a finger to input the BPM manually. Switches the BPM measurement mode to [TAP] when the measurement mode is set to [AUTO]. [SHIFT] + press: Switches the BPM measurement mode to [AUTO]. Rear panel e c 5 7 3 5a 9 8 d 62 1 1 MASTER 1 terminals Connect powered speakers, etc., here. Be sure to use these as balanced outputs. Be careful not to accidentally insert the power cord of another unit. 2 MASTER 2 terminals Connect to a power amplifier, etc. 3 MASTER ATT level selector switch Sets the attenuation level of the sound output from the [MASTER 1] and [MASTER 2] terminals. - [0]: The level of the sound output from [MASTER 1] and [MASTER 2] terminals is output without change. 6 4 b - [-6]: The level of the sound output from the [MASTER 1] and [MASTER 2] terminals is decreased by half. - [-12 dB]: The level of the sound output from the [MASTER 1] and [MASTER 2] terminals is decreased by quarter. The output signal level of DJM-S9 may be too high for some devices connected to [MASTER 1] or [MASTER 2] terminal. If the sound of the connected device is distorted, switch MASTER ATT to -6 dB or -12 dB. 4 BOOTH output terminal Output terminals for a booth monitor, compatible with balanced or unbalanced output for a TRS connector. En 11
-
 1
1 -
2
-
3
-
4
-
5
-
 6
6 -
 7
7 -
 8
8 -
 9
9 -
 10
10 -
 11
11 -
 12
12 -
 13
13 -
 14
14 -
 15
15 -
 16
16 -
17
-
18
-
19
-
20
 |
 |
