Pioneer DJM-S9 Operating Instructions - Page 9
Part names and functions - parts
 |
View all Pioneer DJM-S9 manuals
Add to My Manuals
Save this manual to your list of manuals |
Page 9 highlights
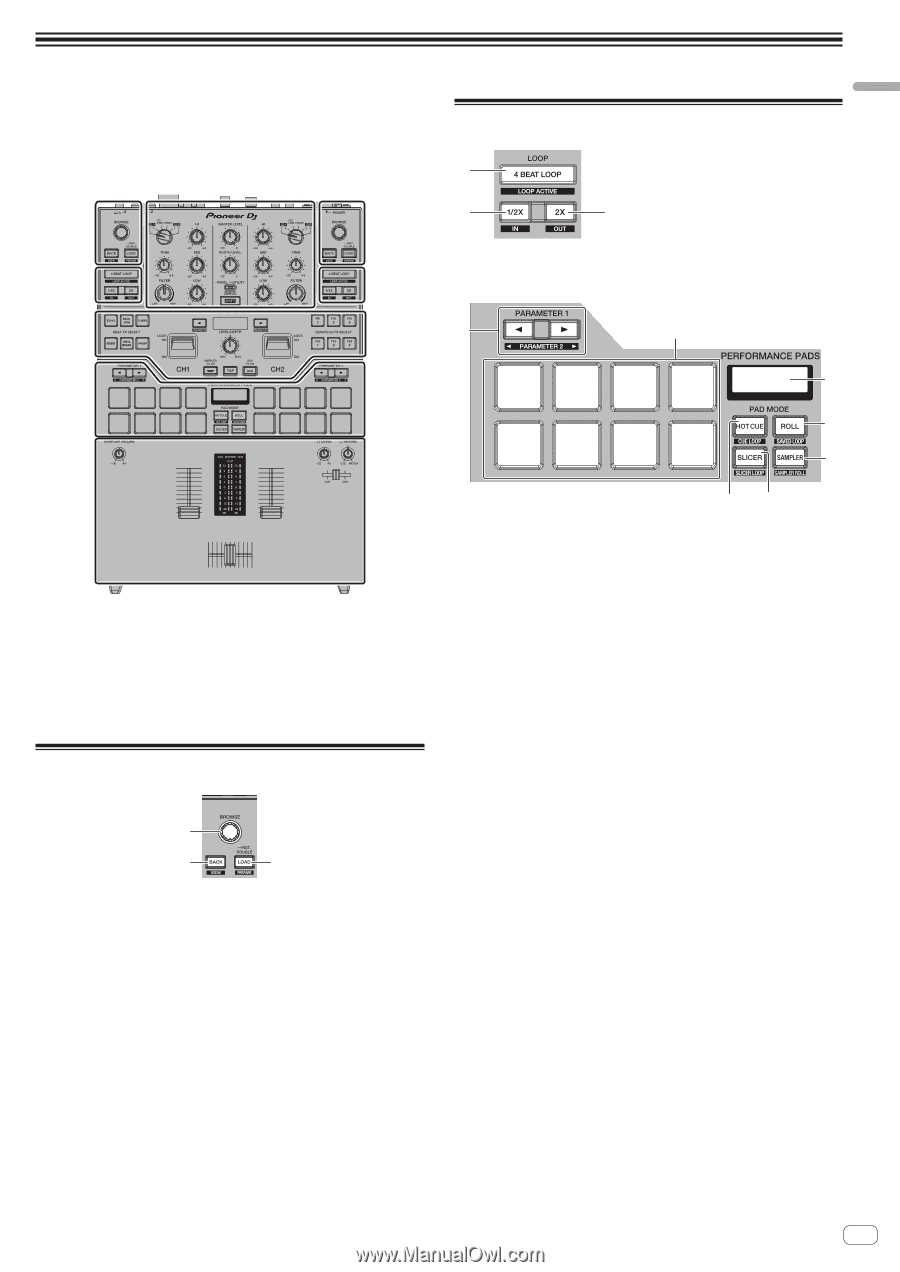
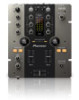
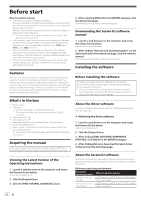
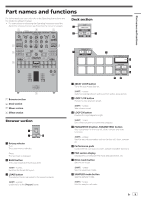
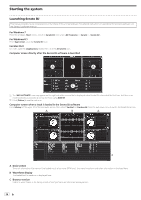
Part names and functions Part names and functions For further details on each unit, refer to the Operating Instructions and the Serato DJ software manual. ! For instructions on obtaining the Operating Instructions and the Serato DJ software manual, see Acquiring the manual on page 6 . 1 3 1 Deck section 1 2 3 2 2 4 2 3 1 Browser section 2 Deck section 3 Mixer section 4 Effect section Browser section 1 2 3 1 Rotary selector Turn: The cursor moves vertically. Press: The next level is displayed. 2 BACK button The cursor moves to the previous level. [SHIFT] + press: Switches the Serato DJ layout. 3 LOAD button The selected tracks are loaded to the respective decks. [SHIFT] + press: Loads tracks to the [Prepare] panel. 4 5 6 7 8 9a 1 4BEAT LOOP button Turns the auto 4-beat loop on. [SHIFT] + press: Switches looping between active and non-active. (Loop Active) 2 LOOP 1/2X button Halves the loop playback length. [SHIFT] + press: Sets a loop in point. 3 LOOP 2X button Doubles the loop playback length. [SHIFT] + press: Sets a loop out point and starts loop playback. 4 PARAMETERc button, PARAMETERd button Sets a parameter for the loop roll, slicer, sampler and other functions. [SHIFT] + press: Sets the second parameters such as the loop roll, slicer, sampler, etc. 5 Performance pads Control the hot cue, loop roll, slicer, sampler and other functions. 6 PAD section display Displays the currently set PAD mode and parameters, etc. 7 ROLL mode button Sets the roll mode. [SHIFT] + press: Sets the saved loop mode. 8 SAMPLER mode button Sets the sampler mode. [SHIFT] + press: Sets the sampler roll mode. En 9
-
 1
1 -
2
-
3
-
 4
4 -
 5
5 -
 6
6 -
 7
7 -
 8
8 -
 9
9 -
 10
10 -
 11
11 -
 12
12 -
 13
13 -
 14
14 -
15
-
16
-
17
-
18
-
19
-
20
 |
 |