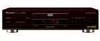
Pioneer DV-434 Owner's Manual - Page 8
Before Using
 |
View all Pioneer DV-434 manuals
Add to My Manuals
Save this manual to your list of manuals |
Page 8 highlights
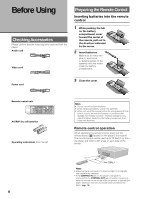
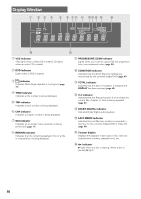
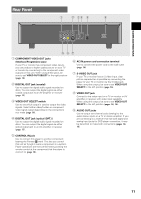
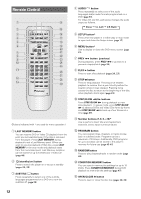
Before Using Checking Accessories Please confirm that the following were received with the player. Audio cord Video cord Preparing the Remote Control Inserting batteries into the remote control 1 While pushing the tab on the battery compartment cover toward the center of the remote, pull out in the direction indicated by the arrow. 2 Insert batteries. Make sure to match the plus (+) and minus (-) polarity guides on the batteries with the marks inside the battery compartment. Power cord 3 Close the cover. Remote control unit 5 AA/R6P dry cell batteries Operating instructions (this manual) 8 Î TV TV FUNC CHANNEL VOLUME REPEAT REPEAT SEARCH MODE A-B TV CONTROL PROGRAM RANDOM 0 9 8 7 6 +10 5 4 NEXT ¢ PAUSE 8 FWD ¡ CLEAR C 3 2 1 REV 1 STEP/SLOW eE 3 7 PLAY STOP 5 PREV 4 5 ENTER TOP MENU RETURN MENU 5 SETUP AUDIO SUBTITLE ANGLE DISPLAY OPEN/ CLOSE 0 LAST CONDITION MEMORY MEMORY Notes • Do not mix old and new batteries. • When replacing batteries, use all new batteries. • When not using the remote control for a long period of time (over 1 month), remove the batteries to avoid possible damage from battery corrosion. If battery leakage occurs, wipe the battery liquid from the battery component, then insert new batteries. Remote control operation When operating the remote control, point it at the remote sensor (Î) located on the player's front panel. The remote control can be used up to 23 feet (7 m) from the player and within a 30° angle on each side of the sensor. 30 30 7m (23ft.) Notes • Exposing the remote sensor to direct sunlight or strong light may cause faulty operation. • If the CONTROL IN jack on the player's rear panel is connected to the CONTROL OUT jack of another component, point the remote control at the other component to operate the player. Operation will not be possible when pointed at this player (page 16).
-
 1
1 -
2
-
 3
3 -
 4
4 -
 5
5 -
 6
6 -
 7
7 -
 8
8 -
 9
9 -
 10
10 -
 11
11 -
 12
12 -
 13
13 -
14
-
15
-
16
-
17
-
18
-
19
-
20
-
21
-
22
-
23
-
24
-
25
-
26
-
27
-
28
-
29
-
30
-
31
-
32
-
33
-
34
-
35
-
36
-
37
-
38
-
39
-
40
-
41
-
42
-
43
-
44
-
45
-
46
-
47
-
48
-
49
-
50
-
51
-
52
-
53
-
54
-
55
-
56
-
57
-
58
-
59
-
60
 |
 |
