Pioneer PDP-5080HD Owner's Manual - Page 20
Place the plasma display on the mounting fittings - instruction manual
 |
View all Pioneer PDP-5080HD manuals
Add to My Manuals
Save this manual to your list of manuals |
Page 20 highlights
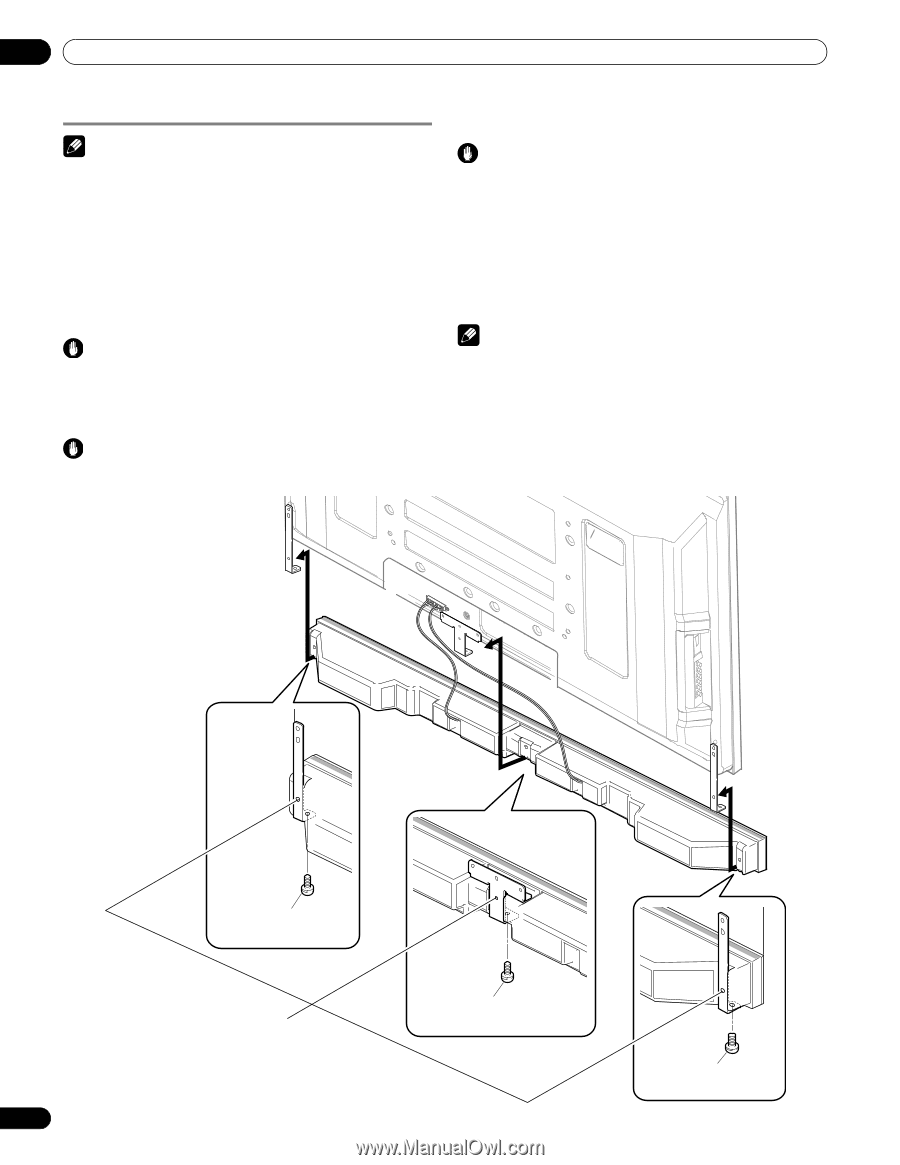
05 Preparation When using the hung on wall unit: Note • First lay the plasma display on top of a soft sheet etc., remove the stand, then attach the speaker mounting fittings. 1 Attach the speaker mounting fittings to the rear of the plasma display (See procedure 1 on page 17. 2 Connect the supplied speaker cables to the rear of the plasma display (See procedure 4 on page 19). 3 Place the plasma display on the mounting fittings of the hung on wall unit. For details, refer to the instruction manual supplied with the hung on wall unit. Caution • Be careful about the speaker mounting fittings when installing or connecting. This may result in injury. 4 Connect the other end of the speaker cables to the speaker (See procedure 5 on page 19). Caution • Have two people perform this procedure. 5 Fit the speaker to the mounting fittings the correct direction. Caution • Be sure not to mount the speaker upside down. 6 Tighten from below using the supplied screws (three locations). • Tighten the three screws in order 1, 2, 3 as shown in the diagram. The screw hole at the rear surface of the speaker mounting fitting is used when the plasma display is installed with the table top stand. It is not used when installed with the stand. Note • If after attaching the speaker its position needs to be adjusted horizontally, first loosen the speaker mounting screws, reposition and then tighten the screws again at the appropriate position. 7 Bundle the cables (See procedure 6 on page 19). 3 Speaker mounting screw (M5 x 10 mm) When using the hung on wall unit, do not use this hole. 1 Speaker mounting screw (M5 x 10 mm) 20 En 2 Speaker mounting screw (M5 x 10 mm)
-
 1
1 -
2
-
3
-
4
-
5
-
6
-
7
-
8
-
9
-
10
-
11
-
12
-
13
-
14
-
 15
15 -
 16
16 -
 17
17 -
 18
18 -
 19
19 -
 20
20 -
 21
21 -
 22
22 -
 23
23 -
 24
24 -
 25
25 -
26
-
27
-
28
-
29
-
30
-
31
-
32
-
33
-
34
-
35
-
36
-
37
-
38
-
39
-
40
-
41
-
42
-
43
-
44
-
45
-
46
-
47
-
48
-
49
-
50
-
51
-
52
-
53
-
54
-
55
-
56
-
57
-
58
-
59
-
60
-
61
-
62
-
63
-
64
-
65
-
66
-
67
-
68
-
69
-
70
-
71
-
72
-
73
-
74
-
75
-
76
-
77
-
78
-
79
-
80
-
81
-
82
-
83
-
84
-
85
-
86
-
87
-
88
-
89
-
90
-
91
-
92
-
93
-
94
-
95
-
96
-
97
-
98
-
99
-
100
-
101
-
102
-
103
-
104
-
105
-
106
-
107
-
108
-
109
-
110
-
111
-
112
-
113
-
114
-
115
-
116
-
117
-
118
-
119
-
120
-
121
-
122
-
123
-
124
-
125
-
126
-
127
-
128
-
129
-
130
-
131
-
132
-
133
-
134
-
135
-
136
-
137
-
138
-
139
-
140
-
141
-
142
-
143
-
144
-
145
-
146
-
147
-
148
-
149
-
150
-
151
-
152
-
153
-
154
-
155
-
156
-
157
-
158
-
159
-
160
-
161
-
162
-
163
-
164
-
165
-
166
-
167
-
168
-
169
-
170
-
171
-
172
-
173
-
174
-
175
-
176
-
177
-
178
-
179
-
180
-
181
-
182
-
183
-
184
-
185
-
186
-
187
-
188
-
189
-
190
-
191
-
192
-
193
-
194
-
195
-
196
-
197
-
198
-
199
-
200
-
201
-
202
-
203
-
204
-
205
-
206
-
207
-
208
-
209
-
210
-
211
-
212
-
213
-
214
-
215
-
216
-
217
-
218
-
219
-
220
-
221
-
222
-
223
-
224
-
225
-
226
-
227
-
228
-
229
-
230
-
231
-
232
-
233
-
234
-
235
-
236
-
237
-
238
-
239
-
240
-
241
-
242
-
243
-
244
-
245
-
246
-
247
-
248
-
249
-
250
-
251
-
252
-
253
-
254
-
255
-
256
-
257
-
258
-
259
-
260
-
261
-
262
-
263
-
264
-
265
-
266
-
267
-
268
-
269
-
270
-
271
-
272
-
273
-
274
-
275
-
276
-
277
-
278
-
279
-
280
-
281
-
282
-
283
-
284
-
285
 |
 |