Pioneer PRO110FD Owner's Manual - Page 17
Preparation - 50 plasma
 |
UPC - 012562864976
View all Pioneer PRO110FD manuals
Add to My Manuals
Save this manual to your list of manuals |
Page 17 highlights
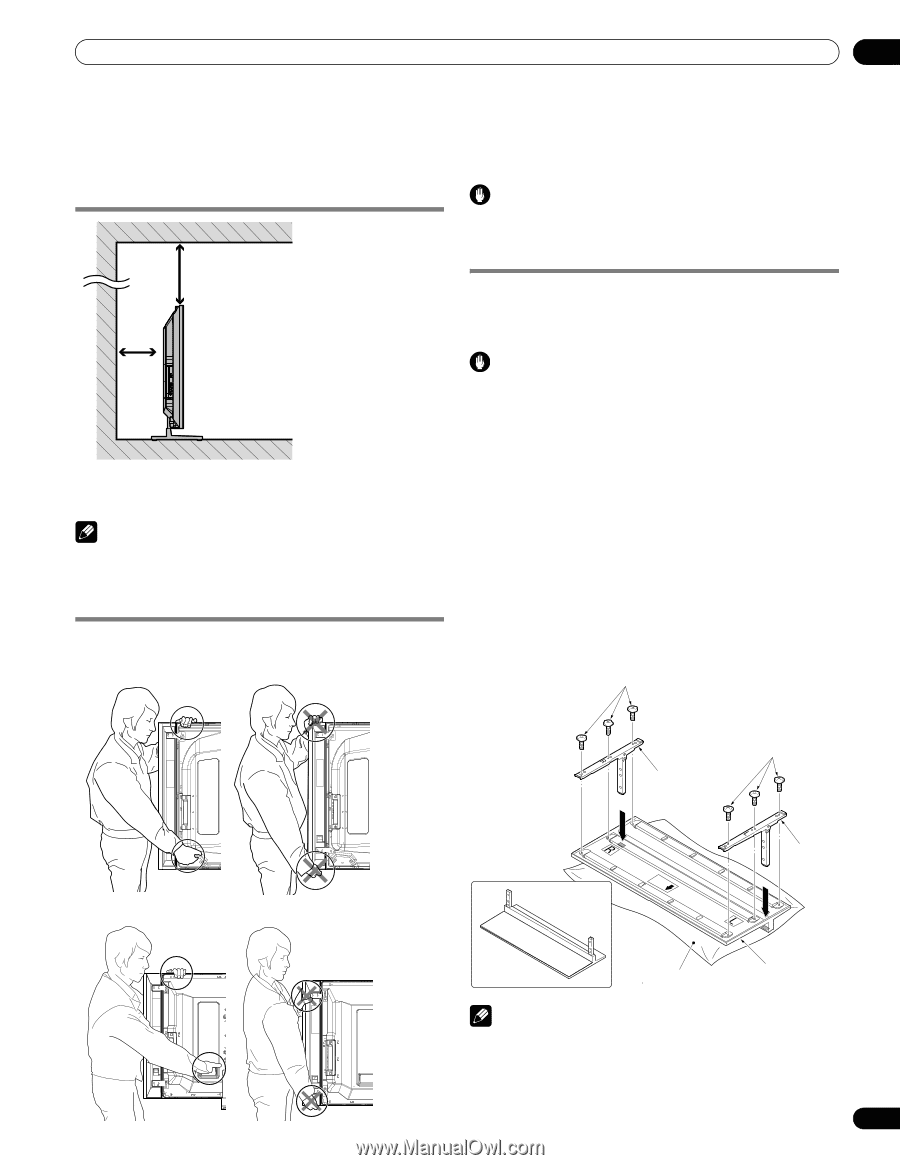
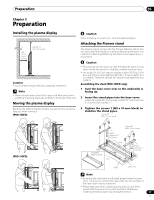
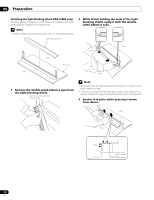
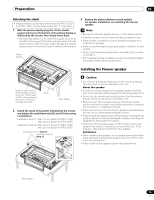
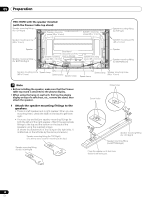
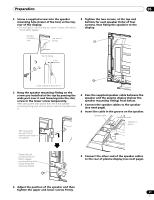
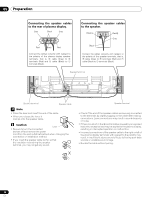
Preparation 05 Chapter 5 Preparation Installing the plasma display Over 10 cm (3-5/16 inches) Over 50 cm (19-11/16 inches) Location • Avoid direct sunlight. Maintain adequate ventilation. Note • Allow enough space around the upper and back parts when installing to ensure adequate ventilation of the rear of the unit. Moving the plasma display Because the plasma display is heavy, be sure to have someone help you when moving it. (PRO-150FD) Caution When installing on a rack, etc., hold the plasma display. Attaching the Pioneer stand The plasma display comes with the Pioneer table top stand. You can also install the display on a rack by detaching the stand. The method for attaching/detaching the stand varies depending on the product. Caution • This product can be used only with the attached stand. Using other stands can result in instability, possibly causing injury. • The weight of a 60 inch plasma display is about 55.5 kg (122.4 lbs.) and a 50 inch about 38.8 kg (85.5 lbs.), it has no depth, and is unstable. Therefore, at least two people must assemble and install it. Assembling the stand (PRO-150FD only) 1 Turn the base cover over so the underside is facing up. 2 Insert the stand pipes into the base cover. Insert stand pipe (R) into the side marked "R" and stand pipe (L) into the side marked "L". 3 Tighten the screws 1 (M5 x 10 mm: black) to stabilize the stand pipes. Screws ➀ (M5 x 10 mm: black) (PRO-110FD) Screws ➀ (M5 x 10 mm: black) Stand pipe with "R" inscribed Rear Completed Table top stand Front Stand pipe with "L" inscribed Sheet Base cover Note • Assemble the stand with a soft sheet placed under the base cover. If a sheet is not laid before assembly, the front surface of the base cover may be scratched. • Please take care when installing stand pipes (L) and (R) to ensure that they are in the correct positions. Mistakenly installing the stand pipes may damage the stand. 17 En
-
 1
1 -
2
-
3
-
4
-
5
-
6
-
7
-
8
-
9
-
10
-
11
-
 12
12 -
 13
13 -
 14
14 -
 15
15 -
 16
16 -
 17
17 -
 18
18 -
 19
19 -
 20
20 -
 21
21 -
 22
22 -
23
-
24
-
25
-
26
-
27
-
28
-
29
-
30
-
31
-
32
-
33
-
34
-
35
-
36
-
37
-
38
-
39
-
40
-
41
-
42
-
43
-
44
-
45
-
46
-
47
-
48
-
49
-
50
-
51
-
52
-
53
-
54
-
55
-
56
-
57
-
58
-
59
-
60
-
61
-
62
-
63
-
64
-
65
-
66
-
67
-
68
-
69
-
70
-
71
-
72
-
73
-
74
-
75
-
76
-
77
-
78
-
79
-
80
-
81
-
82
-
83
-
84
-
85
-
86
-
87
-
88
-
89
-
90
-
91
-
92
-
93
-
94
-
95
-
96
-
97
-
98
-
99
-
100
-
101
-
102
-
103
-
104
-
105
-
106
-
107
-
108
-
109
-
110
-
111
-
112
-
113
-
114
-
115
-
116
-
117
-
118
-
119
-
120
-
121
-
122
-
123
-
124
-
125
-
126
 |
 |