Pioneer PRO110FD Owner's Manual - Page 20
When using the hang on wall unit, first lay the plasma - pro wall mount
 |
UPC - 012562864976
View all Pioneer PRO110FD manuals
Add to My Manuals
Save this manual to your list of manuals |
Page 20 highlights
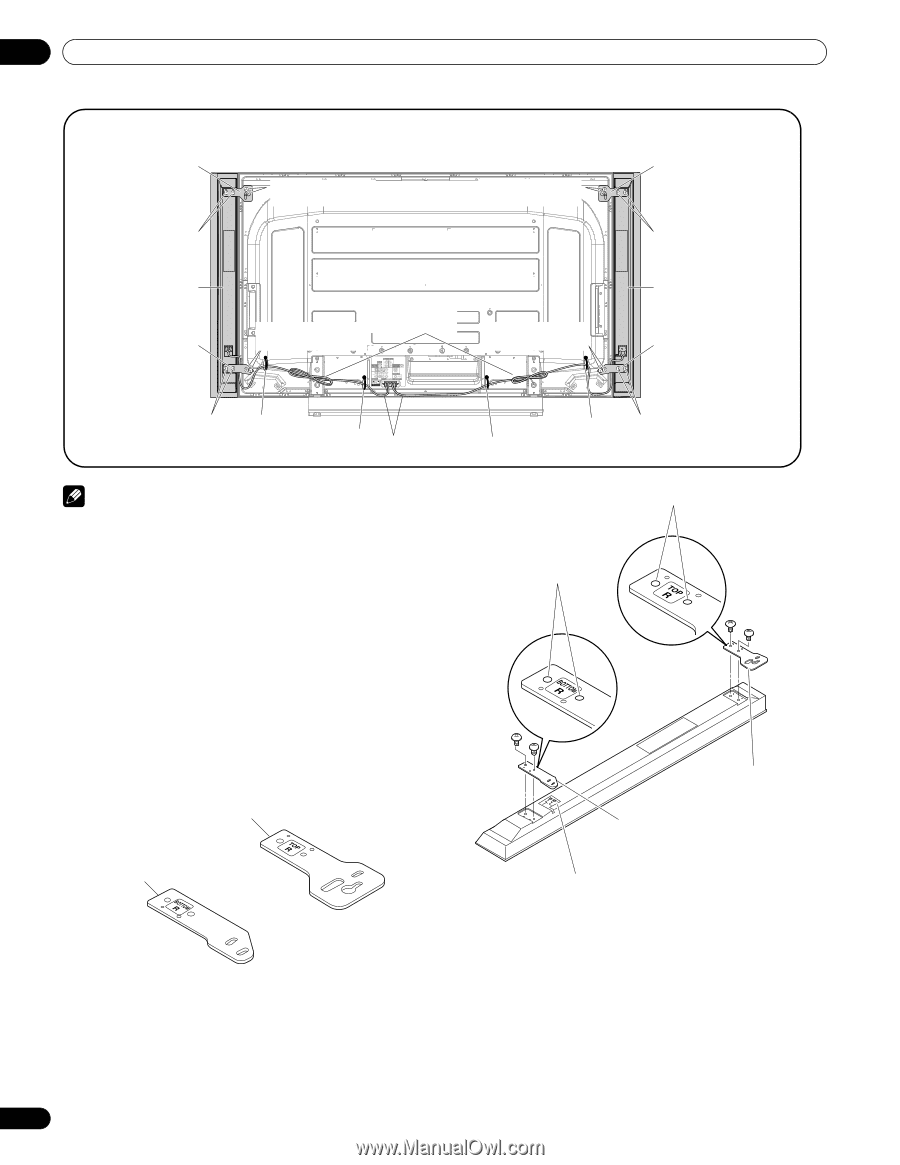
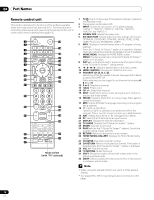
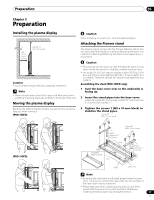
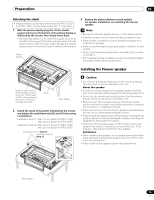
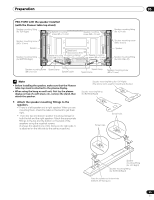
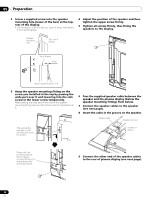
05 Preparation PRO-150FD with the speaker installed (with the Pioneer table top stand) Speaker mounting fitting (for TOP-Right) Speaker mounting screw (M5 x 10 mm) Speaker mounting screw (M5 x 10 mm) Speaker mounting screw (M5 x 10 mm) Speaker Speaker mounting fitting (for BOTTOM-Right) Bead band (accessories of the Speaker mounting plasma display) screw (M5 x 10 mm) Speaker mounting screw (M5 x 10 mm) Speaker mounting fitting (for TOP-Left) Speaker mounting screw (M5 x 10 mm) Speaker Speaker mounting fitting (for BOTTOM-Left) Speaker mounting screw Speed clamp (M5 x 10 mm) Speed clamp Speaker cable Speed clamp Speed clamp Speaker mounting screw (M5 x 10 mm) Note • Before installing the speaker, make sure that the Pioneer table top stand is attached to the plasma display. • When using the hang on wall unit, first lay the plasma display on top of a soft sheet, etc., remove the stand, then attach the speaker. 1 Attach the speaker mounting fittings to the speakers. • There is a left speaker and a right speaker. When you are mounting them, check the label on the back to get them right. • There are top and bottom speaker mounting fittings for both the left and the right speaker. Attach the appropriate fittings to the top and the bottom on the back of the speakers using the supplied screws. (It shows the attachment of the fitting on the right side. It is attached on the left side by the same procedure.) Speaker mounting fitting (for TOP-Right) (The skinny slot is used for mounting to the top.) Speaker mounting fitting (for BOTTOM-Right) Screw holes Screw holes Speaker mounting fitting (for TOP-Right) Speaker mounting fitting (for BOTTOM-Right) Place the speaker so its terminals (bottom) are facing you. 20 En
-
 1
1 -
2
-
3
-
4
-
5
-
6
-
7
-
8
-
9
-
10
-
11
-
12
-
13
-
14
-
 15
15 -
 16
16 -
 17
17 -
 18
18 -
 19
19 -
 20
20 -
 21
21 -
 22
22 -
 23
23 -
 24
24 -
 25
25 -
26
-
27
-
28
-
29
-
30
-
31
-
32
-
33
-
34
-
35
-
36
-
37
-
38
-
39
-
40
-
41
-
42
-
43
-
44
-
45
-
46
-
47
-
48
-
49
-
50
-
51
-
52
-
53
-
54
-
55
-
56
-
57
-
58
-
59
-
60
-
61
-
62
-
63
-
64
-
65
-
66
-
67
-
68
-
69
-
70
-
71
-
72
-
73
-
74
-
75
-
76
-
77
-
78
-
79
-
80
-
81
-
82
-
83
-
84
-
85
-
86
-
87
-
88
-
89
-
90
-
91
-
92
-
93
-
94
-
95
-
96
-
97
-
98
-
99
-
100
-
101
-
102
-
103
-
104
-
105
-
106
-
107
-
108
-
109
-
110
-
111
-
112
-
113
-
114
-
115
-
116
-
117
-
118
-
119
-
120
-
121
-
122
-
123
-
124
-
125
-
126
 |
 |