Pioneer PRS-D800 Owner's Manual
Pioneer PRS-D800 Manual
 |
View all Pioneer PRS-D800 manuals
Add to My Manuals
Save this manual to your list of manuals |
Pioneer PRS-D800 manual content summary:
- Pioneer PRS-D800 | Owner's Manual - Page 1
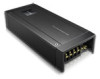
English Français Español BRIDGEABLE TWO-CHANNEL POWER AMPLIFIER AMPLIFICATEUR DE PUISSANCE PONTABLE A DEUX CANAUX AMPLIFICADOR DE POTENCIA DE DOS CANALES PUENTEABLE PRS-D800 Owner's Manual Mode d'emploi Manual de instrucciones - Pioneer PRS-D800 | Owner's Manual - Page 2
has been tested and found instructions sales service for Pioneer products Please contact the dealer or distributor from where you purchased this unit for after-sales service Pioneer Electronics (USA) Inc. CUSTOMER SUPPORT DIVISION P.O. Box 1760 Long Beach, CA 90801-1760 800-421-1404 CANADA Pioneer - Pioneer PRS-D800 | Owner's Manual - Page 3
Receive updates on the latest products and technologies. 3 Download owner's manuals, order product catalogues, research new products, and much more. The Safety speakers if the fuse of the separately sold battery wire or the amplifier fuse blows. Determine and resolve the cause, then replace the fuse - Pioneer PRS-D800 | Owner's Manual - Page 4
protection function will operate in the conditions outlined below. If the protection function is turned on, the power indicator will turn off, and the amplifier will shut down. ! The output will be muted in the situations outlined below. - If a DC voltage is applied to the speaker output terminal - Pioneer PRS-D800 | Owner's Manual - Page 5
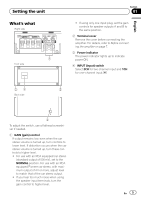
amplifier on page 7. 3 Power indicator The power indicator lights up to indicate power ON. 4 INPUT (input) switch Select 2CH for two-channel input and 1CH for one-channel mV), set to the NORMAL position. For use with an RCA equipped Pioneer car stereo, with maximum output of 4 V or more, adjust level - Pioneer PRS-D800 | Owner's Manual - Page 6
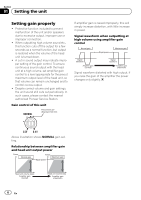
, the unit sound still cuts out periodically. In such cases, please contact the nearest authorized Pioneer Service Station. Gain control of this unit Preout level: 2 V (Standard: 500 mV) If amplifier gain is raised improperly, this will simply increase distortion, with little increase in power - Pioneer PRS-D800 | Owner's Manual - Page 7
sold sepa- rately) d Speaker output terminals Please see the following section for speaker connection instructions. Refer to Connecting the speakers and RCA input on page 9. e Fuse (30 A) Before connecting the amplifier WARNING ! Secure the wiring with cable clamps or adhe- sive tape. To protect the - Pioneer PRS-D800 | Owner's Manual - Page 8
4 W speaker. For other amplifiers, please follow the speaker output connection diagram for bridging shown on rear: two 8 W speakers in parallel for a 4 W load or a single 4 W speaker per channel. For any further enquiries, contact your local authorized Pioneer dealer or customer service. 8 En - Pioneer PRS-D800 | Owner's Manual - Page 9
to suit the mode. 2 3 1 4 5 1 Speaker output 2 RCA input jack A 3 RCA input jack B 4 RCA cable (sold separately) 5 From car stereo (RCA output) One-channel input (Mono) When connecting two speakers (front left and rear left) ! Slide INPUT (input) switch to 1CH position. ! Audio from RCA input - Pioneer PRS-D800 | Owner's Manual - Page 10
input jack A 4 RCA cable (sold separately) 5 From car stereo (RCA output) One-channel input (Mono) When connecting a speaker (Bridge) ! Slide INPUT (input) switch to 1CH After completing all other amplifier connections, finally connect the battery wire terminal of the amplifier to the positive (+) - Pioneer PRS-D800 | Owner's Manual - Page 11
Connecting the units 1 System remote control terminal 2 Ground terminal 3 Power terminal 4 Terminal screws 5 Battery wire 6 Ground wire 7 System remote control wire Connecting the speaker output terminals 1 Use wire cutters or a utility knife to strip the end of the speaker wires to expose about 10 - Pioneer PRS-D800 | Owner's Manual - Page 12
optimal installation location differs depending on the car model. Secure the amplifier at a sufficiently rigid location. ! Firstly make temporary connections and check to ensure the amplifier and system operate properly. ! After installing the amplifier, confirm that the spare tire, jack and tools - Pioneer PRS-D800 | Owner's Manual - Page 13
Installation 2 Install the unit. 1 3 2 1 Tapping-screws (4 mm × 18 mm) 2 Drill a 2.5 mm (1/8 in.) diameter hole. 3 Floor mat or chassis English Section 03 En 13 - Pioneer PRS-D800 | Owner's Manual - Page 14
audio signal is input. Use this value when working out total current drawn by multiple power amplifiers. Power output 125 W RMS × 2 Channels (at 14.4 V, 4 W and ≦ 1 % THD+N) 300 W RMS × 1 Channel (at 14.4 V, 4 W BRIDGE and ≦ 1 % THD+N) 150 W RMS × 2 Channels (at 14.4 V, 2 W and ≦ 1 % THD+N) 14 En - Pioneer PRS-D800 | Owner's Manual - Page 15
figurant ci-dessous sans avoir pris contact au préalable. États-Unis Pioneer Electronics (USA) Inc. CUSTOMER SUPPORT DIVISION P.O. Box 1760 Long Beach, CA 90801-1760 800-421-1404 CANADA Pioneer Électroniques du Canada, Inc. DÉPARTEMENT DE SERVICE AUX CONSOMMATEURS 340 Ferrier Street Unit 2 Markham - Pioneer PRS-D800 | Owner's Manual - Page 16
votre revendeur. ! Déconnectez toujours la borne négative * de la batterie préalablement, de manière à éviter tout risque de choc électrique ou de et l'amplificateur se met hors service dans les situations indiquées ci-dessous. - Si la température à l'intérieur de l'amplifi- cateur est trop élevée. - Pioneer PRS-D800 | Owner's Manual - Page 17
avec un système stéréo de véhicule équipé d'une sortie RCA (sortie standard de 500 mV). Pour l'utilisation avec un système stéréo de véhicule Pioneer équipé d'une sortie RCA, dont la sortie maximale est de 4 V Fr 17 - Pioneer PRS-D800 | Owner's Manual - Page 18
l'amplificateur à un niveau adapté au niveau de sortie maximal de la sortie préamp de l'appareil central de manière à ce que le volume ne nécessite Dans de tels cas, veuillez contacter le Centre d'entretien agréé par Pioneer le plus proche. Commande de gain de l'appareil Relation entre le gain - Pioneer PRS-D800 | Owner's Manual - Page 19
sortie des haut-parleurs Veuillez vous reporter à la section suivante pour les instructions de connexion des hautparleurs. Reportez-vous à la page 21, Connexion de autres équipements. La capacité en courant du fil est limitée. PRÉCAUTION ! Ne raccourcissez jamais aucun fil, faute de quoi le circuit - Pioneer PRS-D800 | Owner's Manual - Page 20
Section 02 Connexion des appareils ! Ne mettez jamais le fil du haut-parleur directement à la terre et ne regroupez jamais les fils de sortie négatifs (*) de plusieurs haut-parleurs. ! Si le fil de la télécommande du système de l'amplificateur est connecté à la borne d'alimentation via le contact - Pioneer PRS-D800 | Owner's Manual - Page 21
par canal. Pour toute autre requête, veuillez contacter le service clientèle ou votre revendeur Pioneer agréé local. Connexion de l'entrée RCA et de que les haut-parleurs sont conformes aux normes suivantes, faute de quoi ils présenteront un risque d'incendie, de fumée ou de dommages. L'impédance - Pioneer PRS-D800 | Owner's Manual - Page 22
Section 02 Connexion des appareils 3 Jack d'entrée RCA B 4 Câble RCA (vendu séparément) 5 Depuis le système stéréo du véhicule (sortie RCA) Entrée un canal (mono) Lors de la connexion de deux hautparleurs (avant gauche et arrière gauche) ! Faites glisser le commutateur INPUT (en- trée) en position - Pioneer PRS-D800 | Owner's Manual - Page 23
Connexion des appareils 2 Connectez les fils à la borne. Fixez fermement les fils à l'aide des vis de la borne. Section 02 Français 1 Cosse (vendue séparément) 2 Fil du haut-parleur 3 Connectez les fils des haut-parleurs aux bornes de sortie des haut-parleurs. Fixez fermement les fils des haut- - Pioneer PRS-D800 | Owner's Manual - Page 24
/freinage, câblage, par exemple) sont protégés des dommages. surface présentant une saillie. Ceci pourrait entraîner un dysfonctionnement. ! Lors de un volume élevé, etc. Le cas échéant, l'amplificateur se met hors service jusqu'à ce qu'il se soit refroidi et atteint une certaine température. ! - Pioneer PRS-D800 | Owner's Manual - Page 25
Installation Exemple d'installation sur le tapis de sol ou le châssis 1 Installez le support au bas de l'appareil. 1 Vis (3 mm × 8 mm) 2 Support de montage 2 Installez l'appareil. 1 3 2 1 Vis autotaraudeuses (4 mm × 18 mm) 2 Percez un trou de 2,5 mm de diamètre. 3 Tapis de sol ou châssis - Pioneer PRS-D800 | Owner's Manual - Page 26
: RCA 6,5 V/22 kW Caractéristiques CEA2006 Rapport S/B 84 dBA (référence : 1 W sur 4 W) Remarques ! Les caractéristiques et la présentation peu- vent être modifiées sans avis préalable. ! Le courant extrait moyen correspond quasi- ment au courant maximal extrait par cet appareil lors de l'entr - Pioneer PRS-D800 | Owner's Manual - Page 27
Pioneer Electronics (USA) Inc. CUSTOMER SUPPORT DIVISION P.O. Box 1760 Long Beach, CA 90801-1760 800-421-1404 CANADÁ Pioneer o con el servicio técnico oficial Pioneer más próximo a su domicilio. Visite nuestro productos y tecnologías. 3 Descargue manuales de instrucciones, solicite catálogos de - Pioneer PRS-D800 | Owner's Manual - Page 28
Presección Antes de comenzar ! Compruebe las conexiones de la fuente de alimentación y los altavoces si se funde el fusible del cable de la batería vendido por separado o el fusible del amplificador. Determine y solucione el problema y después reemplace el fusible por otro de características idé - Pioneer PRS-D800 | Owner's Manual - Page 29
vehículo provisto de RCA (salida estándar de 500 mV), posiciónese en NORMAL. Para el uso con un estéreo de vehículo Pioneer provisto de RCA, con una salida máxima de 4 V o superior, ajuste el nivel para que coincida con la salida de estéreo del vehículo. Es - Pioneer PRS-D800 | Owner's Manual - Page 30
ganancia, el sonido de la unidad aún se interrumpe cada cierto tiempo. De presentarse esta situación, contacte con el servicio técnico oficial Pioneer más cercano a su domicilio. Control de ganancia de esta unidad Relación entre ganancia del amplificador y corriente de salida de la unidad principal - Pioneer PRS-D800 | Owner's Manual - Page 31
Conexión de las unidades Sección 02 Español Diagrama de conexión 2 1 4 5 3 e 6 9 d 7L a R8 9 Cable de control a distancia del sistema (se vende por separado) Conecte el terminal macho de este cable al terminal del control a distancia del sistema en el estéreo del vehículo. El terminal - Pioneer PRS-D800 | Owner's Manual - Page 32
Sección 02 Conexión de las unidades ! Nunca ponga directamente a tierra el cable del altavoz ni junte varios cables conductores negativos (*). ! Si el cable de control a distancia del sistema del amplificador está conectado a un terminal de potencia a través de la llave de encendido (12 V de CC), - Pioneer PRS-D800 | Owner's Manual - Page 33
de 8 W en paralelo para una carga de 4 W o un único altavoz de 4 W por canal. Para cualquier otra consulta, contacte con el distribuidor oficial de Pioneer o diríjase al servicio de atención al cliente. Acerca de una especificación adecuada del altavoz Asegúrese de que los altavoces cumplen con los - Pioneer PRS-D800 | Owner's Manual - Page 34
Sección 02 Conexión de las unidades 4 Cable RCA (se vende por separado) 5 Desde el estéreo del vehículo (salida RCA) Entrada de un canal (mono) Al conectar dos altavoces (delantero izquierdo y trasero izquierdo) ! Deslice el interruptor de INPUT (entrada) a la posición 1CH. ! El audio procedente de - Pioneer PRS-D800 | Owner's Manual - Page 35
Conexión de las unidades Sección 02 Español 1 Terminal de control a distancia del sistema 2 Terminal de puesta a tierra 3 Terminal de potencia 4 Tornillos para terminales 5 Cable de batería 6 Cable de puesta a tierra 7 Cable de control a distancia del sistema 1 Lengüeta (se vende por separado) 2 - Pioneer PRS-D800 | Owner's Manual - Page 36
Sección 03 Instalación Antes de instalar el amplificador ADVERTENCIA ! Para garantizar una instalación correcta, utili- ce las piezas facilitadas del modo indicado. El uso de otras piezas diferentes a las facilitadas, puede dañar las partes internas del amplificador o aflojarse haciendo que éste se - Pioneer PRS-D800 | Owner's Manual - Page 37
Instalación Ejemplo de instalación en la alfombra o chasis 1 Instale las carcasas en la parte inferior de la unidad. 1 Tornillos (3 mm x 8 mm) 2 Carcasa 2 Instale la unidad. 1 3 2 1 Tornillos de rosca cortante (4 mm × 18 mm) 2 Perfore un orificio de 2,5 mm de diámetro. 3 Moqueta o chasis del - Pioneer PRS-D800 | Owner's Manual - Page 38
, 4 W) Consumo medio de corriente 6,4 A (4 W para dos canales) 4,1 A (4 W para un canal) 8 A (2 W para dos canales) Fusible 30 A Dimensiones (An × Al × Pr) 255 mm × 50 mm × 104 mm Peso 1,6 kg Potencia de salida máxima 250 W × 2 (a 14.4 V, 4 W, 2 canales) / 600 W × 1 (a 14.4 V, 4 W, 1 canal - Pioneer PRS-D800 | Owner's Manual - Page 39
Español Es 39 - Pioneer PRS-D800 | Owner's Manual - Page 40
ELECTRONICS OF CANADA, INC. 340 Ferrier Street, Unit 2, Markham, Ontario L3R 2Z5, Canada TEL: 1-877-283-5901 TEL: 905-479-4411 PIONEER ELECTRONICS DE MEXICO, S.A. de C.V. Blvd.Manuel Avila Camacho 138 10 piso Col.Lomas de Chapultepec, Mexico, D.F. 11000 TEL: 55-9178-4270 407號8 886-(0)2-2657
-
 1
1 -
 2
2 -
 3
3 -
 4
4 -
 5
5 -
 6
6 -
 7
7 -
8
-
9
-
10
-
11
-
12
-
13
-
14
-
15
-
16
-
17
-
18
-
19
-
20
-
21
-
22
-
23
-
24
-
25
-
26
-
27
-
28
-
29
-
30
-
31
-
32
-
33
-
34
-
35
-
36
-
37
-
38
-
39
-
40
 |
 |

Owner’s Manual
Mode d’emploi
Manual de instrucciones
BRIDGEABLE TWO-CHANNEL POWER AMPLIFIER
AMPLIFICATEUR DE PUISSANCE PONTABLE A
DEUX CANAUX
AMPLIFICADOR DE POTENCIA DE DOS CANALES
PUENTEABLE
PRS-D800
English
Français
Español