Pioneer PRS-X340 Owners Manual - Page 13
Fitting the end cap
 |
View all Pioneer PRS-X340 manuals
Add to My Manuals
Save this manual to your list of manuals |
Page 13 highlights
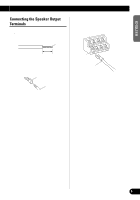
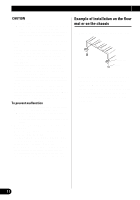
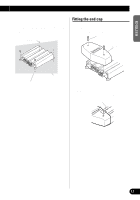
ENGLISH ESPAÑOL 3. Drill 2.5 mm diameter holes at the point marked, and install the amplifier, either on the carpet or directly to the chassis. Tapping-screws (4 × 18 mm) Fitting the end cap 1. Align the main unit and end cap holes, and insert the screw. Screw Endcap Floor mat or chassis Drill a 2.5 mm diameter hole 2. Tighten the screw with a 4 mm hexagonal wrench (not supplied). Hexagonal wrench DEUTSCH FRANÇAIS ITALIANO NEDERLANDS 12
-
 1
1 -
2
-
3
-
4
-
5
-
6
-
7
-
 8
8 -
 9
9 -
 10
10 -
 11
11 -
 12
12 -
 13
13 -
 14
14 -
 15
15 -
 16
16 -
 17
17 -
 18
18 -
19
-
20
-
21
-
22
-
23
-
24
-
25
-
26
-
27
-
28
-
29
-
30
-
31
-
32
-
33
-
34
-
35
-
36
-
37
-
38
-
39
-
40
-
41
-
42
-
43
-
44
-
45
-
46
-
47
-
48
-
49
-
50
-
51
-
52
-
53
-
54
-
55
-
56
-
57
-
58
-
59
-
60
-
61
-
62
-
63
-
64
-
65
-
66
-
67
-
68
-
69
-
70
-
71
-
72
-
73
-
74
-
75
-
76
-
77
-
78
-
79
-
80
-
81
-
82
-
83
-
84
-
85
-
86
-
87
-
88
 |
 |

12
ENGLISH
ESPAÑOL
DEUTSCH
FRANÇAIS
ITALIANO
NEDERLANDS
3.
Drill 2.5 mm diameter holes at the
point marked, and install the ampli-
fier, either on the carpet or directly
to the chassis.
Fitting the end cap
1.
Align the main unit and end cap
holes, and insert the screw.
2.
Tighten the screw with a 4 mm
hexagonal wrench (not supplied).
Endcap
Screw
Hexagonal wrench
Drill a 2.5 mm diameter hole
Tapping-screws
(4
×
18 mm)
Floor mat
or chassis