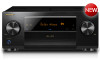
Pioneer SC-LX502 Basic Manual English French/Spanish - Page 7
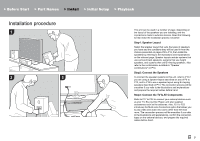
Installation procedure
 |
View all Pioneer SC-LX502 manuals
Add to My Manuals
Save this manual to your list of manuals |
Page 7 highlights
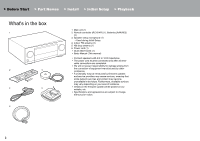
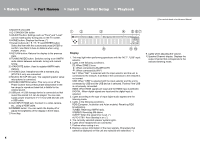
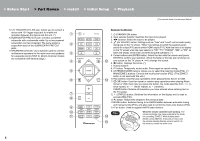
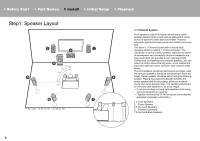
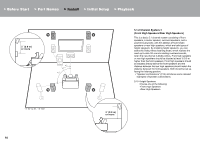
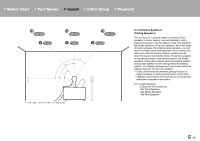
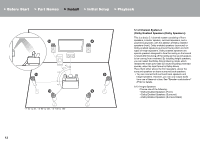
> Before Start > Part Names > Install > Initial Setup > Playback Installation procedure 1 2 3 This unit can be used in a number of ways, depending on the layout of the speakers you are installing, and the connections made to external devices. Read the following to help make the installation process smoother. Step1: Speaker Layout Select the speaker layout that suits the types of speakers you have and the conditions they will be used in from the choices presented on pages P8 to P13, then install the speakers by referring to the illustrations and explanations on the relevant page. Speaker layouts include systems that use surround back speakers, systems that use height speakers, and systems that use Bi-Amping speakers. Also refer to the combinations available in "Speaker combinations" on P14. Step2: Connect the Speakers To connect the speaker systems to this unit, refer to P15 if you are using a speaker layout described on one of P8 to P12, and to P16 to use a speaker layout using Bi-Amping speakers described on P13. The connection process will be smoother if you refer to the illustrations and explanations and prepare the required cables before hand. Step3: Connect the TV & AV Components Refer to P17 to P24 to connect your external devices such as your TV, Blu-ray Disc Player, and also supplied accessories such as the antennas. Also, P21 to P23 introduces the Multi-zone Connection option that allows you to play video and audio into rooms other than the main room. The connection process will be smoother if you refer to the illustrations and explanations, confirm the connection types on the external devices, and prepare the required cables before hand. En 7
-
 1
1 -
 2
2 -
 3
3 -
 4
4 -
 5
5 -
 6
6 -
 7
7 -
 8
8 -
 9
9 -
 10
10 -
 11
11 -
 12
12 -
13
-
14
-
15
-
16
-
17
-
18
-
19
-
20
-
21
-
22
-
23
-
24
-
25
-
26
-
27
-
28
-
29
-
30
-
31
-
32
-
33
-
34
-
35
-
36
-
37
-
38
-
39
-
40
-
41
-
42
-
43
-
44
-
45
-
46
-
47
-
48
-
49
-
50
-
51
-
52
-
53
-
54
-
55
-
56
-
57
-
58
-
59
-
60
-
61
-
62
-
63
-
64
-
65
-
66
-
67
-
68
-
69
-
70
-
71
-
72
-
73
-
74
-
75
-
76
-
77
-
78
-
79
-
80
-
81
-
82
-
83
-
84
-
85
-
86
-
87
-
88
-
89
-
90
-
91
-
92
-
93
-
94
-
95
-
96
-
97
-
98
-
99
-
100
-
101
-
102
-
103
-
104
-
105
-
106
-
107
-
108
 |
 |