Pioneer VSX-1015TX Owner's Manual - Page 25
Mcacc Setup Mic Jack - microphone
 |
View all Pioneer VSX-1015TX manuals
Add to My Manuals
Save this manual to your list of manuals |
Page 25 highlights
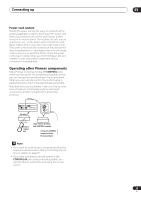
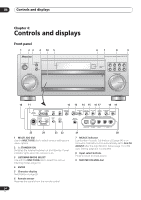
Controls and displays 04 10 Front panel controls To access the front panel controls, push gently on the lower third portion of the panel with your finger. STANDBY/ON LISTESNEILNEGCMT ODE MULTI JOG ENTER AUDIO/VIDEO MULTI-CHANNEL DVD/LD TV/SAT RECEIVER VSX-1015TX CD DVR/VCR TACPDE-R/M/ D VIDEO1 TUNER MASTER VOLUME VIDEO2 11 TUNER CONTROL TUNER EDIT Use with the MULTI JOG dial to memorize and name stations for recall (page 50). TUNING/STATION Use with the MULTI JOG dial to select station presets and radio frequencies (page 49). BAND Switches between AM and FM radio bands (page 49). MPX Press to receive a radio broadcast in mono (page 49). 12 MIDNIGHT/LOUDNESS Use Midnight when listening to movie soundtracks at low volume. Use Loudness to boost the bass and treble at low volume (page 38). 13 TONE When the STEREO mode is selected, press this button to access the bass and treble controls, which you can then adjust with the MULTI JOG dial. 14 ACOUSTIC EQ Press to select an Acoustic Calibration EQ setting (page 34). 15 DIALOG ENHANCEMENT Use to make dialog stand out when watching TV or a movie (page 38). 16 MULTI CH IN Press to select the component connected to the MULTI CH IN terminals (for example, a DVD-Audio player). See Selecting the multichannel analog inputs on page 39. 17 SIGNAL SELECT Use to select an input signal (page 35). 18 EXTENDED MODE Selects the surround back channel mode (page 36) or virtual surround back mode (page 37). 19 SPEAKERS Use to change the speaker system (page 58). 20 VIDEO2 INPUT See Connecting to the front panel video terminal on page 18. 21 MCACC SETUP MIC jack Use to connect the supplied microphone. 22 FL DIMMER Dims or brightens the display. 23 INPUT ATT Attenuates (lowers) the level of an analog input signal to prevent distortion. 24 System Setup menu controls SYSTEM SETUP Use with the MULTI JOG dial to access the System Setup menu (page 11, page 40, page 62). RETURN Press to confirm and exit the current menu screen. 25 PHONES jack Use to connect headphones. When the headphones are connected, there is no sound output from the speakers. 25 En
-
 1
1 -
2
-
3
-
4
-
5
-
6
-
7
-
8
-
9
-
10
-
11
-
12
-
13
-
14
-
15
-
16
-
17
-
18
-
19
-
 20
20 -
 21
21 -
 22
22 -
 23
23 -
 24
24 -
 25
25 -
 26
26 -
 27
27 -
 28
28 -
 29
29 -
 30
30 -
31
-
32
-
33
-
34
-
35
-
36
-
37
-
38
-
39
-
40
-
41
-
42
-
43
-
44
-
45
-
46
-
47
-
48
-
49
-
50
-
51
-
52
-
53
-
54
-
55
-
56
-
57
-
58
-
59
-
60
-
61
-
62
-
63
-
64
-
65
-
66
-
67
-
68
-
69
-
70
-
71
-
72
-
73
-
74
-
75
-
76
 |
 |
