Pioneer VSX 1017TXV Owner's Manual - Page 26
Stereo/f.s.surr - how to reset it
 |
View all Pioneer VSX 1017TXV manuals
Add to My Manuals
Save this manual to your list of manuals |
Page 26 highlights
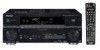
04 Controls and displays 7 TV CONTROL buttons These buttons are dedicated to control the TV assigned to the TV CTRL button. Thus if you only have one TV to hook up to this system assign it to the TV CTRL input source button. If you have two TVs, assign the main TV to the TV CTRL button (see page 57 for more on this). TV - Use to turn on/off the power of the TV. TV VOL +/- - Use to adjust the volume on your TV. INPUT SELECT - Use to select the TV input signal. TV CH +/- - Use to select channels. 8 Component control buttons The main buttons ( , , etc.) are used to control a component after you have selected it using the input source buttons. The controls above these buttons can be accessed after you have selected the corresponding input source button (for example DVD, DVR1 or TV). The following controls can be accessed when listening to the built-in tuner: MPX - Switches between stereo and mono reception of FM broadcasts. If the signal is weak then switching to mono will improve the sound quality (page 33). DISP - Switches between named station presets and radio frequencies (page 34). 9 Receiver controls THX - Press to select a Home THX listening mode (page 28). STANDARD - Press for Standard decoding and to switch between the various 2 Pro Logic IIx and Neo:6 options (page 27). ADV.SURR - Use to switch between the various surround modes (page 28). STEREO/F.S.SURR - Switches between the stereo playback mode (page 29) and the Front Stage Surround Advance mode (page 29). AUTO SURR - Press to select the Auto Surround mode (page 27) or the Stream Direct mode (page 30). Stream Direct playback bypasses the tone controls and any other signal processing for the most accurate reproduction of a source (page 30). ACOUSTIC EQ - Press to select an Acoustic Calibration EQ setting (page 30). SIGNAL SEL - Use to select an input signal (page 30). 10 MULTI OPE Use this button to perform multi operations (page 58). 11 SHIFT Press to access the controls outlined in white boxes (for example, INPUT SELECT ), or to display the currently selected input source in the remote control LCD. 12 SOURCE Press to turn on/off other components connected to the receiver (see page 57 for more on this). 13 Character display (LCD) This display shows information when transmitting control signals. The following commands are shown when you're setting the remote to control other components (see Controlling the rest of your system on page 57): SETUP - Indicates the setup mode, from which you choose the options below. PRESET - See Selecting preset codes directly on page 57. MULTI OP - See Multi Operation and System Off on page 58. SYS OFF - See Multi Operation and System Off on page 58. DIRECT F - See Direct function on page 57. RESET - See Resetting the remote control presets on page 57. READ ID - See Confirming preset codes on page 57. 14 RECEIVER Switches the remote to control the receiver (used to select the green commands above the number buttons (ANALOG ATT, etc.)). Also use this button to set up surround sound (page 8, page 35). 15 VOL +/- Use to set the listening volume. 16 MUTE Mutes the sound or restores the sound if it has been muted (adjusting the volume also restores the sound). 17 EFFECT/CH SEL and LEVEL +/- Press repeatedly to select a channel, then use +/- to adjust the level (see Tip on page 41). Also adjusts the level of the Advanced Surround effects, the Dolby Pro Logic IIx Music and Neo:6 Music parameters and the sound delay setting (page 29). You can then use the +/- buttons to make these adjustments. 26 En
-
 1
1 -
2
-
3
-
4
-
5
-
6
-
7
-
8
-
9
-
10
-
11
-
12
-
13
-
14
-
15
-
16
-
17
-
18
-
19
-
20
-
 21
21 -
 22
22 -
 23
23 -
 24
24 -
 25
25 -
 26
26 -
 27
27 -
 28
28 -
 29
29 -
 30
30 -
 31
31 -
32
-
33
-
34
-
35
-
36
-
37
-
38
-
39
-
40
-
41
-
42
-
43
-
44
-
45
-
46
-
47
-
48
-
49
-
50
-
51
-
52
-
53
-
54
-
55
-
56
-
57
-
58
-
59
-
60
-
61
-
62
-
63
-
64
-
65
-
66
-
67
-
68
-
69
-
70
-
71
-
72
-
73
-
74
 |
 |
