Pioneer VSX 1017TXV Owner's Manual - Page 61
Control Out - av receiver
 |
View all Pioneer VSX 1017TXV manuals
Add to My Manuals
Save this manual to your list of manuals |
Page 61 highlights
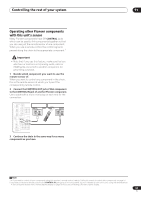
Controlling the rest of your system Operating other Pioneer components with this unit's sensor Many Pioneer components have SR CONTROL jacks which can be used to link components together so that you can use just the remote sensor of one component. When you use a remote control, the control signal is passed along the chain to the appropriate component.1 Important • Note that if you use this feature, make sure that you also have at least one set of analog audio, video or HDMI jacks connected to another component for grounding purposes. 1 Decide which component you want to use the remote sensor of. When you want to control any component in the chain, this is the remote sensor at which you'll point the corresponding remote control. 2 Connect the CONTROL OUT jack of that component to the CONTROL IN jack of another Pioneer component. Use a cable with a mono mini-plug on each end for the connection. OPTICAL DIGITAL IN 1 (DVD/LD) OUT IN 1 (DVR/ VCR1) IN 2 (TV/SAT) IN 2 (TV/SAT) IN 3 (CD) COMPONENT VIDE Y PB IN 1 IN 2 Y PB OUT HDMI ASSIGNABLE 12 XM IN ASSIGNABLE 13 S-VIDEO CONTROL iPod OUT V IN IN AUDIO IN L IN 1 (DVD/LD) R IN 2 (DVR/VCR2) CD COAXIAL ASSIGNABLE 12 OUT IN CD-R/TAPE/MD CONTROL IN OUT RECEIVER RAEVMOPRTEE-CPORNOTGRROALMUMNEITDSAEINNLDEPCULTETARNING SSOYSUTERMCOEFF DVD CD SLEEP SR+ TV DVR 2 CD-R DVR1 TUXNM ERARDIO SB ch TV CTRL ROOM RECEIVER 2 D.ACCESS DIALOG E +10 TOP MENU SDETTVUPMENU ST TUNE DIMMER AANTATLOG PHASE LOMUIDDNNIEGSHST/ CLASS S.RETRIEVER ENTER DISC GUIDE CATEGORY ENTER TUNE ST TV VOL DTV ON/OFF TV SEINLEPCUTT CONTROL TV CH MPX REC DTV INFO BAND VOL MENU T.EDIT RETURN SHIMFTULTIEOFPFTEEHCXATDA/UICUSTHPODSSISOETUALRNRDSUAARCBDOTUITSALTDIECV.ESQCUHRHRSDIGRDNEASCLTESSRETCELOHOPDVDJUKMEBUOTXE RECEIVER CONTROL IN OUT 3 Continue the chain in the same way for as many components as you have. 11 Note 1 • If you want to control all your components using this receiver's remote control, refer to Setting the remote to control other components on page 57. If you have connected a remote control to the CONTROL IN jack (using a mini-plug cable), you won't be able to control this unit using the remote sensor. • See Using this receiver with a Pioneer plasma display on page 50 if you are connecting a Pioneer plasma display. 61 En
-
 1
1 -
2
-
3
-
4
-
5
-
6
-
7
-
8
-
9
-
10
-
11
-
12
-
13
-
14
-
15
-
16
-
17
-
18
-
19
-
20
-
21
-
22
-
23
-
24
-
25
-
26
-
27
-
28
-
29
-
30
-
31
-
32
-
33
-
34
-
35
-
36
-
37
-
38
-
39
-
40
-
41
-
42
-
43
-
44
-
45
-
46
-
47
-
48
-
49
-
50
-
51
-
52
-
53
-
54
-
55
-
 56
56 -
 57
57 -
 58
58 -
 59
59 -
 60
60 -
 61
61 -
 62
62 -
 63
63 -
 64
64 -
 65
65 -
 66
66 -
67
-
68
-
69
-
70
-
71
-
72
-
73
-
74
 |
 |
