Pioneer VSX-21TXH Owner's Manual - Page 99
Amp Err, Advanced, Mcacc, Advanced Mcacc, Amp Overheat, 12v Trg Err, Speakers, Signal Sel, Large
 |
UPC - 012562957067
View all Pioneer VSX-21TXH manuals
Add to My Manuals
Save this manual to your list of manuals |
Page 99 highlights
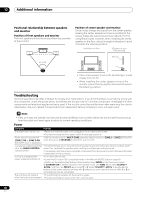
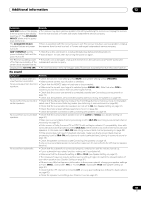
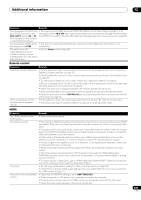
Additional information 12 Symptom Remedy AMP ERR blinks in the display, • The receiver may have a serious problem. Do not try switching the receiver on. Unplug the receiver then the power automatically from the wall and call a Pioneer authorized independent service company. switches off. The ADVANCED MCACC blinks and the power does not turn on. The ADVANCED MCACC indicator flashes and power turns off. • There is a problem with the receiver's power unit. The receiver may have a serious problem. Unplug the receiver from the wall and call a Pioneer authorized independent service company. AMP OVERHEAT and the • Allow the unit to cool down in a well-ventilated place before switching back on. power indicator flash and the • Wait at least 1 minute, then try turning the power on again. power turns off. The Receiver suddenly power • The power unit is damaged. Unplug the receiver from the wall and call a Pioneer authorized off or the blue indicator at the independent service company. center of the receiver flashes. Display blinks 12V TRG ERR. • An error has arisen in the 12 V trigger jacks. Reconnect accurately then turn the power back on. No sound Symptom Remedy No sound is output when an • Check the volume, mute setting (press MUTE) and speaker setting (press SPEAKERS). input function is selected. • Make sure the correct input function is selected. No sound output from the front • Check that the MCACC setup microphone is disconnected. speakers. • Make sure the correct input signal is selected (press SIGNAL SEL). Note that when PCM is selected, you won't be able to hear any other signal format. • Check that the source component is connected properly (see Connecting your equipment on page 15). • Check that the speakers are connected properly (see Connecting the speakers on page 19). No sound from the surround or • Check that the Stereo listening mode or the Front Stage Surround Advance mode isn't selected; center speakers. select one of the surround listening modes (see Listening in surround sound on page 56). • Check that the surround/center speakers are not set to NO (see Speaker Setting on page 91). • Check the channel level settings (see Channel Level on page 92). • Check the speaker connections (see Connecting the speakers on page 19). No sound from surround back • Check that the surround back speakers are set to LARGE or SMALL (see Speaker Setting on speakers. page 91). • Make sure surround back channel processing is set to SBch ON (see Using surround back channel processing on page 59). • If the source is Dolby Surround EX or DTS-ES with no flag to indicate 6.1 compatibility, then with surround back channel processing set to SBch Auto, there will be no sound from the surround back speakers. In this case, set to SBch ON (see Using surround back channel processing on page 59). • If the source does not have 6.1 playback channels, make sure that surround back channel processing is set to SBch ON and a surround mode is selected (see Listening in surround sound on page 56). • Check the speaker connections (see Connecting the speakers on page 19). If only one surround back speaker is connected, make sure it's connected to the left channel speaker terminal. No sound from subwoofer. • Check that the subwoofer is connected properly, switched on and the volume turned up. • If your subwoofer has a sleep function, make sure it is switched off. • Make sure that the Subwoofer setting is YES or PLUS (see Speaker Setting on page 91). • The crossover frequency may be set too low; try setting it higher to match the characteristics of your other speakers (see Speaker Setting on page 91). • If there is very little low frequency information in the source material, change your speaker settings to Front: SMALL / Subwoofer: YES, or Front: LARGE / Subwoofer: PLUS (see Speaker Setting on page 91). • Check that the LFE channel is not set to OFF, or a very quiet setting (see Setting the Audio options on page 66). • Check the speaker level settings (see Channel Level on page 92). 99 En
-
 1
1 -
2
-
3
-
4
-
5
-
6
-
7
-
8
-
9
-
10
-
11
-
12
-
13
-
14
-
15
-
16
-
17
-
18
-
19
-
20
-
21
-
22
-
23
-
24
-
25
-
26
-
27
-
28
-
29
-
30
-
31
-
32
-
33
-
34
-
35
-
36
-
37
-
38
-
39
-
40
-
41
-
42
-
43
-
44
-
45
-
46
-
47
-
48
-
49
-
50
-
51
-
52
-
53
-
54
-
55
-
56
-
57
-
58
-
59
-
60
-
61
-
62
-
63
-
64
-
65
-
66
-
67
-
68
-
69
-
70
-
71
-
72
-
73
-
74
-
75
-
76
-
77
-
78
-
79
-
80
-
81
-
82
-
83
-
84
-
85
-
86
-
87
-
88
-
89
-
90
-
91
-
92
-
93
-
 94
94 -
 95
95 -
 96
96 -
 97
97 -
 98
98 -
 99
99 -
 100
100 -
 101
101 -
 102
102 -
 103
103 -
 104
104 -
105
-
106
-
107
-
108
-
109
-
110
-
111
-
112
-
113
-
114
-
115
-
116
-
117
-
118
-
119
-
120
-
121
-
122
-
123
 |
 |
