Pioneer VSX-D498 Owner's Manual
Pioneer VSX-D498 Manual
 |
View all Pioneer VSX-D498 manuals
Add to My Manuals
Save this manual to your list of manuals |
Pioneer VSX-D498 manual content summary:
- Pioneer VSX-D498 | Owner's Manual - Page 1
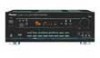
AUDIO/VIDEO MULTI-CHANNEL RECEIVER VSX-D498 Operating Instructions - Pioneer VSX-D498 | Owner's Manual - Page 2
this Pioneer product. Please read through these operating instructions so you will know how to operate your model properly. After you have finished reading the instructions, put them away in a safe place for future reference. In some countries or regions, the shape of the power plug and power outlet - Pioneer VSX-D498 | Owner's Manual - Page 3
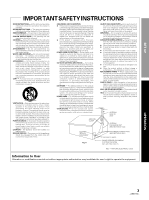
following the operating instructions. Adjust only those controls that are covered by the operating instructions as an improper adjustment of other controls may result in ) GROUND CLAMPS POWER SERVICE GROUNDING ELECTRODE SYSTEM (NEC ART 250, PART H) NEC - NATIONAL ELECTRICAL CODE Information to User - Pioneer VSX-D498 | Owner's Manual - Page 4
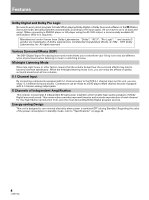
made to a DVD player, Multi channel decoder equipped with 5.1 channel analog output jacks. 5 Channels of Independent Amplification This receiver incorporates 5 independent 80 watt power amplifiers which enable high quality playback of Dolby Digital surround sound. This construction provides improved - Pioneer VSX-D498 | Owner's Manual - Page 5
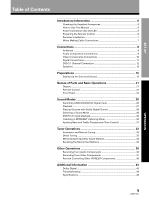
Stations 34 Recalling the Memorized Stations 35 Other Operations 36 Recording from Audio Components 36 Recording from Video Components 37 Remote Controlling Other PIONEER Components 38 Additional Information 43 Dolby Digital 43 Troubleshooting 44 Specifications 46 5 OPERATION - Pioneer VSX-D498 | Owner's Manual - Page 6
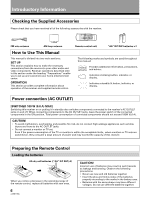
other audio and video components. Receiver operations described later in this section under the heading "Preparations" enable you to set up and customize your home entertainment center. OPERATION This section provides complete information about operation of the receiver and supplied remote control - Pioneer VSX-D498 | Owner's Manual - Page 7
the receiver's remote control at the remote sensor on the front panel of the receiver. The receiver then sends the remote control signals to the other devices via the CONTROL OUT terminal. CONTROL OUT IN Receiver CONTROL IN OUT PIONEER component bearing the Î mark. Remote Control To CONTROL IN - Pioneer VSX-D498 | Owner's Manual - Page 8
reception, attach horizontally along a window frame, etc.). AM loop antenna (See below) ANTENNA DIGITAL IN PCM/ OPT 1 OPT 2 FM UNBAL 75Ω DVD 5.1 CH INPUT SURROUND L SUBWOOFER AM LOOP ANTENNA TO MONITOR TV CONTROL OUT IN VIDEO OUT IN IN PCM/ COAX R CENTER IN OUT IN IN OUT IN IN - Pioneer VSX-D498 | Owner's Manual - Page 9
Connect your audio components as shown below. Refer to "Digital Connections" on page 11 when making digital connections from your DVD or LD player. ANTENNA DIGITAL IN PCM/ OPT 1 OPT 2 FM UNBAL 75Ω DVD 5.1 CH INPUT SURROUND L SUBWOOFER AM LOOP ANTENNA TO MONITOR TV CONTROL OUT IN VIDEO OUT IN - Pioneer VSX-D498 | Owner's Manual - Page 10
SPEAKERS CAUTION: ATTENTION: SEE INSTRUCTION SE REPOTER AU MANUAL MODE D'EMPLON 8~16Ω / SPEAKER 8~16Ω / HAUT- PARLEUR 6 ~ LESS THAN 8Ω /SPEAKER 6 ~ MOINS DE 8Ω /HAUT-PARLEUR IMPEDANCE SELECTOR 7 Front VIDEO VIDEO L AUDIO R INPUT Video camera (etc.) VIDEO INPUT L R » OUTPUT V L R TV - Pioneer VSX-D498 | Owner's Manual - Page 11
is then processed by the receiver through the digital input jacks. For more details, refer to the instruction manual supplied with the RFD-1. The factory setting for each of the digital inputs is described below. COAX : DVD OPT 1 : CD OPT 2 : MD 7 Digital audio cords/Fiber-optic cables Commercially - Pioneer VSX-D498 | Owner's Manual - Page 12
be made from a DVD player, Multi channel decoder equipped with 5.1 analog outputs to the 5.1 analog inputs on this unit. ANTENNA DIGITAL IN PCM/ OPT 1 OPT 2 FM UNBAL 75Ω DVD 5.1 CH INPUT SURROUND L SUBWOOFER AM LOOP ANTENNA TO MONITOR TV CONTROL OUT IN VIDEO OUT IN IN PCM/ COAX R CENTER - Pioneer VSX-D498 | Owner's Manual - Page 13
DVD 5.1 channel, DSP mode, (Dolby) Surround mode). • When you use the speaker on your TV as a center speaker, please connect the CENTER PREOUT jack on this unit to the audio input jack on your TV. In this case, the center speaker shown below is unnecessary. Refer to the instruction manual supplied - Pioneer VSX-D498 | Owner's Manual - Page 14
TV screen, place the speakers farther away from the TV. • Install the center speaker above, below the TV so that the sound of the center channel is localized at the TV screen. CAUTION: When installing the center speaker on top of the TV, be sure to secure it with tape or - Pioneer VSX-D498 | Owner's Manual - Page 15
TEST TONE 7 8 9 SURROUND ATT. 0 CD DISC FUNCTION DSP MODE MUTING CHANNEL SELECT LEVEL RECEIVER STANDBY/ON EFFECT MASTER VOLUME Î AV MULTI-CHANNEL RECEIVER REMOTE CONTROL UNIT 2 33 4 memo • The setting mode is automatically exited if no operation is performed for 20 seconds. Press - Pioneer VSX-D498 | Owner's Manual - Page 16
TEST TONE 7 8 9 SURROUND ATT. 0 CD DISC FUNCTION DSP MODE MUTING CHANNEL SELECT LEVEL RECEIVER STANDBY/ON EFFECT MASTER VOLUME AV MULTI-CHANNEL RECEIVER REMOTE CONTROL UNIT Î 1 Press % or fi to set the front speaker. @,# %,fi Front speaker (initial setting is "L (Large)") • Select - Pioneer VSX-D498 | Owner's Manual - Page 17
Setting speakers to "Small" in "SPEAKER setting mode" sends the respective channels' bass frequencies to the sub woofer (or "Large" speakers). This Hz when only small speakers are used. LFE attenuator setting mode Dolby Digital audio sources include ultra-low bass tones. Set the LFE attenuator as - Pioneer VSX-D498 | Owner's Manual - Page 18
Preparations Low cut filter ON/OFF setting mode Turn the low cut filter ON when distorted sound is output through the sub woofer. memo • Initial setting is "OFF". • If the SUB WOOFER is set to "OFF" in the SUB WOOFER ON/OFF setting mode, the low cut filter cannot be set. SIGNAL SP A SELECT - Pioneer VSX-D498 | Owner's Manual - Page 19
SELECT ANALOG • Initial setting is "OFF". • When the volume level is increased, set to OFF. • For listening enjoyment at low volumes, set to "MAX" for maximum dynamic range compression. • Dynamic range control is effective only when a Dolby Digital signal is being played back. SP A Press % or - Pioneer VSX-D498 | Owner's Manual - Page 20
LEVEL SW SL SR 4 RECEIVER STANDBY/ON EFFECT MASTER VOLUME 2 memo • Depending on the "SPEAKER setting mode" chosen, some channels may not output test tone (refer to page 16). Î AV MULTI-CHANNEL RECEIVER REMOTE CONTROL UNIT • Test tone is only output in Dolby mode. 4 Adjust speaker levels - Pioneer VSX-D498 | Owner's Manual - Page 21
playback of a Dolby Digital signal. However, PRO LOGIC lights during 2 channel playback of Dolby Digital. 3 SFC (DSP) mode indicator Lights when the DSP mode is selected. (Refer to "Surround modes" on page 25) 4 ATT indicator Lights when ATT (refer to "Remote Control", 9, Number buttons page 22 - Pioneer VSX-D498 | Owner's Manual - Page 22
9 SURROUND ATT. 0 CD DISC FUNCTION DSP MODE MUTING CHANNEL SELECT LEVEL RECEIVER STANDBY/ON EFFECT MASTER VOLUME Î AV MULTI-CHANNEL RECEIVER REMOTE CONTROL UNIT 8 9 0 = ~ 1 SOURCE SELECT buttons Use these buttons to select the remote operation mode. For example, pressing TUNER sets the - Pioneer VSX-D498 | Owner's Manual - Page 23
STANDBY STANDBY/ON VSX-D498 AUDIO/VIDEO MULTI-CHANNEL RECEIVER MPX CLASS MEMORY volumes. = Remote sensor Point the remote control toward the remote sensor to operate the receiver. ~ button Press to select the (Dolby) Surround mode. This mode automatically switches between Dolby Digital and Dolby - Pioneer VSX-D498 | Owner's Manual - Page 24
: ANALOG : Selects the analog (R and L) audio signals. DIGITAL : Selects the digital audio signals. This receiver automatically detects and displays the format of the signal being input. AC-3 lights when Dolby Digital signals are input. (Dolby Digital decoding is switched automatically.) • SIGNAL - Pioneer VSX-D498 | Owner's Manual - Page 25
receiver incorporates two surround modes for enjoyment of a variety of program sources. Surround modes (Dolby) Surround mode Use this mode when playing Dolby Digital or Dolby channel) stereo sources, Dolby Surround sources, and Dolby Digital sounds emulates the raw power of the dance music. - Pioneer VSX-D498 | Owner's Manual - Page 26
a karaoke microphone and LD recorded with analog audio only is not output from the digital output, set SIGNAL SELECT to "ANALOG". • This receiver can only play back Dolby Digital, PCM (32kHz, 44kHz, and 48kHz), digital signal formats. With digital signal formats other than these, set SIGNAL SELECT - Pioneer VSX-D498 | Owner's Manual - Page 27
. 0 CD DISC FUNCTION DSP MODE MUTING CHANNEL SELECT LEVEL RECEIVER STANDBY/ON EFFECT MASTER VOLUME Î AV MULTI-CHANNEL RECEIVER REMOTE CONTROL UNIT 1 Turn on the power of the playback component. 2 Press RECEIVER STANDBY/ON to turn on the receiver. Be sure that the standby indicator turns - Pioneer VSX-D498 | Owner's Manual - Page 28
DSP MODE MUTING CHANNEL SELECT LEVEL RECEIVER STANDBY/ON EFFECT MASTER VOLUME Î AV MULTI-CHANNEL RECEIVER REMOTE CONTROL UNIT 3 1 Follow steps 1 to 3 of the playback procedure. (Refer to "Playback" on page 27.) 1 Turn on the power of the playback component. 2 Press RECEIVER STADBY/ON to - Pioneer VSX-D498 | Owner's Manual - Page 29
MODE MUTING CHANNEL SELECT LEVEL RECEIVER STANDBY/ON EFFECT MASTER VOLUME Î AV MULTI-CHANNEL RECEIVER REMOTE CONTROL UNIT Select the sound mode. • For (Dolby) \ Press EFFECT +/-. • Dolby Digital or Dolby Srround sources can be used simultaneously with DSP modes. 2 OPERATION 29 - Pioneer VSX-D498 | Owner's Manual - Page 30
SP A dB memo • When DVD 5.1ch input is selected, Dolby Surround mode, DSP mode, SIGNAL SELECT, ATT, DIRECT, TONE, MIDNIGHT mode, and speakers B cannot be operated. • When DVD 5.1ch input is selected, only the volume level and channel levels can be set. Listening in MIDNIGHT Listening Mode When - Pioneer VSX-D498 | Owner's Manual - Page 31
be adjusted in a range of ±6. • Pressing + and - simultaneously restores the setting to 0. • In cases described below, the tone control cannot be adjusted. 1 Dolby Surround mode is ON. 2 DSP mode is ON. 3 DVD 5.1ch input is selected. 4 Dolby Digital signals are being input. OPERATION 31 - Pioneer VSX-D498 | Owner's Manual - Page 32
remote or FM/AM on the CHANNEL SELECT LEVEL RECEIVER STANDBY/ON EFFECT MASTER VOLUME 4 front panel to select the band (FM or AM). Each press switches the band: FM j AM Î AV MULTI-CHANNEL RECEIVER REMOTE CONTROL Repeat to locate other stations. For Manual Tuning • To change frequencies one - Pioneer VSX-D498 | Owner's Manual - Page 33
DIRECT ACCESS to activate the direct tuning mode. RECEIVER STANDBY/ON EFFECT MASTER VOLUME The cursor blinks in the display on the front panel. Î AV MULTI-CHANNEL RECEIVER REMOTE CONTROL UNIT SIGNAL SELECT ANALOG SP A dB 4 Use the number buttons to enter the frequency of the station you - Pioneer VSX-D498 | Owner's Manual - Page 34
radio stations in 3 classes (each holding 10 channels). When memorizing FM frequencies, the receiver also memorizes the MPX mode (STEREO or MONO). Using the front panel 32 4 1 Tune to the desired station. See "Automatic and Manual Tuning - Pioneer VSX-D498 | Owner's Manual - Page 35
VOLUME The station you were previously tuned to is received automatically. STATION +/- SIGNAL SELECT ANALOG SP A dB 3 2 Press CLASS repeatedly to select a class. Each press switches the display: = CLASS A = CLASS B = CLASS C Î AV MULTI-CHANNEL RECEIVER REMOTE CONTROL UNIT 3 Use the number - Pioneer VSX-D498 | Owner's Manual - Page 36
from the source component. Î AV MULTI-CHANNEL RECEIVER REMOTE CONTROL UNIT SIGNAL SELECT 1 TAPE 2 receiver outputs the input signal directly to the recording device. As there is no conversion of the audio signal, recordings cannot be made from analog to digital, and similarly from digital - Pioneer VSX-D498 | Owner's Manual - Page 37
DSP MODE MUTING CHANNEL SELECT LEVEL RECEIVER STANDBY/ON EFFECT MASTER VOLUME Î AV MULTI-CHANNEL RECEIVER REMOTE CONTROL UNIT 1 Select the component you want to record. Be sure to press SIGNAL SELECT on the front panel to choose "ANALOG". (Refer to "Switching ANALOG/DIGITAL signal input" on - Pioneer VSX-D498 | Owner's Manual - Page 38
ATT. 0 CD DISC FUNCTION DSP MODE MUTING CHANNEL SELECT LEVEL RECEIVER STANDBY/ON EFFECT MASTER VOLUME Î AV MULTI-CHANNEL RECEIVER REMOTE CONTROL UNIT 4 5 6 1 Press to switch the DVD player on or off. 27 Press to stop playback. (With certain models, pressing this button when the unit is - Pioneer VSX-D498 | Owner's Manual - Page 39
ATT. 0 CD DISC FUNCTION DSP MODE MUTING CHANNEL SELECT LEVEL RECEIVER STANDBY/ON EFFECT MASTER VOLUME Î AV MULTI-CHANNEL RECEIVER REMOTE CONTROL UNIT 4 5 6 7 1 Press to switch the LD player on or off. 27 Press to stop playback. (With certain models, pressing this button when the unit is - Pioneer VSX-D498 | Owner's Manual - Page 40
FUNCTION DSP MODE MUTING CHANNEL SELECT LEVEL RECEIVER STANDBY/ON EFFECT MASTER VOLUME Î AV MULTI-CHANNEL RECEIVER REMOTE CONTROL UNIT 3 4 1 Press to switch the TV on or off. 2 TV FUNC. Press to switch the TV's input (not possible with all models). (This operation is possible regardless - Pioneer VSX-D498 | Owner's Manual - Page 41
SURROUND ATT. 0 CD DISC FUNCTION DSP MODE MUTING CHANNEL SELECT LEVEL RECEIVER STANDBY/ON EFFECT MASTER VOLUME Î AV MULTI-CHANNEL RECEIVER REMOTE CONTROL UNIT 4 5 6 7 1 Press to switch CD changers, use to select the disc numbers (not possible with all models). OPERATION 41 - Pioneer VSX-D498 | Owner's Manual - Page 42
CHANNEL SELECT LEVEL RECEIVER STANDBY/ON EFFECT MASTER VOLUME Î AV MULTI-CHANNEL RECEIVER REMOTE CONTROL UNIT 4 5 6 7 1 Press to switch the cassette deck on or off (not possible with all models (not possible with all models). 63 Press to start playback. 7 Number buttons Use to operate deck - Pioneer VSX-D498 | Owner's Manual - Page 43
are played back by using the other channel without the Dolby Digital signals for monaural audio signals. Analog sound Dolby Digital (Monaural) sound (Monaural) Digital sound Video Frequency 2 4 6 8 10 12 14 MHz Comparison with Dolby Pro Logic Surround Dolby Digital is also known as the - Pioneer VSX-D498 | Owner's Manual - Page 44
input source is not properly selected. • Disconnect the power plug from the outlet, and insert again. • Make sure the component is connected correctly (refer to pages 9 to 13). • Press MUTING on the remote control. • Adjust MASTER VOLUME. • Press the TAPE 2 MONITOR button. • Press SPEAKERS (A/B) to - Pioneer VSX-D498 | Owner's Manual - Page 45
SELECT is set incorrectly. • The digital inputs are assigned incorrectly, or not at all. Cannot be remote controlled. • The remote control batteries have worn out. • Too far away or bad angle of operation. • There is an obstacle between the receiver and the remote control. • Strong light such as - Pioneer VSX-D498 | Owner's Manual - Page 46
Power Output Claims for Amplifiers. ** Measured by Audio Spectrum Analyzer. VIDEO Section Input (Sensitivity/Impedance) VCR, DVD/LD, TV/SAT, VIDEO Batteries (SIZE "AA" (IEC R6P 2 Remote Control Unit 1 Operating Instructions 1 NOTE: Specifications and the design are subject to possible - Pioneer VSX-D498 | Owner's Manual - Page 47
in the U.S.A. and you wish to locate the nearest Pioneer Authorized Independent Service Company, or if you wish to purchase replacement parts, operating instructions, service manuals, or accessories, please call the number shown below. 8 0 0 - 4 2 1 - 1 4 0 4 Please do not ship your product to - Pioneer VSX-D498 | Owner's Manual - Page 48
A Lifetime Selecting fine audio equipment such as the a safe level: • Start your volume control at a low setting. • Slowly increase power cord can cause a fire or give you an electrical shock. Check the power cord once in a while. When you find it damaged, ask your nearest PIONEER authorized service
-
 1
1 -
 2
2 -
 3
3 -
 4
4 -
 5
5 -
 6
6 -
 7
7 -
8
-
9
-
10
-
11
-
12
-
13
-
14
-
15
-
16
-
17
-
18
-
19
-
20
-
21
-
22
-
23
-
24
-
25
-
26
-
27
-
28
-
29
-
30
-
31
-
32
-
33
-
34
-
35
-
36
-
37
-
38
-
39
-
40
-
41
-
42
-
43
-
44
-
45
-
46
-
47
-
48
 |
 |

AUDIO/VIDEO
MULTI-CHANNEL RECEIVER
VSX-D498
Operating Instructions