Pioneer VSX-D498 Owner's Manual - Page 24
VIDEO INPUT jacks - receivers
 |
View all Pioneer VSX-D498 manuals
Add to My Manuals
Save this manual to your list of manuals |
Page 24 highlights
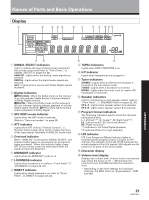
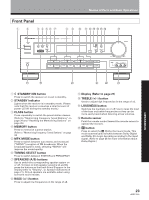
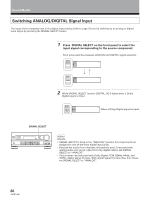
Names of Parts and Basic Operations ! SIGNAL SELECT button Use to select input signals for the digital components. First press DVD/LD, TV/SAT, MD/TAPE 1, CD or VCR (& Function buttons) to select the component, then press SIGNAL SELECT repeatedly to select one of the following: ANALOG : Selects the analog (R and L) audio signals. DIGITAL : Selects the digital audio signals. This receiver automatically detects and displays the format of the signal being input. AC-3 lights when Dolby Digital signals are input. (Dolby Digital decoding is switched automatically.) • SIGNAL SELECT is fixed in the "ANALOG" position for components not assigned to one of the three digital input jacks. • Because the audio from a karaoke microphone and LD recorded with analog audio only is not output from the digital output, set SIGNAL SELECT to "ANALOG". • This receiver can only play back Dolby Digital, PCM (32kHz, 44kHz, and 48kHz),digital signal formats. With digital signal formats other than these, set SIGNAL SELECT to "ANALOG". @ DSP MODE button Press repeatedly to select a DSP sound mode (HALL 1, HALL 2, JAZZ, DANCE, THEATER 1, or THEATER 2). Use these modes to produce surround sound from standard (two channel) stereo sources. # MIDNIGHT button Press to hear effective surround sound at low volume levels. The effect is automatically adjusted according to the volume level. $ MASTER VOLUME After turning on the desired component, rotate to adjust the volume. % PHONES jack Connect headphones for private listening (the speakers turn off automatically). ^ STATION/FREQUENCY (+/-) button STATION: Press to select the preset channel. FREQUENCY: Press to select the frequency. & Function buttons Selects the function. Each press switches the DVD/LD input between DVD/LD and DVD 5.1 channel. * TAPE 2 MONITOR button Switches the TAPE 2 monitor on or off (refer to page 36). ( DIRECT button Switches direct playback on or off. Use to bypass the receiver's tone control circuitry or level control for higher fidelity to the program source. When DIRECT is ON, Dolby, DSP, LOUDNESS and MIDNIGHT mode are automatically turned OFF. ) VIDEO INPUT jacks Connect a video camera, video game system, etc. to the VIDEO INPUT jacks (refer to page 10). 24
-
 1
1 -
2
-
3
-
4
-
5
-
6
-
7
-
8
-
9
-
10
-
11
-
12
-
13
-
14
-
15
-
16
-
17
-
18
-
 19
19 -
 20
20 -
 21
21 -
 22
22 -
 23
23 -
 24
24 -
 25
25 -
 26
26 -
 27
27 -
 28
28 -
 29
29 -
30
-
31
-
32
-
33
-
34
-
35
-
36
-
37
-
38
-
39
-
40
-
41
-
42
-
43
-
44
-
45
-
46
-
47
-
48
 |
 |
