Pioneer XW-NAV1K-K Operating Instructions - Page 21

Pioneer XW-NAV1K-K Manual

Page 21 highlights

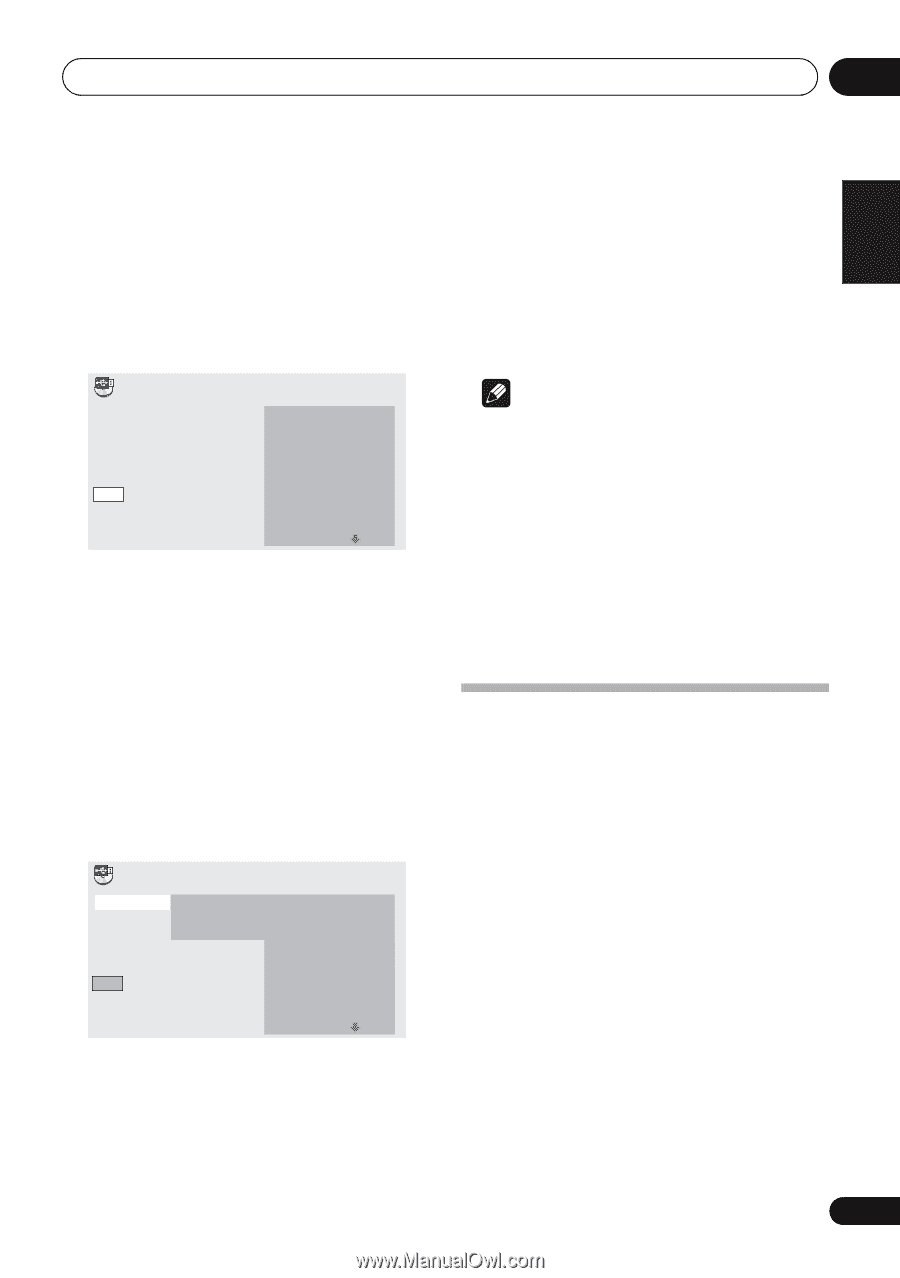
USB playback 06 Recording all the tracks 1 Load the audio CD. • If playback starts automatically, press STOP to stop playback. Only when a CD is in the stop mode, recording can start. • All Clear: Deselect all the tracks. English 5 Use to select 'Bitrate' (transfer rate), then press ENTER. Select '128kbps', '192kbps' or '320kbps'. 6 Use to select 'Start', then press ENTER. Recording starts. Note • If recording does not start, confirm this unit's settings on the TV screen. • The audio signals are converted into MP3 format for output. • 'CD -> USB Rec' can only be selected when the audio CD is stopped. • When recording is completed, a folder named "PIONEER" is automatically created on the USB device. The recorded tracks are stored in this folder. 2 Press USB REC. The CD -> USB Rec screen is displayed. CD -> USB Rec Track 1-13 Select Track Bitrate 

  • 1
  • 2
  • 3
  • 4
  • 5
  • 6
  • 7
  • 8
  • 9
  • 10
  • 11
  • 12
  • 13
  • 14
  • 15
  • 16
  • 17
  • 18
  • 19
  • 20
  • 21
  • 22
  • 23
  • 24
  • 25
  • 26
  • 27
  • 28
  • 29
  • 30
  • 31
  • 32
  • 33
  • 34
  • 35
  • 36
  • 37
  • 38
  • 39
  • 40
  • 41
  • 42
  • 43
  • 44

USB playback
06
21
En
English
Français
Español
Recording all the tracks
1
Load the audio CD.
If playback starts automatically, press
STOP
to stop playback. Only when a CD
is in the stop mode, recording can start.
2
Press
USB REC
.
The CD -> USB Rec screen is displayed.
Selecting the track(s) to be recorded
1
Load the audio CD.
If playback starts automatically, press
STOP
to stop playback. Only when a CD
is in the stop mode, recording can start.
2
Press
HOME MENU
.
The HOME MENU is displayed.
3
Use
/
//
to select ‘CD -> USB Rec’,
then press
ENTER
.
4
Use
/
//
to select ‘
Select Track
Individual
the track(s) you want to
record.
Individual:
Select 1 track at a time.
Select All:
Select all the tracks.
All Clear:
Deselect all the tracks.
5
Use
/
//
to select ‘Bitrate’
(transfer rate), then press
ENTER
.
Select ‘
128kbps
’, ‘
192kbps
’ or ‘
320kbps
’.
6
Use
/
//
to select ‘
Start
’, then
press
ENTER
.
Recording starts.
Note
If recording does not start, confirm this
unit's settings on the TV screen.
The audio signals are converted into MP3
format for output.
• ‘
CD -> USB Rec
’ can only be selected when
the audio CD is stopped.
When recording is completed, a folder
named “PIONEER” is automatically
created on the USB device. The recorded
tracks are stored in this folder.
Playing in the desired order
(Programmed Play)
This unit can play repeatedly files stored in the
USB
storage device. For details, see
Playing in
the desired order (Programmed Play)
on page 19.
CD –> USB Rec
Select Track
Bitrate
Start
Selected Track
Total Time
Track
1–13
"
Track01
"
Track02
"
Track03
"
Track04
"
Track05
"
Track06
"
Track07
"
Track08

01:43

03:17

04:18

04:59

04:20

04:38

04:40

04:11

128kbps

13

055:07
Start
Selected Track
Total Time

00

000:00
Select Track
Bitrate
Individual
Select All
All Clear

01:43

03:17

04:18

04:59

04:20

04:38

04:40

04:11
Track
1–13
Track01
Track02
Track03
Track04
Track05
Track06
Track07
Track08
CD –> USB Rec