Poulan PPB40HT Owner Manual - Page 10
Maintenance
 |
View all Poulan PPB40HT manuals
Add to My Manuals
Save this manual to your list of manuals |
Page 10 highlights
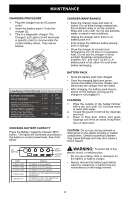
MAINTENANCE CHARGING PROCEDURE 1. Plug the charger into an AC power outlet. 2. Insert the battery pack (1) into the charger (2). 3. This is a diagnostic charger. The Charger LED Lights (3) will illuminate in specific order to communicate the current battery status. They are as follows: 1 CHARGER MAINTENANCE • Keep the charger clean and clear of debris. Do not allow foreign material into the recessed cavity or on the contacts. Wipe with a dry cloth. Do not use solvents, water, or place in wet conditions. • Unplug the charger when there is no battery pack in it. • Fully charge the batteries before placing them in storage. • Store the charger at normal room temperature. Do not store it in excessive heat. Do not use the charger in direct sunlight. Recharge at temperatures between 32°F and 104°F (0-40°C). If battery pack is hot, allow it to cool down before recharging. 3 2 CHARGING PROCEDURE (LED INDICATOR) BATTERY IS CHARGING: FULLY CHARGED: RED RED RED GREEN BATTERY IS TOO WARM OR TOO COLD: (REMOVE FOR APPROX. 30 MINUTES TO ALLOW TO COOL) RED NO BATTERY PRESENT RED DEFECTIVE BATTERY: (REMOVE AND REPLACE WITH RED NEW BATTERY IF THIS OCCURS) ORANGE OFF RED BLINKING CHECKING BATTERY CAPACITY Press the Battery Capacity Indicator (BCI) button. The lights will illuminate according to the battery's current power level. See chart below: BATTERY PACK • Store the battery pack fully charged. • Once the charging light turns green, remove the battery from the charger and disconnect the charger from the outlet. • After charging, the battery pack may be stored on the charger, as long as the charger is not plugged in. CLEANING 1. Wipe the outside of the hedge trimmer with a dry, soft cloth. Do not hose down or wash with water. 2. Scrape the guard to remove dry clippings and mud. 3. Brush or blow dust, debris, and grass clippings out of the air vents. Keep them free of obstruction. CAUTION: Do not use strong solvents or detergents on the plastic housing or plastic components. Certain household cleaners may cause damage and may also cause a shock hazard. BCI BUTTON Lights 4 Green Lights 3 Green Lights 2 Green Lights 1 Green Light Lights go out LIGHT METER BATTERY METER Capacity The battery is at full capacity The battery is at 70% capacity The battery is at 45% capacity The battery is at 10% capacity and requires charging soon The battery is under 10% capacity and requires charging immediately WARNING: To avoid risk of fire, electric shock, or electrocution: • Do not use a damp cloth or detergent on the battery or battery charger. • Always remove the battery pack before cleaning, inspecting, or performing any maintenance on the hedge trimmer. 10
-
 1
1 -
2
-
3
-
4
-
 5
5 -
 6
6 -
 7
7 -
 8
8 -
 9
9 -
 10
10 -
 11
11 -
 12
12 -
 13
13 -
 14
14 -
 15
15 -
16
-
17
-
18
-
19
-
20
-
21
-
22
-
23
-
24
-
25
-
26
-
27
-
28
-
29
-
30
-
31
-
32
-
33
-
34
-
35
-
36
-
37
-
38
-
39
-
40
-
41
-
42
 |
 |
