Poulan PRCS16i Owner Manual - Page 11
OPERATION, To lubricate the saw chain, Before you start the product, To install the battery pack
 |
View all Poulan PRCS16i manuals
Add to My Manuals
Save this manual to your list of manuals |
Page 11 highlights
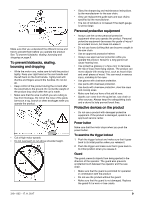
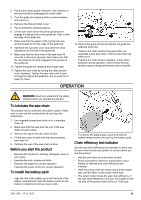
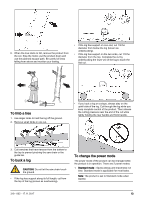
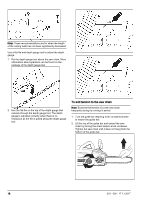
2. Pull the front hand guard rearward in the direction of the front handle to disengage the chain brake. 3. Turn the guide bar retaining knob counterclockwise and remove it. 4. Remove the drive sprocket cover. 5. Put on protective chainsaw gloves. 6. Lift the saw chain above the drive sprocket and engage it in the groove on the guide bar. Start on the top edge of the guide bar. 7. Make sure that the edges of the cutting links are turned forward on the top edge of the guide bar. 8. Assemble the sprocket cover and steer the chain adjuster pin to the hole in the guide bar. 9. Make sure that the drive links of the saw chain fit correctly on the drive sprocket. Also make sure that the saw chain is correctly engaged in the groove in the guide bar. 10. Tighten the guide bar retaining knob finger tight. 11. Tighten the saw chain by turning the chain tension knob clockwise. Tighten the saw chain until it does not sag from below the guide bar, but you can turn it easily by hand. 12. Hold up the guide bar tip and tighten the guide bar retaining knob fully. • Examine the chain tension frequently after you assemble a new saw chain, until the saw chain has been run-in. • Examine the chain tension regularly. A saw chain stretches during operation. Correct chain tension results in good cutting performance and a long life. OPERATION WARNING: Read and understand the safety chapter before you operate the product. To lubricate the saw chain The product has an automatic lubrication system. Make sure to only use the correct chain oil and obey the instructions. 1. Use vegetable-based saw chain oil or a standard chain oil. 2. Make sure that the area near the cap of the saw chain oil tank is clean. 3. Remove the cap of the saw chain oil tank. 4. Fill the saw chain oil tank with the recommended saw chain oil. 5. Put back the cap of the saw chain oil tank. Before you start the product • Examine the product for missing, damaged, loose or worn parts. • Examine the nuts, screws and bolts. • Examine the trigger for correct operation. • Examine the power button for correct operation. To install the battery pack • Align the ribs of the battery pack with the slots in the battery compartment. Push the battery pack into the battery compartment until you hear a click. • To remove the battery pack, push and hold the battery release button and pull out the battery pack. Chain efficiency test indicator Use the saw chain efficiency test indicator to make sure the saw chain tension and system is correct before you use the product. • Add bar and chain oil to the chain oil tank. • Press and hold the efficiency mode button until it flashes to start the saw chain efficiency test indicator. • Hold the product with two hands and pull the trigger fully until the lights on the power meter stop. • The power meter shows the saw chain efficiency. If the saw chain efficiency is too low, the 2 lights on the left side of the power meter will be on. If the saw 319 - 002 - 17.11.2017 11
-
 1
1 -
2
-
3
-
4
-
5
-
 6
6 -
 7
7 -
 8
8 -
 9
9 -
 10
10 -
 11
11 -
 12
12 -
 13
13 -
 14
14 -
 15
15 -
 16
16 -
17
-
18
-
19
-
20
-
21
-
22
-
23
-
24
-
25
-
26
-
27
-
28
-
29
-
30
-
31
-
32
-
33
-
34
-
35
-
36
-
37
-
38
-
39
-
40
-
41
-
42
-
43
-
44
-
45
-
46
-
47
-
48
-
49
-
50
-
51
-
52
-
53
-
54
-
55
-
56
-
57
-
58
-
59
-
60
 |
 |
