Poulan PRCS16i Owner Manual - Page 14
Power meter, Battery state of charge LED, MAINTENANCE, Maintenance schedule, Daily maintenance
 |
View all Poulan PRCS16i manuals
Add to My Manuals
Save this manual to your list of manuals |
Page 14 highlights
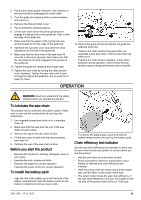
2. Boost mode - The product operates at high speed in Boost mode. Boost mode runs at maximum power for tasks that are not easy. To start Boost mode, push the Boost mode button until the light is on. To stop Boost mode, push the Boost mode button until the light is off. Note: If the trigger is released during operation, the product starts in the last mode. If the product automatically stops, or if the operator pushes the power button, the last used mode is erased from memory. The product is set to Standard mode again when started. Power meter The power meter shows how much power the product uses during operation. • LED lights 4 and 5 show the best performance and best battery efficiency. • LED light 6 on the right side shows maximum power and the minimum battery efficiency. Battery state of charge LED The status of the battery pack is shown until you pull the trigger. When you release the trigger, the status of the battery pack is shown again. The number of LEDs that are on show the current charge level of the battery pack. LED lights All Green LEDs come on LED 1, 2 and 3 come on LED 1 and 2 come on LED 1 comes on LED 1 flashes Battery status Fully Charged (100% - 76%) The battery pack is 75% - 51% charged. The battery pack is 50% - 26% charged. The battery pack is 25% - 6% charged. The battery pack is 5% - 0% charged. Note: If the motor stops and the power LED stays on, push the button on the battery pack. For possible solutions, see Error codes on page 18. Note: When the battery pack is fully discharged, the motor stops immediately. Note: The motor automatically stops if the battery pack or motor controller is too hot during heavy operation. Let the motor and battery pack cool. The product then resets. MAINTENANCE WARNING: Read and understand the safety chapter before you clean, repair or do maintenance on the product. • Clean the guide bar groove. Maintenance schedule Make sure that you obey the maintenance schedule. The intervals are calculated from daily use of the product. The intervals are different if you do not use the product each day. Only do the maintenance work that is found in this manual. Speak to an approved service center about other maintenance work not found in this manual. Daily maintenance • Clean the external surfaces. • Make sure that the trigger lockout and trigger work correctly. • Clean the chain brake and make sure that it operates correctly. • Examine the chain catcher for damage. Replace the chain catcher if it is damaged. • Turn the guide bar daily for more equal wear. • Make sure that the lubrication hole in the guide bar is not clogged. • Remove saw dust and other unwanted material from below the sprocket cover. • Make sure that the guide bar and saw chain get sufficient oil. • Examine the saw chain for: • a crack in the rivets and links. • irregularly worn rivets and links. • the correct tension. • burrs on the chain drive links. If necessary, replace the saw chain. • Sharpen the saw chain. See To sharpen the saw chain on page 15. • Examine the drive sprocket for too much wear and replace if necessary. 14 319 - 002 - 17.11.2017
-
 1
1 -
2
-
3
-
4
-
5
-
6
-
7
-
8
-
 9
9 -
 10
10 -
 11
11 -
 12
12 -
 13
13 -
 14
14 -
 15
15 -
 16
16 -
 17
17 -
 18
18 -
 19
19 -
20
-
21
-
22
-
23
-
24
-
25
-
26
-
27
-
28
-
29
-
30
-
31
-
32
-
33
-
34
-
35
-
36
-
37
-
38
-
39
-
40
-
41
-
42
-
43
-
44
-
45
-
46
-
47
-
48
-
49
-
50
-
51
-
52
-
53
-
54
-
55
-
56
-
57
-
58
-
59
-
60
 |
 |