Poulan PRCS16i Owner Manual - Page 12
To start the motor, To use a spike bumper, To fell a tree, To install the battery, pack
 |
View all Poulan PRCS16i manuals
Add to My Manuals
Save this manual to your list of manuals |
Page 12 highlights
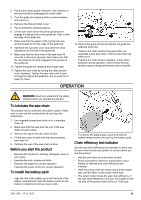
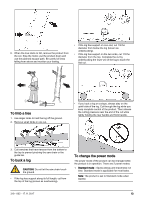
chain efficiency is too high, the 2 lights on the right side of the power meter will be on. The saw chain efficiency is correct when the 2 lights in the center of the power meter are on. • For low saw chain efficiency, increase the saw chain tension. • For high saw chain efficiency, decrease the saw chain tension. Note: Use the saw chain efficiency test indicator as a guide only. Always examine the product and do the necessary maintenance. To start the motor 1. Move the front hand guard forward to engage the chain brake. 2. Install the battery pack. See To install the battery pack on page 11. 3. Press the power button until the light is on. 4. Hold the rear handle with your right hand and the front handle with your left hand. 5. Pull the front hand guard rearward in the direction of the front handle to disengage the chain brake. 6. Press and hold the trigger lockout with your right hand. 7. While you continue to hold the trigger lockout, squeeze and hold the trigger. 8. Continue to squeeze the trigger to operate. Squeeze the trigger lightly for lower speed. Squeeze the trigger more for higher speed. 9. Use the product. To stop the motor 1. Release the trigger. 2. Push the power button until the light is off. To use a spike bumper A spike bumper prevents kickbacks and holds the wood as you cut. The spike bumper is a pivot between the motor body and the guide bar. 1. Put the lower end of the spike bumper at the correct hinge width. 2. Press, with your left hand, against the front handle while you lift the rear handle with your right hand. 3. Saw until you get the correct hinge width. Note: The hinge must have an equal thickness. 4. Saw more than half of the diameter and then put the felling wedge into the saw cut. To fell a tree 1. Remove dirt, stones, loose bark, nails, staples and wire from the tree. 2. Make a notch 1/3 the diameter of the tree, perpendicular to the direction of the fall. 3. Make the lower horizontal notch cut. This helps prevent pinching the saw chain or the guide bar when the second notch is made. 4. Make the felling back cut (X) a minimum of 50 mm (2 in) higher than the horizontal notch cut. Keep the felling back cut parallel to the horizontal notching cut so sufficient wood is left to be a hinge. Do not cut through the hinge. The hinge wood keeps the tree from twisting and falling in the incorrect direction. 5. As the felling back cut nears the hinge, the tree starts to fall. Make sure that the tree can fall in the correct direction and not rock rearward and pinch the saw chain. Stop the cut before the felling back cut is complete to prevent this. Use wedges of wood, plastic or aluminum to open the cut and let the tree fall along the necessary line of fall. 12 319 - 002 - 17.11.2017
-
 1
1 -
2
-
3
-
4
-
5
-
6
-
 7
7 -
 8
8 -
 9
9 -
 10
10 -
 11
11 -
 12
12 -
 13
13 -
 14
14 -
 15
15 -
 16
16 -
 17
17 -
18
-
19
-
20
-
21
-
22
-
23
-
24
-
25
-
26
-
27
-
28
-
29
-
30
-
31
-
32
-
33
-
34
-
35
-
36
-
37
-
38
-
39
-
40
-
41
-
42
-
43
-
44
-
45
-
46
-
47
-
48
-
49
-
50
-
51
-
52
-
53
-
54
-
55
-
56
-
57
-
58
-
59
-
60
 |
 |
