ProForm 390 P Instruction Manual - Page 11
Note: If your stereo has an RCA-type AUDIO OUT
 |
View all ProForm 390 P manuals
Add to My Manuals
Save this manual to your list of manuals |
Page 11 highlights
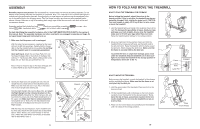
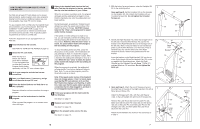
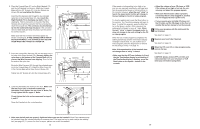
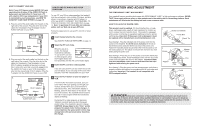
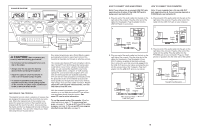
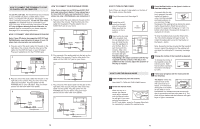
HOW TO CONNECT THE TREADMILL TO YOUR CD PLAYER, VCR, OR COMPUTER To use iFIT.com CDs, the treadmill must be connected to your portable CD player, portable stereo, home stereo, or computer with CD player. See pages 14 and 15 for connecting instructions. To use iFIT.com videocassettes, the treadmill must be connected to your VCR. See page 16 for connecting instructions. To use iFIT.com programs directly from our Web site, the treadmill must be connected to your home computer. See page 15 for connecting instructions. HOW TO CONNECT YOUR PORTABLE CD PLAYER Note: If your CD player has separate LINE OUT and PHONES jacks, see instruction A below. If your CD player has only one jack, see instruction B. A. Plug one end of the audio cable into the jack on the right side of the console. Plug the other end of the cable into the LINE OUT jack on your CD player. Plug your headphones into the PHONES jack. PHONES LINE OUT A LINE OUT PHONES PHONES LINE OUT LINE OUT PHONES Audio Cable Headphones A B. Plug one end of the audio cable into the jack on the A right side of the console. Plug the other end of the cable into the splitter. Plug the splitter into the PHONES jack on your CD player. Plug your headphones into the other side of the splitter. B PHONES PHONES Audio Cable PHONES SpPlHitOtNeESr HOW TO CONNECT YOUR PORTABLE STEREO Note: If your stereo has an RCA-type AUDIO OUT jack, see instruction A below. If your stereo has a 3.5 mm LINE OUT jack, see instruction B. If your stereo has only a PHONES jack, see instruction C. A. Plug one end of the audio cable into the jack on the right side of the console. Plug the other end of the cable into the adaptor. Plug the adaptor into an AUDIO OUT jack on your stereo. A Audio Cable AUDIO OUT AUDIO OUT RIGHT RIGHT LEFT LEFT AUDIO OUT RIGHT Adaptor LEFT A B. Plug one end of the audio cable into the jack on the right side of the console. Plug the other end of the A cable into the LINE OUT jack on your stereo. B Audio Cable LINE OUT LINE OUT LINE OUT C. Plug one end of the audio cable into the jack on the B right side of the console. Plug the other end of the B cable into the splitter. Plug the splitter into the PHONES jack on your stereo. Plug your headphones into the other side of the splitter. C PPHHOONNEESS PHONES Headphones Audio Cable Splitter B B 14 Headphones C C HOW TO TURN ON THE POWER Note: If there is a sheet of clear plastic on the face of the console, remove the plastic. 1 Plug in the power cord (see page 9). 2 Locate the on/off switch on the right side of the console. Make sure that the switch is in the on position. On Position 3 Stand on the foot rails of the treadmill. Find the clip attached to the key, and slide the clip onto the waistband of your clothes. Next, in- sert the key into the console. After a mo- Clip ment, the displays and the matrix will light. Test the clip by care- fully taking a few steps backward until the key is pulled from the console. If the key is not pulled from the console, adjust the position of the clip as needed. HOW TO USE THE MANUAL MODE 1 Insert the key fully into the console. See HOW TO TURN ON THE POWER above. 2 Select the manual mode. When the key is inserted, the manual mode will be selected and the Manual indicator will light. If you have selected a program or the iFIT.com mode, press the Program Select button repeatedly to reselect the manual mode. 3 Press the Start button or the Speed + button to start the walking belt. A moment after the button is pressed, the walking belt will begin to move. Hold the handrails and begin walking. As you exercise, change the speed of the walking belt as desired by pressing the Speed buttons. Each time a button is pressed, the speed will change by 0.1 mph. If a button is held down, the speed will change in increments of 0.5 mph. To stop the walking belt, press the Stop button. The Time/Incline display will begin to flash. To restart the walking belt, press the Start button or the Speed + button. Note: During the first few minutes that the treadmill is used, inspect the alignment of the walking belt, and align the walking belt if necessary (see page 22). 4 Change the incline of the treadmill as desired. To change the incline of the treadmill, press the Incline buttons. Each time a button is pressed, the incline will change by 0.5%. 5 Follow your progress with the matrix and the four displays. The matrix-When the manual mode or the iFIT.com mode is selected, a 1/4-mile track will appear in the matrix. As you walk or run on the treadmill, the indicators around the track will light in succession until the entire track is lit. The track will then darken and the indicators will again begin to light in succession. 11
-
 1
1 -
2
-
3
-
4
-
5
-
 6
6 -
 7
7 -
 8
8 -
 9
9 -
 10
10 -
 11
11 -
 12
12 -
 13
13 -
 14
14
 |
 |
