ProForm 390 P Instruction Manual - Page 8
Serted Properly, The Console May Be Dam
 |
View all ProForm 390 P manuals
Add to My Manuals
Save this manual to your list of manuals |
Page 8 highlights
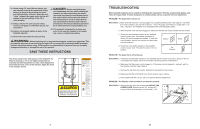
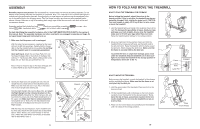
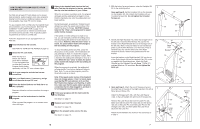
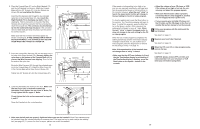
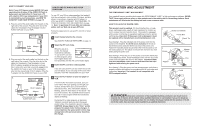
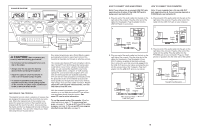
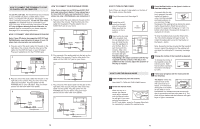
6. Place the Console Base (47) on the Right Handrail (72) 6 and the Left Handrail (not shown). Attach the Console Base with four 3/4" Screws (61) (only two Screws are shown). Do not overtighten the Screws. Insert the Wire Harness (42) through the two indicated nylon ties on the Console Base (47). Next, touch the Right Handrail (72) to discharge any static. Refer to drawing 6a. Find the connector on the end of the Wire Harness (42). Insert the connector into the red socket be- neath the Console (43). The connector should slide eas- ily into the socket and snap into place. If the connector does not slide easily and snap into place, turn the connec- 61 tor and then insert it. Make sure that the connector and wires appear as shown in drawing 6a. IF THE CONNECTOR IS NOT INSERTED PROPERLY, THE CONSOLE MAY BE DAMAGED WHEN THE POWER IS TURNED ON. 47 42 Ties 72 6a 43 42 7. Insert the excess Wire Harness (42) into the large hole in the side of the Right Handrail (72). Securely tighten the nylon ties on the bottom of the Console Base (47) to prevent the Wire Harness from slipping. Then, cut off the ends of the nylon ties. Route the Wire Harness (42) through the indicated opening in the Console Base (47). Attach the Wire Cover (44) to the Console Base with a Silver Ground Screw (75). Tighten two 3/4" Screws (61) into the Console Base (47). 7 Ties 42 Opening 47 44 72 75 61 8. Lower the Handrails (not shown) to the floor. Make sure 8 that the Frame (86) is centered between the Handrails. Firmly tighten the two lower 3" Bolts (70). Firmly tighten the two upper 3" Bolts. 69 Firmly tighten the bolts and screws used in steps 3, 4, and 6. 70 Raise the Handrails to the vertical position. 86 70 9. Make sure that all parts are properly tightened before you use the treadmill. Note: Extra hardware may be included. Keep the included hex keys in a secure place. The large hex key is used to adjust the walking belt (see page 22). To protect the floor or carpet, place a mat under the treadmill. 8 If the speed or incline setting is too high or too low, you can manually override the setting at any time by pressing the Speed or Incline buttons on the console. However, when the next "chirp" is heard, the speed and/or incline will change to the next setting for the CD or video program. To stop the walking belt, press the Stop button on the console. The Time/Incline display will begin to flash. To restart the program, press the Start button or the Speed + button. After a moment, the walking belt will begin to move at 1 mph. When the next "chirp" is heard, the speed and/or incline will change to the next setting for the CD or video program. When the CD or video program is completed, the walking belt will stop and the Time/Incline display will begin to flash. Note: To use another CD or video program, press the Stop button or remove the key and go to step 1 on page 16. Note: If the speed and/or of the treadmill does not change when a "chirp" is heard: • Make sure that the iFIT.com indicator is lit and that the Time/Incline display is not flashing. If the Time/Incline display is flashing, press the Start button or the Speed + button on the console. • Adjust the volume of your CD player or VCR. If the volume is too high or too low, the console may not detect the program signals. • Make sure that the audio cable is properly connected, that it is fully plugged in, and that it is not wrapped around a power cord. • If you are using your portable CD player and the CD skips, set the CD player on the floor or another flat surface instead of on the console. 5 Follow your progress with the matrix and the four displays. See step 5 on page 11. 6 Measure your heart rate if desired. See step 6 on page 12. 7 When the iFIT.com CD or video program ends, remove the key. See step 6 on page 13. CAUTION: Always remove iFIT.com CDs and videocassettes from your CD player or VCR when you are finished using them. 17
-
 1
1 -
2
-
 3
3 -
 4
4 -
 5
5 -
 6
6 -
 7
7 -
 8
8 -
 9
9 -
 10
10 -
 11
11 -
 12
12 -
 13
13 -
14
 |
 |
