ProForm 390 P Instruction Manual - Page 9
Danger, Operation And Adjustment
 |
View all ProForm 390 P manuals
Add to My Manuals
Save this manual to your list of manuals |
Page 9 highlights
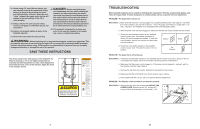
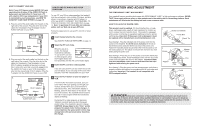
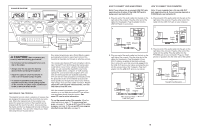
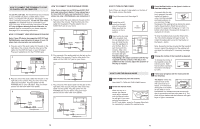
HOW TO CONNECT YOUR VCR Note: If your VCR has an unused AUDIO OUT jack, see instruction A below. If the AUDIO OUT jack is being used, see instruction B. If you have a TV with a built-in VCR, see instruction B. If your VCR is connected to your home stereo, see HOW TO CONNECT YOUR HOME STEREO on page 15. A. Plug one end of the audio cable into the jack on the right side of the console. Plug the other end of the cable into the adaptor. Plug the adaptor into the AUDIO OUT jack on your VCR. A ANT. IN VIDEO AUDIO IN CH 34 OUT RF OUT AUDIO OUT RIGHT LEFT ANT. IN VIDEO AUDIO IN CH 34 OUT RF OUT Audio Cable Adaptor AUDIO OUT RIGHT LEFT A B. Plug one end of the audio cable into the jack on the right side of the console. Plug the other end of the cable into the adaptor. Plug the adaptor into an A RCA Y-adaptor (available at electronics stores). Next, remove the wire that is currently plugged into the AUDIO OUT jack on your VCR and plug the wire into the unused side of the Y-adaptor. Plug the Y-adaptor into the AUDIO OUT jack on VIDEO AUDIO ANT. IN your VCR. IN RF OUT CH 34 OUT B ANT. IN VIDEO AUDIO IN CH 34 OUT RF OUT RCA Y-adaptor Audio Cable Adaptor B Wire removed from AUDIO OUT jack B HOW TO USE IFIT.COM CD AND VIDEO PROGRAMS To use iFIT.com CDs or videocassettes, the treadmill must be connected to your portable CD player, portable stereo, home stereo, computer with CD player, or VCR. See HOW TO CONNECT THE TREADMILL TO YOUR CD PLAYER, VCR, OR COMPUTER on page 14. Note: To purchase iFIT.com CDs and videocassettes, visit our Web site at www.iFIT.com. Follow the steps below to use an iFIT.com CD or video program. 1 Insert the key fully into the console. See HOW TO TURN ON THE POWER on page 11. 2 Select the iFIT.com mode. When the key is inserted, the manual mode will be selected. To use an iFIT.com CD or video program, press the Program Select button repeatedly until the iFIT.com indicator lights. 3 Insert the iFIT.com CD or videocassette. If you are using an iFIT.com CD, insert the CD into your CD player. If you are using an iFIT.com videocassette, insert the videocassette into your VCR. 4 Press the PLAY button on your CD player or VCR. A moment after the button is pressed, your personal trainer will begin guiding you through your workout. Simply follow your personal trainer's instructions. Note: If the Time/Incline display is flashing, press the Start button or the Speed + button on the console. The treadmill will not respond to a CD or video program whilst the Time/Incline display is flashing. During the CD or video program, an electronic "chirping" sound will alert you when the speed and/or incline of the treadmill is about to change. CAUTION: Always listen for the "chirp" and be prepared for speed and/or incline changes. In some instances, the speed and/or incline may change before the personal trainer describes the change. AUDIO OUT RIGHT LEFT AUDIO OUT RIGHT 16 OPERATION AND ADJUSTMENT THE PERFORMANT LUBETM WALKING BELT Your treadmill features a walking belt coated with PERFORMANT LUBETM, a high-performance lubricant. IMPORTANT: Never apply silicone spray or other substances to the walking belt or the walking platform. Such substances will deteriorate the walking belt and cause excessive wear. HOW TO PLUG IN THE POWER CORD This product must be earthed. If it should malfunction or break down, earthing provides a path of least resistance for electric current to reduce the risk of electric shock. This product is equipped with a power cord having an equipment-earthing conductor and an earthing plug. Important: If the power cord is damaged, it must be replaced with a manufacturer-recommended power cord. See drawing 1. Plug the indicated end of the power cord into the socket on the treadmill. If a ferrite box is included, lift the tab on the ferrite box and clamp the ferrite box around the power cord. Fasten the included plastic tie just behind the ferrite box and cut off the excess plastic tie. The plastic tie will prevent the ferrite box from sliding along the power cord. 1 2 Screw Socket on treadmill Ferrite Box Plastic Tie Tab Adapter Cover See drawing 2. Press the pins on the power cord into the metal clips in the adapter as shown. Close the adapter cover over the end of the power cord and tighten the screw in the adapter. Important: Make sure that the adapter cover is secure and the screw has been tightened before using the power cord. See drawing 3. Plug the power cord into an appropriate outlet that is properly installed and earthed in accordance with all local codes and ordinances. Important: The treadmill is not compatible with GFCI-equipped outlets. Adapter 3 Pins Metal Clips Outlet DANGER: Improper connection of the equipment-earthing conductor can result in an in- creased risk of electric shock. Check with a qualified electrician or serviceman if you are in doubt as to whether the product is properly earthed. Do not modify the plug provided with the product-if it will not fit the outlet, have a proper outlet installed by a qualified electrician. 9
-
 1
1 -
2
-
3
-
 4
4 -
 5
5 -
 6
6 -
 7
7 -
 8
8 -
 9
9 -
 10
10 -
 11
11 -
 12
12 -
 13
13 -
 14
14
 |
 |
