ProForm 390 P Instruction Manual - Page 7
How To Use Programs Directly
 |
View all ProForm 390 P manuals
Add to My Manuals
Save this manual to your list of manuals |
Page 7 highlights
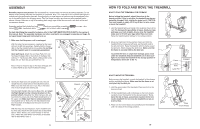
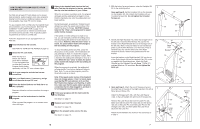
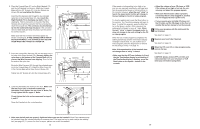
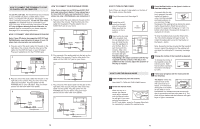
HOW TO USE PROGRAMS DIRECTLY FROM OUR WEB SITE 7 Return to the treadmill and stand on the foot rails. Find the clip attached to the key, and slide the clip onto the waistband of your clothes. Our Web site at www.iFIT.com allows you to access basic programs, audio programs, and video programs directly from the internet. Additional options are soon to be available. See www.iFIT.com for details. To use programs from our Web site, the treadmill must be connected to your home computer. See HOW TO CONNECT YOUR COMPUTER on page 15. In addition, you must have an internet connection and an internet service provider. A list of specific system requirements is found on our Web site. Follow the steps below to use a program from our Web site. 1 Insert the key into the console. See HOW TO TURN ON THE POWER on page 10. 2 Select the iFIT.com mode. When the key is inserted, the manual mode will be selected. To use a program from our Web site, press the Program Select button repeatedly until the iFIT.com indicator lights. 3 Go to your computer and start an internet connection. 4 Start your Web browser, if necessary, and go to our Web site at www.iFIT.com. 5 Follow the desired links on our Web site to select a program. Read and follow the on-line instructions for using a program. 6 Follow the on-line instructions to start the program. When you start the program, an on-screen countdown will begin. When the on-screen countdown ends, the program will begin and the walking belt will begin to move. Hold the handrails, step onto the walking belt, and begin walking. During the program, an electronic "chirping" sound will alert you when the speed and/or incline of the treadmill is about to change. CAUTION: Always listen for the "chirp" and be prepared for speed and/or incline changes. If the speed or incline setting is too high or too low, you can manually override the setting at any time by pressing the Speed or Incline buttons on the console. However, when the next "chirp" is heard, the speed and/or incline will change to the next setting for the program. To stop the walking belt at any time, press the Stop button on the console. The Time/Incline display will begin to flash. To restart the program, press the Start button or the Speed + button. After a moment, the walking belt will begin to move at 1 mph. When the next "chirp" is heard, the speed and/or incline will change to the next setting for the program. When the program is completed, the walking belt will stop and the Time/Incline display will begin to flash. Note: To use another program, press the Stop button and go to step 5. Note: If the speed and/or incline of the treadmill does not change when a "chirp" is heard, make sure that the iFIT.com indicator is lit and that the Time/Incline display is not flashing. In addition, make sure that the audio cable is properly connected, that it is fully plugged in, and that it is not wrapped around a power cord. 8 Follow your progress with the matrix and the four displays. See step 5 on page 11. 9 Measure your heart rate if desired. See step 6 on page 12. 10 When the program ends, remove the key. See step 6 on page 13. 18 3. With the help of a second person, raise the Uprights (25, 3 29) to the vertical position. Open part bag B. Set the Crossbar (40) on the brackets on the Uprights (25, 29). Attach the Crossbar with two Crossbar Screws (39). Do not tighten the Crossbar Screws yet. 39 25 40 39 29 4. Identify the Right Handrail (72), which has a large hole in the left side. Feed the Wire Harness (42) up into the 4 bracket on the Right Handrail and out of the large hole in the left side. (Note: It may be helpful to use needlenose pliers to pull the Wire Harness out of the hole.) Press a Handrail Cap (76) onto the lower end of the Right Handrail as shown. Remove any plastic ties from the bracket. Insert the bracket on the Right Handrail (72) into the top of the Right Upright (29) so the Handrail Cap (76) is resting against the Upright as shown. Attach the Right Handrail and the Handrail Cap with three 1" Bolts (37) and two Washers (38) as shown. Do not tighten the Bolts yet. 42 Large Hole Bracket 72 37 38 38 37 29 37 76 5. Open part bag C. Attach the end of the ground wire to the small hole in the side of the Right Handrail (72) with a Silver Ground Screw (75). Attach the Storage Latch (36), with the Latch Spacer (122), to the Left Upright (25) with two 3/4" Screws (61). Remove the Latch Knob (30) from the Latch Pin (35). Make sure that the Latch Pin Collar (33) and the Spring (32) are on the Latch Pin. Insert the Latch Pin into the Storage Latch (36), and then tighten the Latch Knob back onto the Latch Pin. Attach the left Handrail (not shown) in the same way as in step 4. 5 36 30 61 32 25 122 Large Hole 33 35 Ground Wire 75 72 7
-
 1
1 -
 2
2 -
 3
3 -
 4
4 -
 5
5 -
 6
6 -
 7
7 -
 8
8 -
 9
9 -
 10
10 -
 11
11 -
 12
12 -
13
-
14
 |
 |
