ProForm 390 P Instruction Manual - Page 12
How To Use A Preset Program
 |
View all ProForm 390 P manuals
Add to My Manuals
Save this manual to your list of manuals |
Page 12 highlights
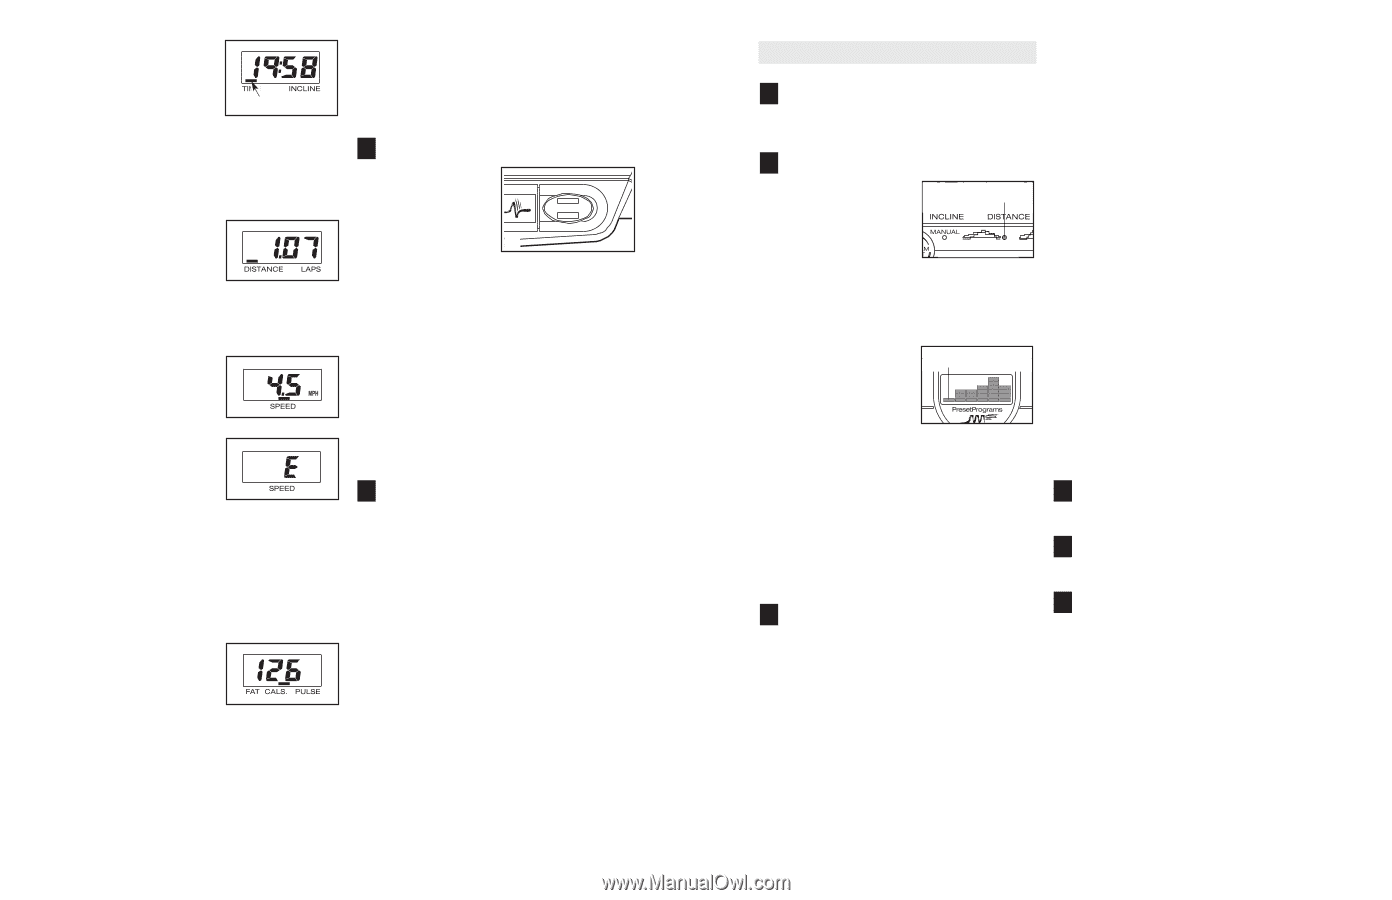
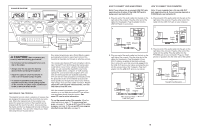
Time/Incline display- When the manual mode or the iFIT.com mode is selected, this display will show the elapsed time and the incline level of Indicator the treadmill. The display will alternate between one number and the other every few seconds, as shown by the indicators in the display. When a preset program is selected, the display will show the time remaining in the pro- gram and the incline level of the treadmill. Distance/Laps display-This display shows the distance that you have walked or run and the number of 1/4mile laps you have completed. The display will alternate between one number and the other every few seconds, as shown by the indicators in the display. Speed display-This display shows the speed of the walking belt. Note: The console can display speed and distance in either miles or kilometers. The letters "MPH" or "Km/H" will appear in the Speed display to show which unit of measurement is selected. To change the unit of measurement, press the Stop button whilst inserting the key into the console. An "E" for English miles or an "M" for metric kilometers will appear in the Speed display. Press the Speed + button to change the unit of measurement. When the desired unit of measurement is selected, remove the key and then reinsert it. Fat Calories/Calories/ Pulse display-This display shows the approximate numbers of fat calories and calories you have burned (see FAT BURNING on page 23). The display will alternate between one number and the other every few seconds, as shown by the indicators in the display. The display will also show your heart rate when you use the pulse sensor (see step 6). 6 Measure your heart rate if desired. To measure your heart rate, stand on the foot rails and place your thumb on the pulse sensor. Do not press too hard, or the circulation in your thumb will be restricted and your pulse will not be detected. When your pulse is detected, the heart-shaped indicator in the Fat Calories/Calories/ Pulse display will flash each time your heart beats, and your heart rate will be shown. Hold your thumb on the pulse sensor for about 15 seconds for the most accurate reading. If the displayed heart rate appears to be too high or too low, or if your heart rate is not displayed, lift your thumb off the pulse sensor for a few seconds. Then, place your thumb on the pulse sensor as described above. Remember to stand still whilst measuring your heart rate. 7 When you are finished exercising, remove the key. Step onto the foot rails, press the Stop button, and adjust the incline of the treadmill to the lowest level. The incline must be at the lowest level when the treadmill is raised to the storage position or the treadmill will be damaged. Next, remove the key from the console and put the key in a secure place. When you are finished using the treadmill, move the on/off switch to the off position. HOW TO USE A PRESET PROGRAM 1 Insert the key into the console. See HOW TO TURN ON THE POWER on page 11. 2 Select one of the preset programs. When the key is in- serted, the manual Program Indicator mode will be selected. To select a preset pro- gram, press the Program Select button repeatedly until one of the four program indicators lights. Note: The graphs beside the program indicators show how the speed and incline of the treadmill will change during the programs. Each program consists of either 20 or 30 one- Current Period minute segments. One speed setting and one incline setting are pro- grammed for each seg- ment. The speed set- ting for the first segment appears in the left column of the matrix. The speed settings for the next five segments appear in the five columns to the right. Note: One bar in a column represents a speed setting of either 1 mph or 1.5 mph, two bars repre- sent a speed setting of 2 mph or 2.5 mph, three bars represent a speed setting of 3 mph or 3.5 mph, and so forth. Important: Even if the same number of bars appear in two consecutive columns, a different speed setting may be pro- grammed for each segment. 3 Press the Start button or the Speed + button to start the program. When the button is pressed, the left column of the matrix will begin to flash, and the treadmill will automatically adjust to the speed and incline settings for the first segment. Hold the handrails and begin walking. When the first segment of the program ends, a series of tones will sound and all speed settings will move one column to the left. If the speed and/or incline of the treadmill is about to change, the Speed display and/or the Time/Incline display will flash to alert you. The speed setting for the second segment will then appear in the left column of the matrix and the treadmill will automatically adjust to the speed and incline settings for the second segment. The program will continue until the speed setting for the last segment appears in the left column of the matrix and the last segment ends. The walking belt will then slow to a stop. If the speed or incline setting is too high or too low at any time during the program, you can manually override the setting by pressing the Speed or Incline buttons. However, when the next segment begins, the treadmill will automatically adjust to the speed and incline settings for the next segment. To stop the program, press the Stop button. The Time/Incline display will begin to flash. To restart the program, press the Start button or the Speed + button. The walking belt will begin to move at 1 mph. When the next segment begins, the treadmill will automatically adjust to the speed and incline settings for the next segment. 4 Follow your progress with the four displays. Refer to step 5 on page 11. 5 Measure your heart rate if desired. See step 6 on page 12. 6 When you are finished exercising, remove the key. When the program ends, make sure that the treadmill is at the lowest incline level. Next, remove the key from the console and put it in a secure place. When you are finished using the treadmill, move the on/off switch to the off position. 12 13
-
 1
1 -
2
-
3
-
4
-
5
-
6
-
 7
7 -
 8
8 -
 9
9 -
 10
10 -
 11
11 -
 12
12 -
 13
13 -
 14
14
 |
 |