ProForm 390 P Instruction Manual - Page 3
Warning, Important Precautions
 |
View all ProForm 390 P manuals
Add to My Manuals
Save this manual to your list of manuals |
Page 3 highlights
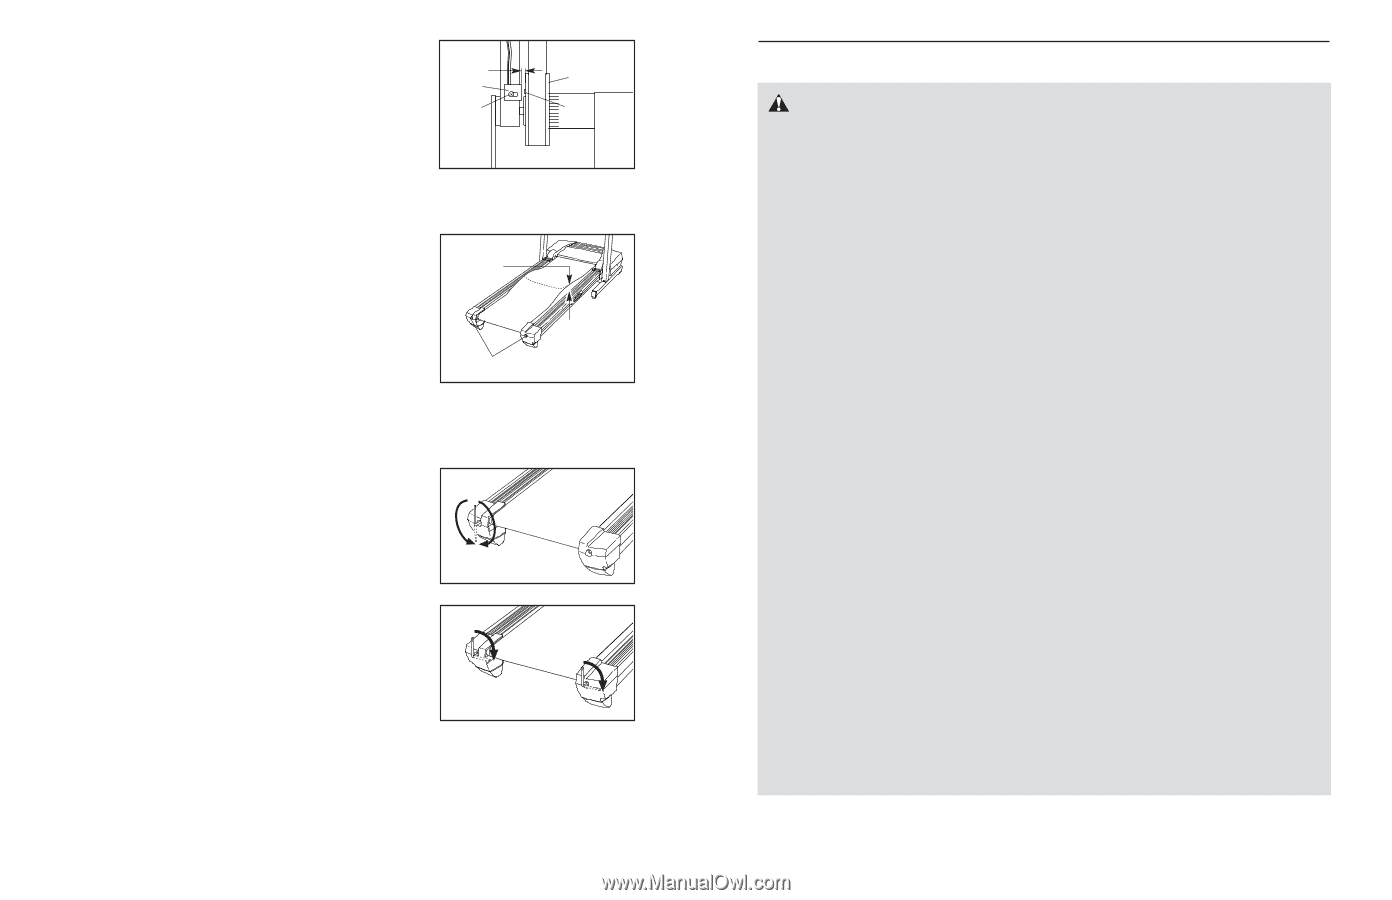
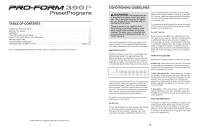
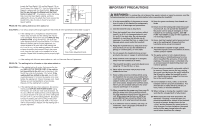
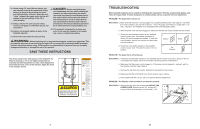
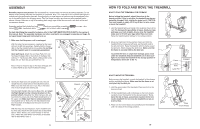
Locate the Reed Switch (10) and the Magnet (18) on the left side of the Pulley (17). Turn the Pulley until the Magnet is aligned with the Reed Switch. Make sure 1/8" 17 that the gap between the Magnet and the Reed 10 Switch is about 1/8". If necessary, loosen the Screw (26), move the Reed Switch slightly, and then 26 18 retighten the Screw. Re-attach the Hood, and run the treadmill for a few minutes to check for a correct speed reading. Top View PROBLEM: The walking belt slows when walked on SOLUTION: a. Use only a single-outlet surge suppressor that meets all of the specifications described on page 9. b. If the walking belt is overtightened, treadmill performance may decrease and the walking belt may become damaged. Remove the key and UNPLUG THE POWER CORD. Using the hex key, turn both rear roller adjustment bolts counterclockwise, 1/4 of a turn. When the walking belt is properly tightened, you should be able to lift each side of the walking belt 8-10 cm (3-4 in.) off the walking platform. Be careful to keep the walking belt centred. Plug in the power cord, insert the key, and run the treadmill for a few minutes. Repeat until the walking belt is properly tightened. b 8-10 cm Rear Roller Adjustment Bolts c. If the walking belt still slows when walked on, call our Customer Service Department. PROBLEM: The walking belt is off-centre or slips when walked on SOLUTION: a. If the walking belt is off-centre, first remove the key and UNPLUG THE POWER CORD. If the walking a belt has shifted to the left, use the hex key to turn the left rear roller bolt clockwise 1/2 of a turn; if the walking belt has shifted to the right, turn the bolt counterclockwise 1/2 of a turn. Be careful not to over- tighten the walking belt. Plug in the power cord, insert the key, and run the treadmill for a few minutes. Repeat until the walking belt is centred. b. If the walking belt slips when walked on, first remove the key and UNPLUG THE POWER CORD. Using b the hex key, turn both rear roller bolts clockwise, 1/4 of a turn. When the walking belt is correctly tightened, you should be able to lift each side of the walking belt 8-10cm (3-4 in.) off the walking platform. Be careful to keep the walking belt centred. Plug in the power cord, insert the key, and carefully walk on the tread- mill for a few minutes. Repeat until the walking belt is properly tightened. 22 IMPORTANT PRECAUTIONS WARNING: To reduce the risk of burns, fire, electric shock, or injury to persons, read the following important precautions and information before operating the treadmill. 1. It is the responsibility of the owner to ensure that all users of this treadmill are adequately informed of all warnings and precautions. 2. Use the treadmill only as described. 3. Place the treadmill on a level surface, with at least 2.5 m (8 ft.) of clearance behind it and 0.5 m (2 ft.) on each side. Do not place the treadmill on a surface that blocks any air openings. To protect the floor or carpet from damage, place a mat under the treadmill. 4. Keep the treadmill indoors, away from moisture and dust. Do not put the treadmill in a garage or covered patio, or near water. 5. Do not operate the treadmill where aerosol products are used or oxygen is administered. 6. Keep children under the age of 12 and pets away from the treadmill at all times. 7. The treadmill should be used only by persons weighing 113 kg (250 lbs.) or less. 8. Never allow more than one person on the treadmill at a time. 9. Wear suitable exercise clothes whilst using the treadmill. Do not wear loose clothes that could become caught in the treadmill. Athletic support clothes are recommended for both men and women. Always wear athletic shoes. Never use the treadmill with bare feet, wearing only stockings, or in sandals. 10. When connecting the power cord (see page 9), plug the power cord into an earthed circuit. No other appliance should be on the same circuit. When replacing the fuse, an ASTA approved BS1362 type should be fitted to the fuse carrier. A 13 amp fuse should be used. 11. If an extension cord is needed, use only a 3conductor, 1mm2 (14-gauge) cord that is no longer than 1.5 m (5 ft.). 12. Keep the power cord away from heated surfaces. 13. Never move the walking belt whilst the power is turned off. Do not operate the treadmill if the power cord or plug is damaged, or if the treadmill is not working properly. (See BEFORE YOU BEGIN on page 5 if the treadmill is not working properly.) 14. Never start the treadmill whilst you are standing on the walking belt. Always hold the handrails whilst using the treadmill. 15. The treadmill is capable of high speeds. Adjust the speed in small increments to avoid sudden jumps in speed. 16. The pulse sensor is not a medical device. Various factors, including the user's movement, may affect the accuracy of heart rate readings. The pulse sensor is intended only as an exercise aid in determining heart rate trends in general. 17. Never leave the treadmill unattended whilst it is running. Always remove the key, unplug the power cord and move the on/off switch to the off position when the treadmill is not in use. (See the drawing on page 5 for the location of the on/off switch.) 18. Do not attempt to raise, lower, or move the treadmill until it is properly assembled. You must be able to safely lift 20 kg (45 lbs.) to raise, lower, or move the treadmill. 19. When folding or moving the treadmill, make sure that the storage latch is fully closed. 20. Whilst using iFIT.com CDs and videos, an electronic "chirping" sound will alert you when the speed and/or incline of the treadmill is about to change. Always listen for the "chirp" and be prepared for speed and/or incline changes. In some instances, the speed and/or incline may change before the personal trainer describes the change. 3
-
 1
1 -
 2
2 -
 3
3 -
 4
4 -
 5
5 -
 6
6 -
 7
7 -
 8
8 -
 9
9 -
10
-
11
-
12
-
13
-
14
 |
 |